9. Update Record
Use the Update Record server behavior to modify existing records in a data source.
Requirements: A recordset, a form with form elements linked to the dynamic data, and a Submit button.
To insert an Update Record server behavior, follow these steps:
From the Server Behaviors panel, choose Update Record. The Update Record dialog box appears, as shown in Figure 9.
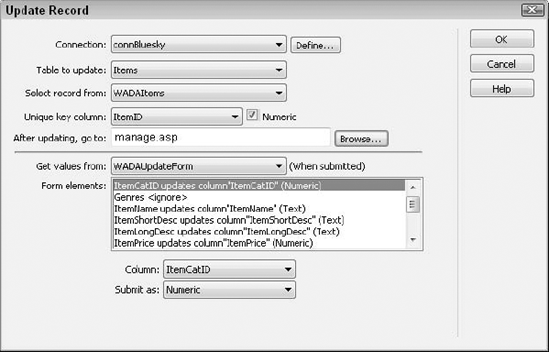
From the Update Record dialog box, choose a connection from the drop-down list. To establish a new connection, click Define.
Select the data table you want to use from the Update table list.
Choose the data source on which to base your update from the Select Record From list.
Select
the key field from the Unique Key Column list. Dreamweaver attempts to
detect whether the field is a number type and if so, selects the Numeric
option.
Enter the path to the destination page in the After Updating, Go To field or click the Browse button to locate the file.
Select
the name of the form to be used from the Get Values From list. If there
is only one form on the page, the form is preselected.
For each object listed in the Form Elements area:
Select the data source field into which the form object's value is to be inserted from the Columns list.
Choose
the data source type for the data from the Submit As list. The options
are Text; Numeric; Date; Date MS Access; Checkbox Y, N; Checkbox 1,0;
Check −1,0; and Checkbox MS Access.
Click OK when you're finished.
10. Delete Record
The Delete Record server behavior is used to remove existing records from a data source.
Requirements: A recordset, a form, and a Submit button.
To attach a Delete Record server behavior to a form, follow these steps:
Make sure that a form exists on a dynamic page that includes at least one recordset.
From the Server Behaviors panel, choose Delete Record. The Delete Record dialog box is displayed, as shown in Figure 10.
HP and ColdFusion users: Choose the desired option from the First Check If Variable Is Defined List.
Leave
the entry set to Primary Key Value if you are using a form to confirm
the deletion. If you want the deletion to occur without confirmation,
choose another entry from the list such as URL Parameter or Form
Variable.
From the Connection list, choose a connection from the drop-down list.
Select the data table you want to modify from the Table list.
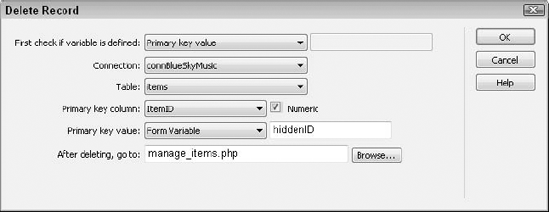
Select
the key field from the Primary Key Column list. Dreamweaver attempts to
detect whether the field is a number type and if it is, selects the
Numeric option.
Choose the variable that holds the Primary Key value from that menu and enter the name of the variable in the adjacent field.
Enter the path to the destination page in the After Deleting, Go To field or click the Browse button to locate the file.
Click OK when you're finished.
11. User authentication
The World Wide Web is
all about accessing information from anywhere in the world. Sometimes,
however, you need to restrict access to certain areas of your site to
authorized users. Dreamweaver supplies a full complement of server
behaviors to support authenticating the user against a specified data
source.
11.1. Log In User
The Log In User server
behavior redirects authorized users to one page and unauthorized users
to another and creates a session variable for the username.
Requirements: A recordset, a form, appropriate form elements for a username and a password, and a Submit button.
From the Server Behaviors panel, click the Add (+) button and choose User Authentication => Log In User. The Log In User dialog box is displayed, as shown in Figure 11.
If
there is more than one form on the page, select the form containing the
username and password fields from the Get Input From Form list.
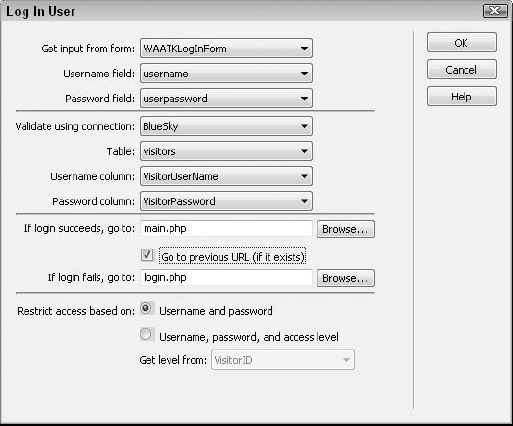
Select the form element used to gather the username from the Username Field list.
Select the form element used to gather the password from the Password Field list.
Choose a connection to the data source containing the table of registered users from the Validate Using Connection list.
Select the table of registered users from the Table list.
Choose the field containing the username from the Username Column list.
Choose the field containing the password from the Password Column list.
Enter the path to the page for the authorized user in the If Login Succeeds, Go To field.
If
you want the user to proceed to the previously selected link, rather
than the page entered in Step 9, select the Go To Previous URL option.
Enter the path to the page for the unauthorized user in the If Login Fails, Go To field.
If access levels should be evaluated as part of the authentication:
Select the Restrict Access Based On Username, Password, And Access Level option.
Choose the data source field containing the access level data from the Get Level From list.
Click OK when you're finished.
11.2. Restrict Access To Page
The Restrict Access
To Page server behavior prevents unauthorized users from viewing
specific pages by checking a session variable. After it is defined, the
server behavior can be copied and pasted onto another page by using the
context menu commands from the Server Behaviors panel.
Requirements: A dynamic page.
To apply the Restrict Access To Page server behavior, follow these steps:
From the Server Behaviors panel, click the Add (+) button and choose User Authentication => Restrict Access To Page. The Restrict Access To Page dialog box, shown in Figure 12, is displayed.
If
you don't want to restrict admission by access levels, be sure that the
Restrict Based On Username And Password option is selected.
To set group permissions for the page:
Choose the Restrict Based On Username, Password, And Access Level option.
Choose one or more groups from the Select Level(s) area.
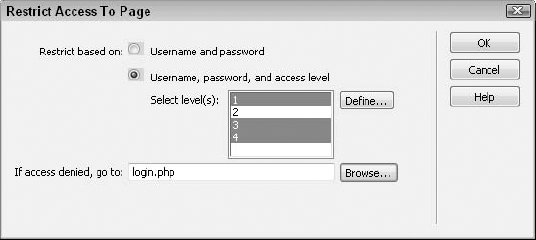
To add new groups to the Select Level(s) list:
Click Define. The Define Access Levels dialog box opens.
Enter
the name for the access level in the Name field. The name must match a
value stored in your data source in whichever column is designated for
the group access levels.
To add additional levels, click the Add (+) button and enter another name.
To delete any levels, choose the level in the list area and click the Remove (−) button.
Click OK to close the Define Access Levels dialog box.
Enter
the path to the file to which you want to redirect unauthorized users
in the If Access Denied, Go To field. Alternatively, click the Browse
button to locate the file.
Click OK when you're finished.
11.3. Log Out User
The Log Out User server
behavior clears the username session variable established by the Log In
User server behavior and redirects the user to an exit page. You can
set up the Log Out User server behavior so that a user selects a link to
log out or is automatically logged out when a particular page, such as
one confirming the completion of an order, is viewed.
Requirements: A Log In User server behavior on another page.
To use the Log Out User server behavior, follow these steps:
To apply the server behavior to a specific link on the page, select that link.
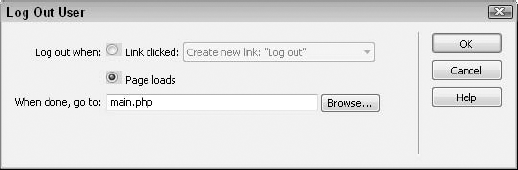
From the Server Behaviors panel, click the Add (+) button and choose User Authentication => Log Out User. The Log Out User dialog box displays (see Figure 13).
To
trigger the server behavior with a link, choose the Log Out When Link
Clicked option and make sure that your selected link is chosen in the
list. If no link was preselected, Dreamweaver offers to apply the server
behavior to a new link, Log Out.
To automatically log out users when the current page is viewed, select the Log Out When Page Loads option.
If
you're using a link as a trigger, enter the path to the destination
page in the When Done, Go To field. Alternatively, click the Browse
button to locate the file.
|
Do not use the When Done, Go
To option if you are automatically logging out a user when the page
loads. If you do, the user never sees the current page.
|
|
Click OK when you're finished.
11.4. Check New Username
The Check New Username
server behavior verifies that the requested username is not already in
the data source, redirecting the user if it is.
Requirements: An Insert Record server behavior, a form, and appropriate form elements.
From the Server Behaviors panel, click the Add (+) button and choose User Authentication => Check New Username. The Check New Username dialog box is displayed, as shown in Figure 14.
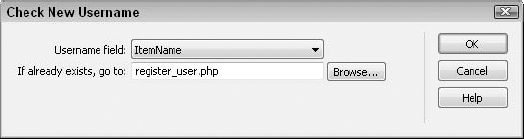
Select
the form element that contains the requested username from the Username
Field list. If a form element is called USERNAME, Dreamweaver
automatically selects that entry.
In
the If Already Exists, Go To field, enter the path to the file you want
a user to see if the name the user requested is already stored in the
data source. You can also click Browse to locate the file.
Click OK when you're finished.
