Blocking Senders
For the latter, note that Outlook Express also
comes with a Blocked Senders list. If you put an address on this list,
Outlook Express watches for messages from that address and deletes them
automatically. To use this feature, follow these steps:
1. | Select a message that comes from the address you want to block.
|
2. | Select
Message, Block Sender. Outlook Express adds the address to the Blocked
Senders list and asks whether you want to delete all messages from that
address.
|
3. | Click Yes to delete the messages, or click No to leave them.
|
To view the Blocked
Senders list, select Tools, Message Rules, Blocked Senders List. Outlook
Express opens the Message Rules dialog box and displays the Blocked
Senders tab. From here, you can add another blocked sender, or modify or
delete an existing blocked sender.
Creating a Mail Rule
For more general situations, you need to set up mail rules. Here’s how it works:
1. | Select the Tools, Message Rules, Mail command. Outlook Express displays the New Mail Rule dialog box.
|
2. | In
the Select the Conditions for Your Rule list, activate the check box
beside the rule condition you want to use to pick out a message from the
herd. Outlook Express adds the condition to the Rule Description text
box. Note that you’re free to select multiple conditions.
|
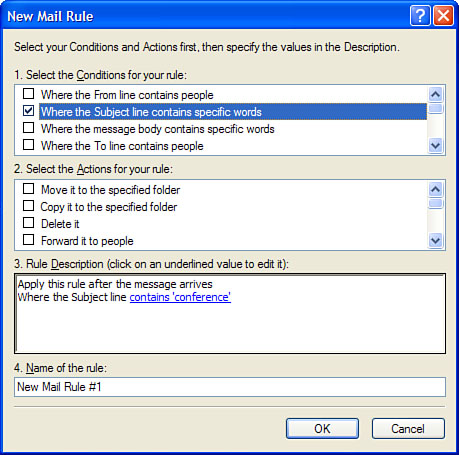
3. | The
condition shown in the Rule Description text box will probably have
some underlined text. You need to replace that underlined text with the
specific criterion you want to use (such as a word or an address). To do
that, click the underlined text, type the criterion in the dialog box
that appears and click Add. Most conditions support multiple criteria
(such as multiple addresses or multiple words in a Subject line), so
repeat this step as necessary. When you’re done, click OK. Outlook
Express updates the Rule Description text box with the text you entered,
as shown in Figure 1.
Tip
If you add multiple words or phrases to a rule criterion, you can make that criterion use Boolean operators such as AND, OR, and NOT. To do this, click the Options button in the dialog box that appears in step 3. To make an AND criterion, activate Message Matches All of the X Below (where X depends on the condition—for example, words or people); to make an OR criterion, activate Message Matches Any One of the X Below; to make a NOT criterion, activate Message Does Not Contain the X Below.
|
4. | In
the Select the Actions for your rule list, activate the check box
beside the action you want Outlook Express to take with messages that
meet your criteria. Again, you might have to click underlined text in
the Rule Description text box to complete the action. Also, you can
select multiple actions.
|
5. | If
you selected multiple conditions, Outlook Express assumes that all the
conditions must be true before invoking the rule (Boolean AND). To change this, click and in the Rule Description text box, activate the Messages Match Any One of the Criteria option, and click OK.
|
6. | Use the Name of the Rule text box to type a descriptive name for the rule.
|
7. | Click OK. Outlook Express drops you off at the Mail Rules tab of the Message Rules dialog box.
|
Whichever method you used, here are a few notes to bear in mind when working with the list of rules:
Toggling rules on and off— Use the check box beside each rule to turn the rule on and off.
Setting rule order—
Some rules should be processed before others. For example, if you have a
rule that deletes spam, you want Outlook Express to process that rule
before sending out a vacation reply. To adjust the order of a rule,
select it and then click either Move Up or Move Down.
Modifying a rule— To edit a rule, select it and click Modify.
Applying a rule—
If you want to apply a rule to existing inbox messages or to messages
in a different folder, click Apply Now. Select the rule you want to
apply (or click Select All to apply them all). To choose a different
folder, click Browse. When you’re ready, click Apply Now.
Deleting a rule— Select the rule and click Remove. When Outlook Express asks whether you’re sure, click Yes.
