Sending a Fax
To fax something to a friend or colleague (or, heck, even a total stranger), Windows XP gives you two ways to proceed:
Specifying Send Options
Before getting to
the specifics of sending a fax, let’s take a quick look at the various
options that the Fax service provides for sending. To see these options,
follow these steps:
1. | Select Tools, Fax Printer Configuration to display the Fax Properties dialog box.
|
2. | Display the Devices tab.
|
3. | If you have multiple fax/modems installed on your computer, select the fax/modem you want to use to send faxes.
|
4. | Click Properties. The modem’s property sheet appears.
|
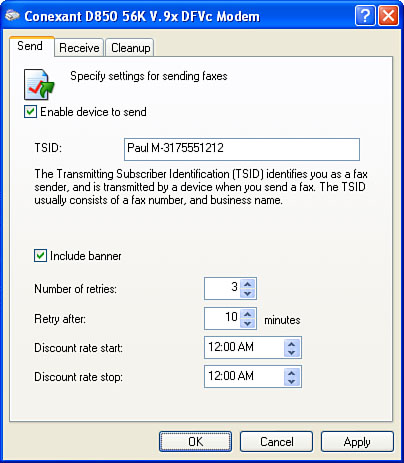
5. | The Send tab, shown in Figure 2, has the following options:
| Enable Device to Send | Activate this check box to enable the Fax service’s Send feature. | | TSID | Use this text box to type the transmitting subscriber identification that appears at the top of all your outgoing faxes. | | Include Banner | When
you activate this option, the Fax service includes text banner across
the top edge of each page of the outgoing fax. This text includes your
TSID, page number, and the recipient’s fax number. | | Number of Retries | This
value determines the number of times the Fax service attempts to send a
fax if it encounters a busy signal or some other error. | | Retry After | This value determines the number of minutes the Fax service waits between retries. | | Discount Rate Start | You’ll
see later on that you can tell the Fax service to send a fax “when
discount rates apply,” which means when your phone rates are
discounted (such as after midnight). Use the Discount Rate Start spin
box to specify the start time for your discounted phone rates. | | Discount Rate Stop | Use this spin box to specify the end time for your discounted phone rates. |
|
6. | Click OK in each open dialog box.
|
Sending a Cover Page Fax
Let’s start with the
simple cover page route. This is handled by the Send Fax Wizard, which
you can launch by using any of the following methods:
In the Fax Console, select File, Send a Fax.
From the Printers and Faxes window, click the task pane’s Send a fax link. Alternatively, select File, Send Fax.
Select Start, All Programs, Accessories, Communications, Fax, Send a Fax.
Here’s what happens when the Send Fax Wizard arrives on the scene:
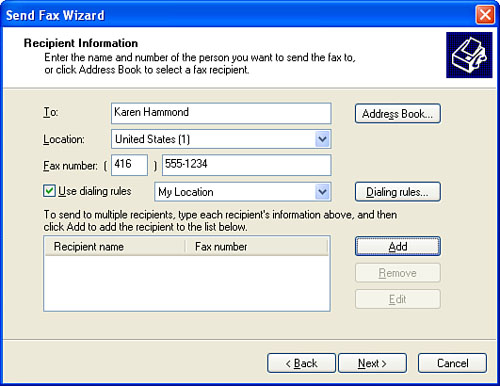
1. | The
initial dialog box isn’t much use, so just click Next to continue. The
Send Fax Wizard displays the Recipient Information dialog box, shown in Figure 3.
|
2. | Fill in the following fields:
Tip
If the recipient is in
your Address Book and you have the Fax field filled in (in either the
Business or the Home tab), click Address Book, select the recipient,
click To, and then click OK. The Send Fax Wizard adds the person’s name
and fax number to the recipient list.
| To | Type the name of the fax recipient. | | Location | If
you’re calling long distance and you need to start the dialing with a
number other than 1, activate the Use Dialing Rules check box and then
use the Location list to select the country code for the fax recipient’s
phone number. | | Fax Number | Use
these two text boxes to enter the area code (if necessary) and phone
number for the fax recipient. Note that you can’t enter the area code
unless you activate the Use Dialing Rules check box. |
|
3. | Click
Add. This isn’t necessary if you’re sending the fax to a single
recipient or if you inserted the recipient via the Address Book.
|
4. | If you want to send the fax to several people, repeat steps 2 and 3 as necessary.
|
5. | When you’re ready to move on, click Next. The Preparing the Cover Page dialog box appears.
|
6. | Fill in the following fields (click Next when you’re done):
| Cover Page Template | Select the cover page you want to use.
| | Subject Line | Type the subject of the fax. | | Note | Type your cover page message. |
|
7. | The wizard now asks you for the time you want the fax sent:
| Now | Sends the fax right away | | When Discount Rates Apply | Sends the fax as soon as possible after your discount rates begin (as you specified in the previous section) | | Specific Time in the Next 24 Hours | Sends the fax at the specified time |
|
8. | Set the fax priority to High, Normal, or Low, and then click Next.
|
9. | In the final wizard dialog box, click Preview Fax to check out the fax in the Windows Picture and Fax Viewer.
|
10. | When
you’re ready to ship the fax, click Finish. The Fax Monitor window
replaces the wizard so that you can see what’s happening with the fax.
|
Faxing from an Application
The other (and probably
more common) method of sending a fax is to send a document directly
from an application. You don’t need applications with special features
to do this, either. That’s because when you install the Fax service, it
adds a new printer driver to Windows XP. This printer driver, however,
doesn’t send a document to the printer. Instead, it renders the document
as a fax and sends it to your modem.
To try this, follow these steps:
1. | Create the document that you want to ship.
|
2. | Select the program’s File, Print command to get to the Print dialog box.
|
3. | Select Fax as the printer and then click Print. The Send Fax Wizard appears.
|
4. | Follow
the steps outlined in the previous steps to set the fax options. With
this method you don’t have to bother with a cover page. If you’d still
like to include one, activate the Select a Cover Page Template with the
Following Information check box when you get to the Preparing the Cover
Page dialog box.
|
Tip
You can use
Windows XP’s Photo Printing Wizard to fax a scanned image or photo.
After you scan the picture, right-click the resulting file and then
click Print to start the Photo Printing Wizard. (If you have the task
pane displayed, you can also select the file and then click the Print this
Picture link.) Click Next in the first two dialog boxes. In the
Printing Options dialog box, select Fax in the What Printer Do You Want
to Use? list. Click Next in the rest of the wizard’s dialog boxes. When
the wizard “prints” the image, the Send Fax Wizard appears.
