Logo
programming4us
programming4us
programming4us
programming4us
Home
programming4us
XP
programming4us
Windows Vista
programming4us
Windows 7
programming4us
Windows Azure
programming4us
Windows Server
programming4us
Windows Phone
 
Windows XP

Surfing the Web Securely (part 1) - Adding and Removing Zone Sites

- Free product key for windows 10
- Free Product Key for Microsoft office 365
- Malwarebytes Premium 3.7.1 Serial Keys (LifeTime) 2019
12/12/2011 3:58:31 PM

Adding and Removing Zone Sites

Three of these zones—Local Intranet, Trusted Sites, and Restricted Sites—enable you to add sites. To do this, follow these steps:

1.
Select the zone you want to work with and then click Sites.

2.
If you selected Trusted Sites or Restricted Sites, skip to step 4. Otherwise, if you selected the Local intranet zone, you see a dialog box with three check boxes:

Include All Local (Intranet) Sites Not Listed in Other ZonesWhen activated, this option includes all intranet sites in the zone. If you add specific intranet sites to other zones, those sites aren’t included in this zone.
Include All Sites That Bypass the Proxy ServerWhen this check box is activated, sites that you’ve set up to bypass your proxy server (if you have one) are included in this zone.
Include All Network Paths (UNCs)When this check box is activated, all network paths that use the Universal Naming Convention are included in this zone. (UNC is a standard format used with network addresses. They usually take the form \\server\resource, where server is the name of the network server and resource is the name of a shared network resource.)

3.
To add sites to the Local Intranet zone, click Advanced.

4.
Type the site’s address in the Add this Web Site to the Zone text box and then click Add.

Note

When entering an address, you can include an asterisk as a wildcard character. For example, the address http://*.microsoft.com adds every microsoft.comwww.microsoft.com, support.microsoft.com, windowsupdate.microsoft.com, and so on. domain, including

5.
If you make a mistake and enter the wrong site, select it in the Web Sites list and then click Remove.

6.
Two of these dialog boxes (Local Intranet and Trusted Sites) have a Require Server Verification (https:) for All Sites In this Zone check box. If you activate this option, each site you enter must use the secure HTTPS protocol.

7.
Click OK.

Changing a Zone’s Security Level

To change the security level for a zone, first select it in the Security tab’s Select a Web Content Zone to Specify Its Security Settings list. Then use the Security Level for This Zone slider to set the level. To set up your own security settings, click Custom Level. This displays the Security Settings dialog box shown in Figure 1.

Figure 1. Use this dialog box to set up customized security levels for the selected zone.


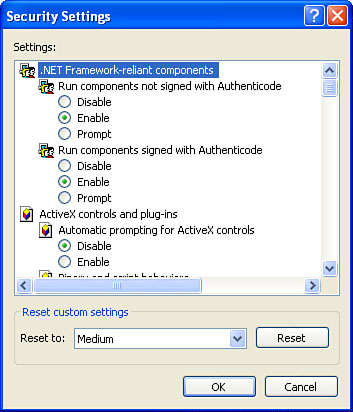
The Security Settings dialog box provides you with a long list of possible security issues, and your job is to specify how you want Internet Explorer to handle each issue. You usually have three choices:

DisableSecurity is turned on. For example, if the issue is whether to run an ActiveX control, the control is not run.
EnableSecurity is turned off. For example, if the issue is whether to run an ActiveX control, the control is run automatically.
PromptYou’re asked how you want to handle the issue. For example, whether you want to accept or reject an ActiveX control.

Other -----------------
- Keeping Intruders Out of Your System : Turning Off File and Printer Sharing, the Messenger Service
- Working with Email Safely and Securely : Sending a Secure Message & Receiving a Secure Message
- Working with Email Safely and Securely : Maintaining Your Privacy While Reading Email & Setting Up an Email Account with a Digital ID
- Troubleshooting Network Problems : Working with Email Safely and Securely - Protecting Yourself Against Email Viruses & Filtering Out Spam
- Troubleshooting Network Problems : Troubleshooting General Network Nuisances
- Troubleshooting Network Problems : Working with Network Diagnostics
- Troubleshooting Network Problems : Repairing a Network Connection
- Visual Basic 2008 : Using FTP in the Service (part 2)
- Visual Basic 2008 : Using FTP in the Service (part 1)
- Windows Presentation Foundation in .NET 4 : Introducing WPF - The Architecture of WPF
 
 
Top 10
- Microsoft Visio 2013 : Adding Structure to Your Diagrams - Finding containers and lists in Visio (part 2) - Wireframes,Legends
- Microsoft Visio 2013 : Adding Structure to Your Diagrams - Finding containers and lists in Visio (part 1) - Swimlanes
- Microsoft Visio 2013 : Adding Structure to Your Diagrams - Formatting and sizing lists
- Microsoft Visio 2013 : Adding Structure to Your Diagrams - Adding shapes to lists
- Microsoft Visio 2013 : Adding Structure to Your Diagrams - Sizing containers
- Microsoft Access 2010 : Control Properties and Why to Use Them (part 3) - The Other Properties of a Control
- Microsoft Access 2010 : Control Properties and Why to Use Them (part 2) - The Data Properties of a Control
- Microsoft Access 2010 : Control Properties and Why to Use Them (part 1) - The Format Properties of a Control
- Microsoft Access 2010 : Form Properties and Why Should You Use Them - Working with the Properties Window
- Microsoft Visio 2013 : Using the Organization Chart Wizard with new data
 
programming4us
Windows Vista
programming4us
Windows 7
programming4us
Windows Azure
programming4us
Windows Server