It
takes only a fraction of a second to wipe out a week's worth of work.
You might accidentally delete a folder full of files or, worse,
overwrite an entire group of files with changes that can't be undone.
Whatever the cause of your misfortune is, Windows 7 includes tools that
offer hope of recovery.
For accidental deletions, your first stop should be the Recycle Bin, a
Windows institution since 1995. If you don't find what you're looking
for in the Recycle Bin, your next recourse is a considerably more
powerful recovery tool called Previous Versions. We explain how to use
both features in this section.
1. Recovering Files and Folders with the Recycle Bin
The Recycle Bin provides protection against accidental erasure of files. In most cases, when you delete one or more files or folders, the deleted
items go to the Recycle Bin, not into the ether. If you change your
mind, you can go to the bin and recover the thrown-out items.
Eventually, when the bin fills up, Windows begins emptying it,
permanently deleting the files that have been there the longest.
The following kinds of deletions do not go to the Recycle Bin:
Files stored on removable disks
Files stored on network drives, even when that volume is on a computer that has its own Recycle Bin
Files deleted from a command prompt
Files deleted from compressed (zipped) folders
You can bypass the Recycle Bin yourself, permanently deleting
an item, by holding down the Shift key while you press the Delete key.
You might want to do this if you need to get rid of some very large
files and you're sure you'll never want those files back. Skipping the
Recycle Bin in this case will reclaim some disk space.
You can also turn off the Recycle Bin's services permanently, as we explain in the following section.
2. Changing Recycle Bin Settings
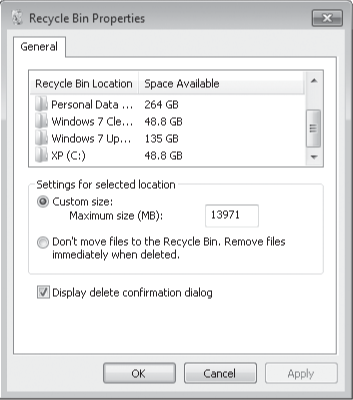
To see and adjust the
amount of space currently used by the Recycle Bin for each drive that it
protects, right-click the Recycle Bin icon on your desktop and choose
Properties from the shortcut menu. In the Recycle Bin Properties dialog
box (shown in Figure 1),
you can select a drive and enter a different value in the Custom Size
box. Windows ordinarily allocates up to 10 percent of a disk's space for
recycling. (When the bin is full, the oldest items give way to the
newest.) If you think that amount of space is excessive, enter a lower
value.

Note:
If you don't see a
Recycle Bin icon on your desktop, it's probably hidden. To make it
visible, right-click the desktop, choose Personalize, and then click
Change Desktop Icons. In the Desktop Icon Settings dialog box, select Recycle Bin and click OK. If you use the Show All Folders option in Windows Explorer.
If you'd rather do
without the Recycle Bin for a particular drive, select the drive from
the Recycle Bin Properties dialog box and then click Do Not Move Files To The Recycle Bin. Remove Files Immediately When Deleted. This action is equivalent to setting the maximum capacity to 0.
Whether the
Recycle Bin is enabled or disabled, Windows normally displays a
confirmation prompt when you delete something. If that prompt annoys
you, clear the Display Delete Confirmation Dialog check box.
3. Restoring Files and Folders
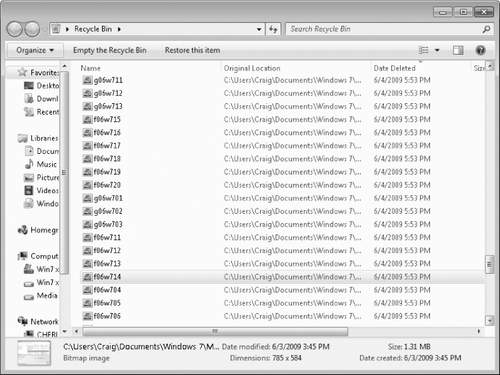
When you open the Recycle
Bin, Windows displays the names of recently deleted items in an
ordinary Windows Explorer window. In Details view (see Figure 2),
you can see when each item was deleted and which folder it was deleted
from. You can use the column headings to sort the folder—for example, to
display the items that have been deleted most recently at the top, with
earlier deletions below. Alternatively, you can organize the bin by
disk and folder by clicking the Original Location heading. If these
methods don't help you find what you're hoping to restore, use the
search box.

Note that deleted
folders are shown only as folders; you don't see the names of items
contained within the folders. If you restore a deleted folder, however,
Windows re-creates the folder and its contents.
The Restore This Item
command (on the toolbar) puts the item back in the folder from which it
was deleted. If that folder doesn't currently exist, Windows asks your
permission to re-create it. If no object is selected, a Restore All
Items option is available on the toolbar. If your Recycle Bin contains
hundreds or thousands of deleted files
dating back weeks or months, this option can create chaos. It's most
useful if you recently emptied the Recycle Bin and all of its current
contents are visible.
If you want, you can restore
a file or folder to a different location. Select the item, choose Edit,
Move To Folder, and then specify the new location. (If the menu bar
isn't currently visible, you can right-click the item, choose Cut, and
then paste it in the new location.) Or, simplest of all, you can drag
the item out of the Recycle Bin and put it where you want it.
4. Purging the Recycle Bin
A deleted file sitting in your Recycle Bin takes up as much space as it did before it was deleted. If you're deleting files
to free up space for new programs and documents, transferring them to
the Recycle Bin won't help. You need to remove them permanently. The
safest way to do this is to move the items to another storage medium—a
different hard disk or a removable disk, for example.
If you're sure you'll never
need a particular file again, however, you can delete it in the normal
way, and then purge it from the Recycle Bin. Display the Recycle Bin,
select the item, and then press Delete.
To empty the Recycle
Bin entirely, right-click the Recycle Bin icon on your desktop and
choose Empty Recycle Bin from the shortcut menu. Or display the Recycle
Bin and click Empty The Recycle Bin on the toolbar.
5. Restoring Previous Versions of Files and Folders
Need a time machine? With Previous
Versions, you have it. This invaluable feature is a side benefit of the
way the operating system now creates backup copies and restore points.
With System Protection turned on (its default state), Windows creates a
daily restore point
that lets you roll your system back to an earlier state in the event
that a new installation or some other event creates instability. Restore points are built from shadow copies,
which are essentially change logs for files and folders. Shadow copies
are also created by the Windows Backup program.
If you perform regular periodic backups, you have the Backup program's
shadow copies as well as those created by System Protection.
You can't open or manipulate shadow copies directly. However, you can access their contents indirectly via the Previous Versions tab of the properties dialog box for any file, folder, or drive icon, or you can use the Restore Previous Versions command on the File menu in Windows Explorer. Using Previous
Versions, you can open, copy, or restore a document or folder as it
existed at an earlier point in time. This feature is a lifesaver if you
accidentally delete files from a folder or want to "roll back" to an
earlier version of a document you've been working on for days or weeks;
if you have a shadow copy from a time before you made the deletions or
changes, you can recover the earlier version by restoring individual
files or replacing the folder's contents with the earlier version. (As
an alternative to restoring the earlier version, you can create a copy
of the earlier version of the file or folder and then compare its
contents to the current version.)
The Previous
Versions feature is independent of the Recycle Bin. Purging the Recycle
Bin (or declining to use it) has no bearing on the availability of
shadow copies.
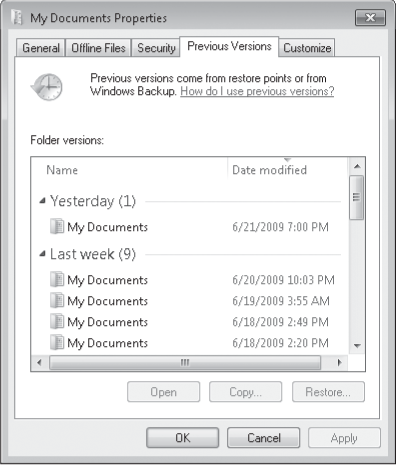
To see what previous versions are available for a file or folder, right-click the item in Windows Explorer and choose Restore Previous Versions. The Previous Versions tab of the object's properties dialog box (see Figure 3)
will list the available shadow copies. Select the one you want, and
then click Open (to view the file or folder), Copy (to create a copy of
it without changing the original), or Restore (to overwrite the object
in its current state with the selected copy).

Note:
Previous versions are not available for system files
or files in an offline cache. You can use the feature to restore
earlier versions of uncached files on network shares, however. For more
about offline caches, see the following section.