When a Stop error occurs, Windows displays
information that can help you analyze the root cause of the problem.
Windows writes the information to the paging file (Pagefile.sys) on the
%SystemDrive% root by default. When you restart the computer in normal
or safe mode after a Stop error occurs, Windows uses the paging file
information to create a memory dump file in the %SystemRoot% folder.
Analyzing dump files can provide more information about the root cause
of a problem and lets you perform offline analysis by running analysis
tools on another computer.
You can configure your system to generate three types of dump file:
Small memory dump files Sometimes referred to as minidump files,
these dump files contain the least amount of information but are very
small. Small memory dump files can be written to disk quickly, which
minimizes downtime by allowing the operating system to restart sooner.
Windows stores small memory dump files (unlike kernel and complete
memory dump files) in the %SystemRoot%\Minidump folder, instead of using
the %SystemRoot%\Memory.dmp file name.
Kernel memory dump files
These dump files record the contents of kernel memory. Kernel memory
dump files require a larger paging file on the boot device than small
memory dump files and take longer to create when a failure has occurred.
However, they record significantly more information and are more useful
when you need to perform in-depth analysis. When you choose to create a
kernel memory dump file, Windows also creates a small memory dump file.
Complete memory dump files
These dump files record the entire contents of physical memory when the
Stop error occurred. A complete memory dump file's size will be
slightly larger than the amount of physical memory installed at the time
of the error. When you choose to create a complete memory dump file,
Windows also creates a small memory dump file.
By default, Windows is
configured to create kernel memory dump files. By default, small memory
dump files are saved in the %SystemRoot%\Minidump folder, and kernel and
complete memory
dump files are saved to a file named %SystemRoot%\Memory.dmp. To change
the type of dump file Windows creates or to change their location,
follow these steps:
Click Start, right-click Computer, and then select Properties.
Click Advanced System Settings.
In the System Properties dialog box, click the Advanced tab. Under Startup And Recovery, click Settings.
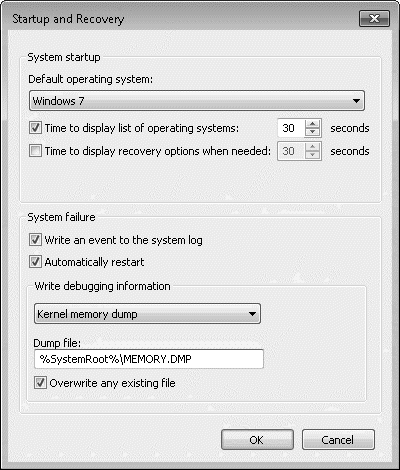
Use the drop-down Write Debugging Information list and then select the debugging type.
If desired, change the path shown in the Dump File box. Figure 1 shows the Startup And Recovery dialog box.
Click OK twice and then restart the operating system if prompted.
The sections that follow describe the different types of dump files in more detail.
1. Configuring Small Memory Dump Files
Small memory dump files
contain the least amount of information, but they also consume the least
amount of disk space. By default, Windows stores small memory dump
files in the %SystemRoot%\Minidump folder.
Windows always creates a
small memory dump file when a Stop error occurs, even when you choose
the kernel dump file or complete memory dump file options. Small memory
dump files can be used by both Windows Error Reporting (WER) and
debuggers. These tools read the contents of a small memory dump file to
help diagnose problems that cause Stop errors.
A small memory dump file
records the smallest set of information that might identify the cause of
the system stopping unexpectedly. For example, the small memory dump
includes the following information:
Stop error information Includes the error number and additional parameters that describe the Stop error.
A list of drivers running on the system
Identifies the modules in memory when the Stop error occurred. This
device driver information includes the file name, date, version, size,
and manufacturer.
Processor context information for the process that stopped
Includes the processor and hardware state, performance counters,
multiprocessor packet information, deferred procedure call information,
and interrupts.
Kernel context information for the process that stopped
Includes offset of the directory table and the page frame number
database, which describes the state of every physical page in memory.
Kernel context information for the thread that stopped Identifies registers and IRQLs and includes pointers to operating system data structures.
Kernel-mode call stack information for the thread that stopped
Consists of a series of memory locations and includes a pointer to the
initial location. Developers might be able to use this information to
track the source of the error. If this information is greater than 16
kilobytes (KB), only the topmost 16 KB is included.
A small memory dump file
requires a paging file of at least 2 megabytes (MB) on the boot volume.
The operating system saves each dump file with a unique file name every
time a Stop error occurs. The file name includes the date the Stop error
occurred. For example, Mini011007-02.dmp is the second small memory
dump generated on January 10, 2007.
Small memory dump files are
useful when space is limited or when you are using a slow connection to
send information to technical support personnel. Because of the limited
amount of information that can be included, these dump files do not
include errors that were not directly caused by the thread that was
running when the problem occurred.
2. Configuring Kernel Memory Dump Files
By default, Windows
systems create kernel memory dump files. The kernel memory dump file is
an intermediate-size dump file that records only kernel memory and can
occupy several megabytes of disk space. A kernel memory dump file takes
longer to create than a small dump file and thus increases the downtime
associated with a system failure. On most systems, the increase in
downtime is minimal.
Kernel memory
dumps contain additional information that might assist troubleshooting.
When a Stop error occurs, Windows saves a kernel memory dump file to a
file named %SystemRoot%\Memory.dmp and creates a small memory dump file
in the %SystemRoot%\Minidump folder.
A kernel memory dump file
records only kernel memory information, which expedites the dump file
creation process. The kernel memory dump file does not include
unallocated memory or any memory allocated to user-mode programs. It
includes only memory allocated to the Executive, kernel, Hardware
Abstraction Layer (HAL), and file system cache, in addition to nonpaged
pool memory allocated to kernel-mode drivers and other kernel-mode
routines.
The size of the kernel memory
dump file will vary, but it is always less than the size of the system
memory. When Windows creates the dump file, it first writes the
information to the paging file. Therefore, the paging file might grow to
the size of the physical memory. Later, the dump file information is
extracted from the paging file to the actual memory dump file. To ensure
that you have sufficient free space, verify that the system drive would
have free space greater than the size of physical memory if the paging
file were extended to the size of physical memory. Although you cannot
exactly predict the size of a kernel memory dump file, a good rule of
thumb is that roughly 50 MB to 800 MB, or one-third the size of physical
memory, must be available on the boot volume for the paging file.
For most purposes, a kernel
memory dump file is sufficient for troubleshooting Stop errors. It
contains more information than a small memory dump file and is smaller
than a complete memory dump file. It omits those portions of memory that
are unlikely to have been involved in the problem. However, some
problems do require a complete memory dump file for troubleshooting.
Note:
By default, a new kernel
memory dump file overwrites an existing one. To change the default
setting, clear the Overwrite Any Existing File check box. You can also
rename or move an existing dump file prior to troubleshooting.
3. Configuring Complete Memory Dump Files
A complete memory dump file, sometimes referred to as a full dump file,
contains everything that was in physical memory when the Stop error
occurred. This includes all the information included in a kernel memory
dump file, plus user-mode memory. Therefore, you can examine complete
memory dump files to find the contents of memory contained within
applications, although this is rarely necessary or feasible when
troubleshooting application problems.
If you choose to use complete memory dump files, you must have available space on the systemdrive
partition large enough to hold the contents of the physical RAM.
Additionally, you must have a paging file equal to the size of your
physical RAM.
When a Stop error occurs,
the operating system saves a complete memory dump file to a file named
%SystemRoot%\Memory.dmp and creates a small memory dump file in the
%SystemRoot%\Minidump folder. A Microsoft technical support engineer
might ask you to change this setting to facilitate data uploads over
slow connections. Depending on the speed of your Internet connection,
uploading the data might not be practical, and you might be asked to
provide the memory dump file on removable media.
Note:
By default, new complete memory
dump files overwrite existing files. To change this, clear the
Overwrite Any Existing File check box. You can also choose to archive or
move a dump file prior to troubleshooting.
4. How to Manually Initiate a Stop Error and Create a Dump File
To be absolutely certain that a dump file will be created when a Stop error occurs, you can manually initiate a Stop error by creating
a registry value and pressing a special sequence of characters. After
Windows restarts, you can verify that the dump file was correctly
created.
To initiate a crash dump manually, follow these steps:
Click Start and type Regedit.
On the Start menu, right-click Regedit and click Run As Administrator.
Respond to the User Account Control (UAC) prompt that appears.
In the Registry Editor, navigate to HKEY_LOCAL_MACHINE\SYSTEM\CurrentControlSet\Services\i8042prt\Parameters.
On the Edit menu, click New, DWORD (32-bit) Value, and then add the following registry value:
Close the Registry Editor and then restart the computer.
Log on to Windows. While holding down the right Ctrl key, press the Scroll Lock key twice to initiate a Stop error.
You cannot manually initiate a Stop error on a virtual machine that has virtual machine extensions installed.
