When you drop shapes onto the Visio drawing page,
they are usually oriented the way you want them to be. However, there
are times when you want the shapes to appear at a different angle. Visio
provides several ways to accomplish this.
In this exercise, you will add several shapes to the Visio drawing page and rotate the shapes to different angles.
Tip:
The font size for some of the
graphics in this exercise has been increased for readability. The font
in your shapes may be smaller.
Note:
Start Visio, or if it’s already running, click the File tab, and then
click New. In the Template Categories section, click General, and then
double-click the Block Diagram thumbnail. Save the drawing as Orient Shapes and Text.
Page Width
On the View tab, in the Zoom group, click the Page Width button, and then position the page so you can see the top edge.
Drag a Box shape from the Blocks
stencil and drop it so the center is approximately 8 inches (200 mm) up
from the bottom and 3 inches (75 mm) in from the left side of the page.
Tip:
Use the ruler on the left and top edges of the drawing page to guide shape placement.
The shapes in the US Units version of the Block Diagram stencil contain the word text,
whereas the same shapes in the Metric Units version of the stencil do
not. Because the examples in this article were created using the U.S.
version, you will see the word text. If you are using the Metric stencil, add the word text to each shape.
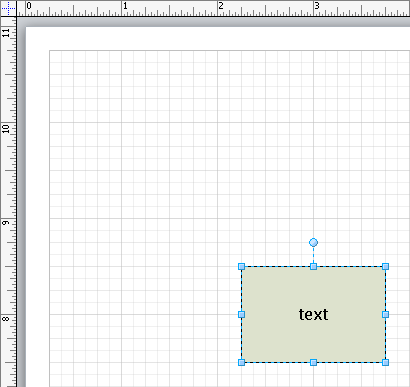
In addition to the regular
selection handles surrounding the box, notice the rotation handle at the
top center just above the box.
When
you point to the rotation handle, the cursor changes from an arrow to a
circular arrow. Notice also that a dot appears in the center of the
rectangle. This dot shows the geometric center of the shape, that is,
the point around which the shape will rotate when you drag the rotation
handle.
Tip:
If you do not see a rotation handle above a shape, it’s because the shape designer has turned off the rotation feature.
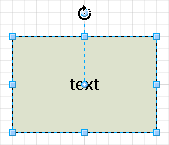
Grab the rotation handle and rotate the shape 90 degrees to the left (counterclockwise). Both the shape and the text rotate.
Drag the rotation handle counterclockwise another 90 degrees so the box is inverted.
Notice that the text is also upside down—more about that in the next exercise.
Return
the box to its original upright position to continue with this
exercise. As you can see, you are able to rotate the shape freely
through 360 degrees of arc.
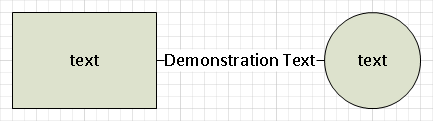
Drag a Circle onto the page so its center is approximately 3 inches (75 mm) to the right of the center of the box, using the Dynamic Grid to align it with the box.
Connector

On the Home tab, in the Tools group, click the Connector button.
Draw a connector from the right side of the box to the left side of the circle.
Pointer Tool

On the Home tab, in the Tools group, click the Pointer Tool button.
Click the new connector and type Demonstration Text. Then press Esc.
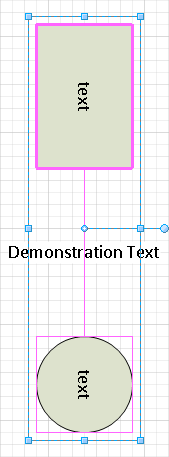
Draw a bounding box around all three shapes to select them, and then right-click on any of the shapes.
In the Mini Toolbar, set the font size to 14 pt. to make it easier to read the text in the steps that follow.
Tip:
Note that you can apply the same change to multiple shapes at one time.
Draw a bounding box around all three shapes to select them, and then rotate the entire selection 90 degrees clockwise.
Tip:
You can rotate selections of shapes as easily as you can rotate individual shapes.
Notice the difference in behavior between the text in the box or circle and the text on the connector.
Rotate the selection another 90 degrees clockwise so the shapes are inverted.
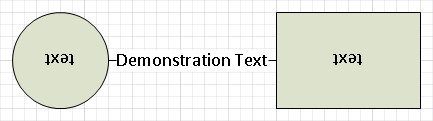
At this point, it’s quite
obvious that the text in some shapes seems to behave better—or at least
differently—than the text in other shapes when the shapes are rotated.
The next exercise will make this even clearer and will show you how to
change the text orientation.
Note:
Save your changes to the Orient Shapes and Text drawing but leave it open if you are continuing with the next exercise.
