Let's begin then with XNA. XNA supports two different profiles—sets of features that are supported by the underlying API. The first profile, Reach, limits the features to those that are available for Windows Phone 7, Windows, and the Xbox 360. The second profile is the HiDef
profile, which provides additional functionality that is not available
to Windows Phone 7 (programmable vertex and pixel shaders for advanced
graphics techniques, for example).
The active profile can be selected by opening the
Project Properties page for your XNA game. For Windows Phone 7 projects,
this will be locked into the Reach profile; once we have transferred
projects across to Windows, they will default to HiDef. You can switch
the Windows project profile back to Reach if you want to reduce the
chance of adding any functionality that the phone is unable to support.
Because the HiDef profile is a superset of Reach, the
majority of the core API that we have been using can be converted
directly over to Windows. A few features are different or missing,
including these:
The TouchPanel object and high level Gestures support
Isolated storage (Windows can use the normal file system instead)
Tombstoning support (there is no such thing in Windows as it offers full multitasking)
Nearly everything else is identical, however, and can be transferred across to Windows without too much effort.
1. Porting Projects to Windows
Fortunately for us, Microsoft has simplified this
process about as much as it could have. Once you have developed your
Windows Phone 7 XNA project, the Visual Studio will create a Windows
version with just a couple of mouse clicks.
Let's walk through the steps needed to accomplish this; we will start with something simple.
Reopen the project in Visual Studio (or, if you
prefer, make a copy and open that so that the original project is not
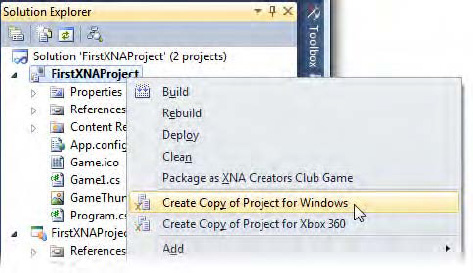
disturbed). Once it has opened, right-click the main game project and
select Create Copy of Project for Windows from the context menu, as
shown in Figure 1.

The result of this operation will be that a new project appears in your solution, named Windows Copy of FirstXNAProject.
To run the project, right-click it and select Set as StartUp Project
from the context menu; the project title will become bold to indicate
that it is the project that will run when you begin debugging. Start the
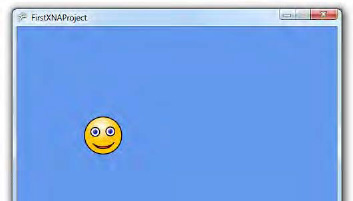
project running, and after a few seconds the project will appear, but
this time running directly inside a Windows window, rather than in the
emulator. Figure 2 shows the results.

NOTE
If the Windows Phone 7 emulator is not running
when you launch the project, you might find that it opens, even though
you are not running the phone version of the game. You can simply
minimize it to get it out of the way.
There—that was easy! There is a little more to it
than this once we start to get into more complex projects, but that is
the heart of the conversion process. You can switch back and forward
between the two target platforms just by setting the appropriate startup
project in Solution Explorer.
At this stage, you have three projects in your
solution: the main game project for Windows Phone 7, the main game
project for Windows, and the Content project. There is a lot of sharing
going on between these projects. The more obvious sharing is of the
Content project, which is used by both of the game projects.
Less obvious is the fact that the copy of the project
created for Windows is really only a copy of the project file. The
source code files within are not copied and are being shared between the
two game projects. If you begin making changes to the Windows version,
you are also changing the Windows Phone 7 version, as they are using the
same source code files. Don't spend a lot of time fixing the source
code for one platform only to find that you have destroyed the code for
the other!
|
If you want to temporarily remove one of the two
projects from your solution with a view to adding it back in later on,
right-click the project and select Unload Project from the context menu.
The project will remain inside Solution Explorer marked as Unavailable,
but will otherwise be completely ignored. To restore it later on,
right-click it again and select Reload Project.
|
|
Before spending any more time working on projects
that have been converted in this way, you should decide whether you want
to try to maintain a single source code base that works for both
platforms (which is entirely feasible, as discussed in a moment), or
whether you want to branch the source code and create two completely
separate projects, each with its own independent source code. This
decision will be dictated by how much additional development you intend
to do on your game; it would be counterproductive to have to make every
change twice if this can be avoided.
2. Using Conditional Compilation
If you do decide to try to get the same source code
working on both platforms, you will need to use a handy feature of the
C# compiler called conditional compilation.
By adding special compiler directives to your source code, you can
instruct the compiler to build sections of your code only if certain
conditions are met, and to completely ignore it if they are not met.
This allows us to very easily create alternative code
paths for the Windows Phone 7 and Windows versions of the project, even
though they share the same source files. The Windows Phone 7 project
file declares a compilation constant named WINDOWS_PHONE, while the Windows project instead declares a constant named WINDOWS. By checking for one or other of these, the compiler can include code that is relevant just to the appropriate project type.
Listing 1 shows how this is used. The #if directive begins a block of code that will only be compiled if the WINDOWS_PHONE constant is defined. The block is terminated with a corresponding #endif. This example contains an alternative code path for non-Windows Phone 7 platforms.
Example 1. Conditional compilation for Windows Phone 7 or other platforms
#if WINDOWS_PHONE
        // Execute code for Windows Phone 7
        DoWP7Stuff();
#else
        // Execute code for non-Windows Phone 7
        DoNonWP7Stuff();
#endif
|
In addition to #if and #endif, the #elif operator can be used for "else/if" logic. Listing 2 shows separate code paths for Windows Phone 7, Windows. and Xbox 360.
Example 2. Multiple alternate compilation code paths
#if WINDOWS_PHONE
        // Execute code for Windows Phone 7
        DoWP7Stuff();
#elif WINDOWS
        // Execute code for Windows
        DoWindowsStuff();
#elif XBOX
        // Execute code for Xbox 360
        DoXboxStuff();
#endif
|
NOTE
Visual Studio will automatically gray out
conditional code that will not be included by the current project.
Switching between the same source file in the various projects will
change this highlighting, but each source file can only be opened from
within one project at a time, so the existing source code window will
need to be closed before it can be reopened in another project.
Clearly this conditional compilation approach
introduces an increased level of code volume and complexity, and this
complexity is one of the things that should be factored into your
decision about whether to maintain a single code base for multiple
platforms.
3. Project Differences
When running XNA games on Windows Phone 7, the
runtime environment always looked for a class within the project that
derived from Microsoft.Framework.Xna.Game. When one was found, this class would be used to host the game.
In Windows, the program launches in a different way. The runtime looks for a static class named Program and calls its Main
method to initiate the game. This class by default uses conditional
compilation so that it is entirely omitted when running under Windows
Phone 7, but it is an integral part of the game in Windows.
If you have renamed your main game class from the default name Game1,
you will find that the class does not compile in the Windows
environment. This is because it is still referring to the game class
using its original name. The two references to Game1 within the class will need to be modified to use the actual game class name for compilation to succeed.