The Sales Order Processing module, also commonly referred to as SOP,
bridges the gap between the Inventory and Receivables modules in
Dynamics GP. In SOP, you can enter quotes, orders, back orders,
invoices, and returns, with detailed inventory and non-inventory items.
SOP also integrates to the Purchase Order Processing module with the
ability to automatically create purchase orders for sales orders that
you do not have stock to fill.
Setup for Sales Order Processing consists of the following steps:
Sales Order Processing Setup
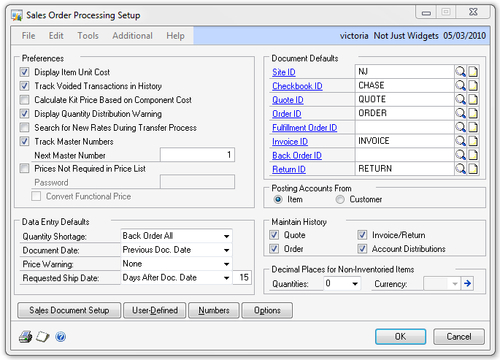
To begin setting up SOP, navigate to Microsoft Dynamics GP | Tools | Setup | Sales | Sales Order Processing. The following is a list of the fields on the Sales Order Processing Setup window:
Display Item Unit Cost:
Unmarking this will show the unit cost of items entered on sales order
transactions as zero. Some companies prefer to hide item costs from
users; however, this option hides them only on the Sales Transaction
Entry window, not anywhere else in the system. So, unless a user has
extremely limited access in Dynamics GP, this is not as useful as it
sounds.
Track Voided Transactions in History: It is recommended to leave this option marked, as there may often be a reason to look at voided sales transactions.
Calculate Kit Price based on Component Cost:
This option applies to pricing methods based on cost, which are not too
common. Selecting this option will cause the cost of the kit (and thus
the price) to be recalculated based on the cost of each component in the
kit.
Display Quantity Distribution Warning:
Selecting this enables a warning during transaction entry that helps
users avoid mistakes when entering quantities for transactions. It is
recommended to leave this checked.
Search for New Rates During Transfer Process:
This setting only applies to Multicurrency transactions. If it is
checked, then during the transfer of sales documents (for example from
quote to order), Dynamics GP will look for an updated exchange rate. If
this setting is not selected, the system will still verify that the
exchange rate is valid, but will not update exchange rates unless they
are expired.
Track Master Numbers and Next Master Number: Dynamics GP offers the ability to track related transactions with a Master Number.
For example, a quote, a resulting order, and two partial invoices may
all have their own individual numbers but share one master number, thus
allowing for easy lookups of all related transactions. It is recommended
to leave this option selected, even if you do not foresee a need to use
master numbers. The Next Master Number can be anything you would like, although there is typically no reason to change it from the default value of 1.
Prices Not Required in Price List:
This option works together with the Inventory module and, if selected,
allows users to enter items without a price level set up. This may
sometimes be needed, but it is better to leave this unchecked and create
price lists for all items to keep setup consistent. If
this option is selected and no Password is supplied, any user can enter
a item without a price level on a transaction. With a Password
selected, a user will be prompted to enter the password before they can
continue.
Convert Functional Price: This option is only available if Prices Not Required in Price List
is selected. With this checked, if a price cannot be found for the item
in the currency that is being used on the transaction, the functional
currency price will be converted as needed, using the current exchange
rate.
Data Entry Defaults: These are defaults to help speed up data entry:
Quantity Shortage: Choose what users will see as the default option when they enter a quantity that is greater than what is in stock.
Document Date: When entering a new SOP transaction, the Document Date will default to either the User Date (this is at the top of every window next to the User ID and Company Name)
or the date of the previously saved transaction. For companies that
typically enter all invoices with the same date (for example, the end of
the previous month), it is best to default this to the Previous Doc. Date. For companies that want to have the current date defaulted for new transactions, choose User Date.
Price Warning:
You can decide whether to warn users if the price being used on a
transaction they are entering is a default price for an item because a
price has not been set up for the customer's price level. This may be
useful if there should be a price set up on the item price list for each
customer price level and can help avoid mistakes. If you choose to give
a warning, using the Message option is recommended, as it will give users an indication of what the problem is; the Beep
option may not be enough to catch a user's attention when you consider
the typical noise level in an office and the number of beeps various
applications generate.
Requested Ship Date:
When SOP orders are entered into Dynamics GP, a Requested Ship Date
automatically populates to help determine when orders should be shipped
and when purchase orders may need to be placed. A user can change the
requested ship date on each line item for an order; however, if there is
a typical default you can use this setting to help speed up data entry.
Choices are either Document Date (order date) or number of Days After Doc. Date. If the latter is chosen, a box will appear next to this option where you can fill in the number of days (up to 999).
Document Defaults:
Similar to a customer with multiple Address IDs, each transaction type
in SOP can have multiple document types set up to follow different
rules. During transaction entry, users select which transaction type and
document type to use for the proper set of rules to be followed. This
section allows you to optionally set up a default for each transaction
type, as well as the Site ID and Checkbook ID,
to help speed up data entry. If you decide to set these up, you will
need to come back to this section after you have created the various
document types for each transaction type. If there is a transaction type
you will not be using, or that you want to make sure users have to
proactively select during transaction entry, you can leave it blank.
Posting Accounts From: If Item
is chosen, the system will first look at the item's accounts, then at
the Inventory series of the company posting accounts to determine what
GL accounts to use for SOP transactions. If Customer
is chosen, the system will first look at the customer's accounts, then
at the Sales series of the company posting accounts to determine what GL
accounts to use for SOP transactions.
Maintain History: It is recommended to keep all history and leave all of these selections checked.
Decimal Places for Non-Inventoried Items: If non-inventory items are entered on SOP transactions, these settings will determine how many decimal places to use for Quantities and Currency. If Multicurrency is enabled, use the expansion button (blue arrow) next to the Currency field to enter these for each currency.
The following screenshot shows a typical Sales Order Processing Setup window:
Sales Document Setup
You can set up as many document
types as you need for each Sales Order Processing transaction type. One
reason to set up different document types is to set up different
transaction rules. Another reason is to use different numbering schemes
or be able to segregate transactions for reporting purposes.
Dynamics GP has two
types of transactions that are basically the same—a fulfillment order
and an invoice. In most places you will see these listed together as Fulfillment Order/Invoice.
When using Workflow with the SOP module, a fulfillment order becomes a
separate transaction type that, once completed, turns into an invoice
automatically.
To start setting up document types, click the Sales Document Setup button at the bottom of the Sales Order Processing Setup window. You will see a list of the available transaction types:

The sections below will go over the setup for each transaction type.
Quote
Quotes are typically the
start of the sales process and can be entered for customers or
prospects. Prospects can be created "on the fly", as they are needed in
Dynamics GP, and then transferred to customers if they accept a quote
and place an order. The following list explains the fields on the Sales Quote Setup window:
Quote ID: An
ID for this quote document type—up to 15 characters. This ID is what
users will need to type or select on a sales transaction when using this
quote document type.
Quote ID Next Number:
If you are setting up multiple Quote IDs and would like for each to
have its own numbering scheme, you can enter the next quote number here.
Otherwise, if all quotes share one numbering scheme that can be entered
during SOP Document Numbers setup, and you can leave this blank.
Days to Expire:
The default number of days a quote is valid for. After expiration, the
user will not be able to transfer quotes to orders. Users can change
this as needed on individual quotes.
Comment ID:
This is the default Comment ID for a quote. For example, if all quotes
are set to expire in 30 days, you could create a comment that says
Prices are guaranteed for 30 days from quote date and enter the
corresponding Comment ID here. The comment would automatically populate
on every quote created with this Quote ID.
Format: Dynamics GP has four report formats available for each SOP transaction type: Blank Paper, Short Form, Long Form, and Other Form.
If you need to set up multiple Quote IDs that show different
information when printed, each Quote ID can be defaulted to use a
different report format.
Transfer Quote to Order: If this quote can be transferred to an order, check the box and enter an Order ID.
Transfer Quote to Fulfillment Order/Invoice: If this quote can be transferred to a fulfillment order or invoice, check the box and enter a Fulfillment Order/Invoice ID.
Default Quantities: This determines whether the item quantities for the quote default to Quantity to Invoice or Quantity to Order. This setting will depend on whether you plan to typically transfer a quote to an order or an invoice.
Use Prospects: Leave this checked if you want to allow prospects to be used on quotes, otherwise only customers will be allowed.
Allow Repeating Documents:
A quote can be set up to repeat. This is more typical for orders, but
may be needed at times for quotes. This setting determines whether this
Quote ID will be allowed to repeat.
Options and Password scrolling list: each of the Options listed has an optional Password, saved in clear text.
Delete Documents: With this unchecked, once saved, a quote cannot be deleted.
Edit Printed Documents: With this unchecked, once a quote is printed, it cannot be changed.
Override Document Numbers:
If users can change the quote numbers when they are creating them,
check this option (once created a quote number cannot be changed).
Void Documents: Select this if users are allowed to void quotes. If so, make sure that you have selected Track Voided Transactions in History on the Sales Order Processing Setup window.
Order
In Dynamics GP, a sales
transaction can start out as an order, or quotes can be transferred to
orders. Depending on setup, orders can allocate inventory items, thus
making them unavailable for other orders or invoices. The following is a
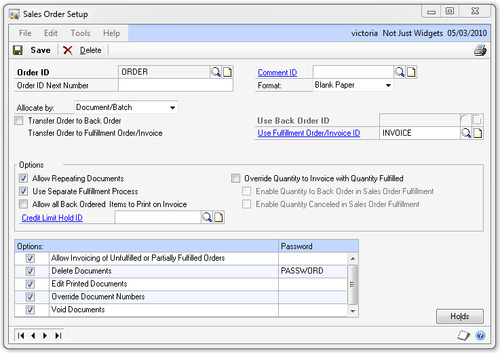
list of the fields on the Sales Order Setup window:
Order ID:
An ID for the order document type—the maximum length allowed is 15
characters. This is what users will need to type or select when using
this order document type.
Order ID Next Number: If you are setting up multiple Order IDs and would like for each to have its own numbering scheme, you can enter the Next Number
here. Otherwise, if all orders will share one numbering scheme, that
numbering scheme can be entered during SOP Document Numbers setup.
Comment ID: The default Comment ID for an order.
Format: Dynamics GP has four report formats available for each SOP transaction type: Blank Paper, Short Form, Long Form, and Other Form.
If you need to set up multiple Order IDs that show different
information when printed, each Order ID can be defaulted to use a
different report format.
Allocate by:
This setting determines how (or if) inventory is allocated for the
Order ID. Allocated inventory is still considered On Hand stock, but it
is not available for other orders or invoices.
Line Item:
Select this if you want to allocate inventory as each line is entered.
Users will need to choose an action on each line with a quantity
shortage, which could significantly slow down order entry if most of the
orders being entered do not have inventory in stock.
Document/Batch:
Inventory is not allocated as orders are entered and a separate
allocation process is run either for each order or batch of orders. This
gives less visibility of inventory availability during order entry;
however, this can greatly speed it up because each line item is not
checked and dealt with individually.
None: Orders
are not allocated at all and only after an order is transferred to an
invoice or fulfillment order is inventory allocated.
Transfer Order to Back Order: If this order type can be transferred to a back order, check this selection and enter a Back Order ID. Many companies do not use back orders, and simply use the back ordered quantity on orders to track back ordered items.
Transfer Order to Fulfillment Order/Invoice: There is no checkbox here, as the basic functionality of an order is to transfer to an invoice. The only choice is what Fulfillment Order/Invoice ID to use.
Options section:
Allow Repeating Documents: If this Order ID can be set up to be repeated, mark this checkbox. Allocate by has to be set to Document/Batch or None to enable this option.
Use Separate Fulfillment Process: If this option is checked, a separate step to fulfill orders will be needed prior to being able to transfer them to invoices.
Allow all Back Ordered Items to Print on Invoice:
If this is selected, all back ordered items will be transferred to an
invoice with a fulfilled quantity of zero, allowing them to print on the
invoice. Most companies like to show only items that are being billed
on invoices, so they would leave this option unchecked.
Credit Limit Hold ID:
Holds can offer an additional level of control in Sales Order
Processing. S
Override Quantity to Invoice with Quantity Fulfilled:
Marking this option will set the Quantity to Invoice to be the same as
Quantity Fulfilled, if Quantity Fulfilled is not zero. If this option is
checked, Enable Quantity Cancelled in Sales Order Fulfillment becomes available. If Transfer Order to Back Order is selected, Enable Quantity to Back Order in Sales Order Fulfillment will also be enabled.
Options and Password scrolling list: Each of these Options has an optional Password, saved in clear text.
Allow Invoicing of Unfulfilled or Partially Fulfilled Orders: This option is activated only when the Use Separate Fulfillment Process option is selected. Otherwise, if Use Separate Fulfillment Process
is not selected, invoicing an unfulfilled or partially fulfilled order
will not be allowed, even though you can select this option.
Delete Documents: With this unchecked, a saved order cannot be deleted.
Edit Printed Documents: With this unchecked, once an order is printed, it cannot be changed.
Override Document Numbers:
If users can change the order numbers when they are creating them,
check this option (once created, an order number cannot be changed).
Void Documents: Select this option if users are allowed to void orders. If so, make sure that you have selected Track Voided Transactions in History in the Sales Order Processing Setup window.
The following screenshot shows a typical Sales Order Setup window:
Back Order
Back orders allow
companies to transfer unfulfilled line items from orders or invoices to a
separate transaction. Many companies do not use back orders and simply
use the back order quantity on orders for back ordered items. If you
choose to use back orders in Dynamics GP, refer to the setup options
under the Quote section for an explanation of the fields on the Sales Back Order Setup window.
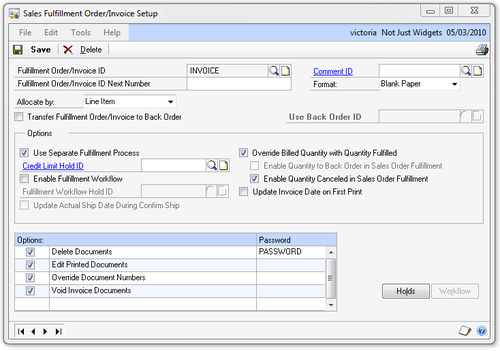
Fulfillment Order/Invoice
Fulfillment orders and
invoices share the same setup window because they are basically the same
transaction. All the options on the Sales Fulfillment Order/Invoice Setup window have been explained under the Order section, with the following new fields: Enable Fulfillment Workflow, Update Actual Ship Date During Confirm Ship, and Update Invoice Date on First Print.
These fields are used with Sales Fulfillment Workflow, which offers
additional functionality for the SOP module. A sample Sales Fulfillment Order/Invoice Setup window is shown here:
Return
A sales return
transaction allows the return of inventory and non-inventory items to be
entered. There are just a few options on the Sales Return Setup
window compared to the other sales document types. All of these options
have been explained in previous sections except the following:
Use next number from Fulfillment Order/Invoice ID:
If you would like your returns to use the same numbering scheme as your
invoices, choose this option and provide an Invoice ID with the desired
numbering scheme. With this selected, if the last invoice number was
1234, a new return transaction will be numbered 1235, and the next
invoice will be 1236.
Override Item Unit Cost for Returns:
The default item cost on returns will be the Current Cost of the item.
If this option is selected, users can override the costs on returns.
Some
of the fields on the sales document type setup windows are difficult to
give recommendations for, as they are very much dependent on the exact
workflow and needs of your organization. Textbook explanations of these
options are sometimes not enough to get a full understanding. Use your
Dynamics GP resource to help you determine the best settings for your
specific situation, and perform tests to verify that your selected
settings will behave as desired.
|
