User-Defined Fields
During sales transaction entry,
users have a window of user-defined fields available to them for
entering additional data to be tracked for transactions. Additionally,
prospects and customer items have some user-defined fields available.
The labels for all of these fields can be changed on the Sales User-Defined Fields Setup window, accessed by clicking the User-Defined button at the bottom of the Sales Order Processing Setup window.
There are three sections of fields you can set up labels for:
User-Defined Field Entry: These fields are accessed from the Sales Transaction Entry or Sales Transaction Inquiry
windows. There are three lists that can hold predefined values (up to
20 characters), two date fields, and five text fields that can hold up
to 20 characters each.
Prospect Maintenance: These fields are available when entering or changing a prospect. Two text fields of 20 characters each are available.
Customer/Item Maintenance: If you will be using customer items, five text fields holding 20 characters each will be available on the Customer Item Maintenance window.
You can change these labels at any time and the corresponding field names on the windows showing them will change.
SOP Document Numbers
Clicking the Numbers button at the bottom of the Sales Order Processing Setup window opens the Sales Document Numbers Setup window where you can change the Code, Next Number, and Format for each sales transaction type, as well as Packing Slips and Picking Tickets.
It is not recommended to change the default Codes, as that will make it more difficult for support and training. The Next Number
selections in this window will only be used if no numbering scheme is
set up for a Document Type ID. Some companies like to have letters at
the beginning of transaction numbers, so that by looking at a
transaction list they can quickly identify the transaction types, while
other companies prefer to use only numbers. In either case, make sure to
leave enough digits for growth, as the number of characters will not
auto increment. After reaching 999, the next number will be 000, not 1000. However, after reaching 00999, the next number will be 01000.
Dynamics GP will allow the
same number to be used for different sales transaction types. This
means you can have Order # 12345, Invoice # 12345, and Return # 12345
all co-existing in the system with no conflicts. A unique transaction is
determined by the combination of transaction type and number. Even
though it is allowed by the system, users may find it confusing to have
the same numbers for different transaction types and this is typically
not recommended.
Packing slips and picking
tickets can either have their own numbering schemes, or use the number
of the transaction they are being printed for. The following screenshot
shows a typical Sales Document Numbers Setup window where the invoice numbers will start with 0005500
to continue from a previous system, but all the other transaction types
will have a new numbering scheme starting with a different digit for
somewhat easier identification:
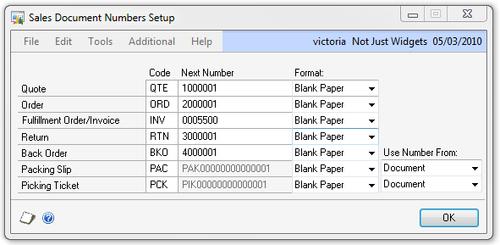
Note that you can also default a Format for each sales transaction type on this window. If the Next Number for a transaction is taken from this window, the Format selected here will be defaulted, otherwise the Next Number and Format will be taken from the document type setup.
Sales Order Processing Setup Options
The Sales Order Processing Setup Options window can be opened by clicking the Options button at the bottom of the Sales Order Processing Setup
window. This window holds additional setup selections for the SOP
module such as tax defaults and defaults for how POs are created from
SOP transactions. The following is a list of the fields on this window:
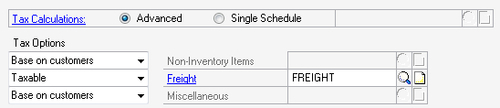
Tax Calculations: If Single Schedule
is chosen, you can specify one tax schedule to be used on SOP
transactions. Typically, if a company is selling taxable products and
services, the Advanced setting is recommended so that you can control taxes with more granularity.
Tax Options: When Advanced Tax Calculations is selected, this section is enabled and you can set up Tax Options for Non-Inventory Items, Freight, and Miscellaneous
amounts. Typically non-inventory and miscellaneous amounts are taxed
based on the customer's tax setup, and whether freight is taxed depends
on each state. If you have a tax schedule called FREIGHT containing all the tax details where freight is taxed, the setup would look like the following:
Defaults for Picking Ticket:
These options will work only for Advanced Picking and when using
multiple bins.
Defaults for Purchase Order: These settings control the behavior of purchase orders that are created directly from sales order transactions:
Required Date: Purchase orders can store and print required dates. Choose between Requested Ship Date from the order or Days Prior to Requested Ship Date, which will enable you to enter the number of Days.
U of M: Select whether to use the Sales Line Item's U of M or the Item's Default Purchasing U of M.
Combine Similar Items Into a Single PO Line:
If the same item exists on multiple lines, they will be combined into
one PO line with this option selected. Often there is a reason why the
same item is on separate lines on an order, so this is typically
unchecked to preserve the separate line items on the PO.
The following is a sample
Defaults for Purchase Order setup, where POs are always received at the
NJ site and the PO Required Date is set to 3 Days before the required
ship date for the sales order:

E-mail Settings
If you are planning on
e-mailing sales documents to customers from Dynamics GP, you will need
to make sure that e-mailing for Sales Order Processing transactions is
enabled and set up. To do this, navigate to Microsoft Dynamics GP | Tools | Setup | Sales | E-mail Settings.
You may have already completed this setup as part of the Receivables
module setup.
Customer Items
The Customer Items
functionality in Dynamics GP allows you to set up customer-specific
numbers for your inventory items. This may be needed for larger
customers who want to order using their own part numbers and want to see
these numbers on their invoices. When entering sales transactions, if a
customer item number is typed in, the system will automatically
substitute it with your inventory item number.
As the name suggests,
customer items allows you to set up a one-to-one relationship between
each customer and item you have set up in Dynamics GP. To start this
setup, navigate to Cards | Sales | Customer Items. The fields on the Customer Item Maintenance window are:
Customer ID and Name: When you select a Customer ID, their Name will automatically be displayed.
Item Number and Description: Select the Item Number you want to set up a customer item for and the Description will be displayed.
Customer Item: Enter the customer part number for the item.
Customer Item Description: This will default to your Item Description, but if you would like the customer to see a different description, enter it here.
Customer Item Short Name and Customer Item Generic:
These will be blank by default, if there is any other information you
want to save about the customer item, you can store it in these fields.
Text Fields 1, 2, 3, 4, and 5:
These are user-defined fields and can store any other information you
need about the customer item. The labels for these fields can be changed
on the Sales User-Defined Fields Setup window, accessed by clicking the User-Defined button at the bottom of the Sales Order Processing Setup window.
Substitute Item Number, Description, and Effective Date Range:
Optionally, you can set up an item to be offered as a substitute if the
item being ordered is out of stock. This is a customer-specific
substitute, as opposed to generic substitutes that can be set up for
each item in the Inventory module.
Once the setup of the Sales Order Processing module is complete, you can start entering SOP transactions in Dynamics GP.
