Installing Exchange Server 2007 on the Active Node
Now that the cluster is established and both
nodes are able to control the resources, it is time to install the
Exchange Server 2007 mailbox components on the cluster. This process
will be broken out by node, and you will start with the node that
currently owns the cluster resources. This is referred to as the active
node. To install the Exchange Server 2007 Single Copy Cluster, follow
these steps:
1. | Insert the Exchange Server 2007 media in the CD-ROM drive.
|
2. | Run Setup.exe.
|
3. | Following
the Exchange 2007 Installation Wizard, you are prompted to install the
.NET Framework 2.0. and MMC 3.0 on the system. Follow the Setup Wizard
as prompted through the installation of the .NET Framework and MMC
components.
|
4. | The
installation then takes you to the Microsoft website. Click Download
when prompted, and then choose Run. The files download and a security
warning appears. Click Run.
|
5. | When the Update Wizard is complete, click Next.
|
6. | After reading and agreeing to the license agreement, click I Agree, and click Next.
|
7. | When the update is completed, click Finish.
|
8. | Return to the setup interface, and click Install Microsoft Command Shell.
|
9. | Click Open when prompted. The files decompress and open a window. Double-click Msh_Setup.msi.
|
10. | When the security warning appears, click Run.
|
11. | When the Command Shell (x64) Setup Wizard appears, click Next.
|
12. | After reading and agreeing to the license agreement, click I Accept the Terms in the License Agreement, and click Next.
|
13. | Accept the default destination folder, and click Next.
|
14. | At the Start Installation screen, click Install.
|
15. | When the Setup Wizard completes, click Finish.
|
16. | Return to Setup.exe and click Install Microsoft Exchange.
|
17. | Files copy and the Exchange Server 2007 setup launches. Click Next.
|
18. | Accept the license agreement, and click Next.
|
19. | Leave the error reporting options set to Yes, and click Next.
|
20. | Choose Custom Exchange Server Installation, and click Next.
|
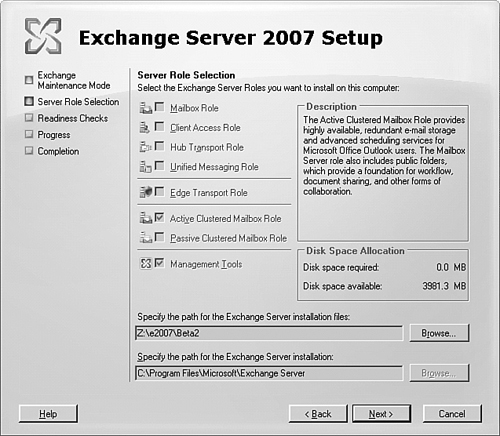
21. | Under Server Role Selection, choose Active Clustered Mailbox Role, as shown in Figure 3, and click Next.
|
22. | Select
Single Copy Cluster, and enter a name for the clustered Mailbox server.
This name is different than the cluster name. This is the name that
Outlook will connect to. Enter a unique IP address as well. Click Next.
|
23. | The Setup Wizard performs a readiness check and if it passes, the role can be installed.
Note
In the case of Windows Server 2003, x64 Enterprise Edition SP1, you will need to install a hotfix from KB898790. This upgraded Mountmgr.sys is included in SP2.
|
24. | Click Install.
|
25. | When the setup is completed, click Finish.
|
26. | At the setup interface, click Get Critical Updates for Microsoft Exchange.
|
27. | The Microsoft Update site launches. Click Express to get recommended updates.
|
28. | Click Install Updates if any updates are available.
|
At this point, the installation of the first
node of the Exchange Server 2007 mailbox cluster is complete. Verify
that the Exchange Server 2007 services start correctly and that the
virtual server is seen in the Exchange Management Console. If these
services are started correctly, you can move on to installing the second
node.
Installing Exchange Server 2007 on the Passive Node
With the active node installed and functioning
as an Exchange Server 2007 Mailbox server, you can now install Exchange
Server 2007 on the second node to complete the Single Copy Cluster.
Follow these steps:
1. | Insert the Exchange Server 2007 media in the CD-ROM drive.
|
2. | Run Setup.exe.
|
3. | Following
the Exchange 2007 Installation Wizard, you are prompted to install the
.NET Framework 2.0 and MMC 3.0 on the system. Follow the wizard as
prompted through the installation of the .NET Framework and MMC
components.
|
4. | The
installation then takes you to the Microsoft website. Click Download
when prompted, and then choose Run. The files download and a security
warning appears. Click Run.
|
5. | When the Update Wizard is complete, click Next.
|
6. | After reading and agreeing to the license agreement, click I Agree, and click Next.
|
7. | When the update is completed, click Finish.
|
8. | Return to the setup interface, and click Install Microsoft Command Shell.
|
9. | Click Open when prompted. The files decompress and open a window. Double-click Msh_Setup.msi.
|
10. | When the security warning appears, click Run.
|
11. | When the Command Shell (x64) Setup Wizard appears, click Next.
|
12. | After reading and agreeing to the license agreement, click I Accept the Terms in the License Agreement, and click Next.
|
13. | Accept the default destination folder, and click Next.
|
14. | At the Start Installation screen, click Install.
|
15. | When the wizard completes, click Finish.
|
16. | Return to Setup.exe and click Install Exchange Server 2007.
|
17. | Files copy and the Exchange Server 2007 setup launches. Click Next.
|
18. | After reviewing the license agreement, click to accept the terms, and click Next.
|
19. | Leave the error reporting options set to Yes, and click Next.
|
20. | Choose Custom Exchange Server Installation, and click Next.
|
21. | Under Server Role Selection, choose Passive Clustered Mailbox Role, and click Next.
|
22. | When the readiness checks are complete, click Install.
Note
In the case of Windows Server 2003, x64 Enterprise Edition SP1, you need to install a hotfix from KB898790. This upgraded Mountmgr.sys is included in SP2.
|
23. | When the setup is completed, click Finish.
|
24. | At the setup interface, click Get Critical Updates for Microsoft Exchange.
|
25. | The Microsoft Update site launches. Click Express to get recommended updates.
|
26. | Click Install Updates if any updates are available.
|
The cluster is now ready for use.
The default installation options place the first
storage group and the associated database on the C drive. You should
move these resources to the shared disks to allow correct failover of
the resources.
Administrators who are familiar with clustering
in Exchange 2003 will find that this process is very similar but has the
advantage of not needing to manually create the System Attendant or the
Exchange virtual server.
Special Considerations for SCC
A few items must be taken into consideration
when preparing to use a Single Copy Cluster. The single biggest
challenge for most administrators is the configuration of the storage.
Important things to keep in mind are the distribution of disks and the
methods of connection. For example, if an Exchange Server 2007 cluster
is going to be formed using a shared SCSI enclosure, each node needs a
dedicated controller for this shared storage. Any local disks for the
operating system must use a different controller. A multichannel
controller does not work for this differentiation; the controllers must
be physically different and the controllers for each node must use a
different SCSI ID.
When it comes time to partition out the drives
for the cluster, be sure to provide drives for the quorum, the
Distributed Transaction Coordinator, the logs, and the databases.
If the drives are going to be partitioned on a
SAN, be sure to zone the LUNs and the host bus adapters (HBAs) such that
only the cluster nodes can see the drives; otherwise, you run the risk
of another Windows system writing a signature to the drive and rendering
it unusable by the cluster.
Other Advantages of SCC
Utilizing clustered mailboxes can provide
benefits beyond just the obvious disaster recovery abilities. Having a
clustered mailbox gives the administrator increased flexibility in
dealing with the Mailbox servers.
Imagine a situation in which you need to take
down a Mailbox server to perform maintenance or to perform an upgrade.
Normally, you schedule the outage, let the user population know that
mail will be unavailable during that time, and hope that they get their
work done during that outage window. Meanwhile, processes and users who
are dependent on the mailboxes are unable to perform their normal tasks.
If, on the other hand, you could simply fail the mailbox role over to
the passive node, you could perform the maintenance or upgrade on the
previously active node without interrupting the Exchange services.
Users and applications would still be able to access the mailboxes, and
there wouldn’t be a constraint around when you could do the work.
Another very common
example of this is in the area of patch management. With clustered
mailboxes, an administrator can patch the passive node, fail the
Exchange services over to it, and then patch the remaining node. This
greatly reduces the downtime associated with installing patches on
Exchange Server 2007 servers.
