Quite a bit happens behind the scenes when the Exchange Management Shell is launched.
When the administrator
clicks the Exchange Management Console shortcut to open EMS, Windows
PowerShell V2 is launched, and some Exchange Server-specific scripts are
run. These scripts find the most suitable Exchange Server 2010 server
and attempt to connect to its PowerShell virtual directory in IIS using
WinRM. Assuming the administrator has rights to connect, Exchange Server
then determines which RBAC management roles have been assigned to the
administrator. Finally, it creates an ESM environment that contains all
the Exchange Server management cmdlets that the administrator is allowed
to use.
As noted earlier, all
EMS instances are actually made as remote connections, even if EMS is
opened on a local Exchange server. The previous steps occur every time
EMS is opened.
Note
Simply opening PowerShell
V2 is not the same as the Exchange Management Shell. PowerShell does not
automatically make a remote connection to the Exchange server and does
not include any of the Exchange Server–specific cmdlets, such as Get-Mailbox.
When
the administrator opens EMS the first time, all the Exchange Server
cmdlets available for that RBAC role will be downloaded to the local
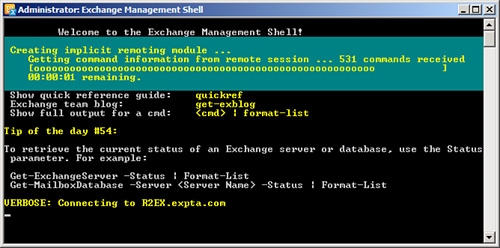
computer. Figure 1
shows EMS connecting to an Exchange Server 2010 server for the first
time and importing the cmdlets to which the administrator has access.

After connecting, the administrator can run EMS and PowerShell cmdlets, as usual.
Note
The PowerShell Get-Command cmdlet is useful to see a list of cmdlets to which the administrator has access.
It is important to
understand that the Exchange Server–specific cmdlets that are downloaded
to the local computer actually run on the Exchange Server 2010 server.
For example, when an administrator with the RecipientAdministrator role
launches EMS from a remote computer, the cmdlets associated with that
role are imported into the remote computer’s EMS environment. When the
administrator runs an Exchange Server 2010 cmdlet, EMS proxies the
command to the Exchange server, on which the command is carried out. The
output from the command is then proxied back to the remote computer for
display or further processing.
When EMS opens a remote
connection to an Exchange Server 2010 server, the connection remains
open until EMS is closed. This is made possible by a managed hosting API
built into PowerShell and is also utilized by the Exchange Management
Console. By keeping the connection open, better performance is achieved
in both EMS and EMC.
Starting EMS from a Non-Exchange Server
To use EMS on a remote
computer, PowerShell V2 and its prerequisites must be installed on the
computer and the Active Directory account must be given remote
administration rights.
EMS relies on remoting,
which is possible using PowerShell V2, WinRM 2.0, and the .NET Framework
2.0, or greater. All these components are available for free download
from the Microsoft
Download Center. PowerShell V2 is installed with the operating system
by default in Windows 7 and Windows Server 2008 R2. It must be
downloaded and installed on Windows XP SP2 or greater, Windows Vista,
and Windows Server 2008.
Note
Windows Server 2008
includes Windows PowerShell as an optional feature that can be
installed after the operating system is installed. This feature is
PowerShell V1, not PowerShell V2 as required by Exchange Server 2010
EMS. You must uninstall the PowerShell feature if it is installed before
installing PowerShell V2 from the Microsoft Download Center.
It doesn’t matter
whether the x86 or x64 version of PowerShell V2 is installed on the
local computer because the EMS commands are actually run on the remote
Exchange Server 2010 server, as described in the previous section.
After PowerShell V2
is installed, you must also configure the PowerShell script execution
policy. By default, Windows PowerShell is set to a secure configuration
that prevents any scripts from running. To allow EMS to run its
connection scripts, you must set the execution policy to run digitally
signed scripts with the following command:
Set-ExecutionPolicy RemoteSigned
Note
Setting the
execution policy writes to the Registry. You might need to run
PowerShell as an Administrator to configure the execution policy.
The Active Directory
account used to install Exchange Server 2010 will be granted remote
management rights in PowerShell by default. To grant this right to
another Active Directory user, the administrator must use the Set-User
cmdlet with the RemotePowerShellEnabled parameter. For example, to grant
this right to a user named Keith Johnson, the administrator enters the
following at the PowerShell prompt:
Set-User 'Keith Johnson' –RemotePowerShellEnabled $True
After these one-time
prerequisites are met, it’s time to run EMS remotely. The Active
Directory user (Keith Johnson, in this example) enters the following
commands at the PowerShell prompt:
$session = New-PSSession -ConfigurationName Microsoft.Exchange -ConnectionUri http://<Exchange2010fqdn>/PowerShell -Authentication Kerberos
Import-PSSession $session
The first line defines the variable $session
to be the remote PowerShell session object on the Exchange Server 2010
server. The second line tells PowerShell to import the remote session
object to this computer. When this second line is executed, PowerShell
makes a remote connection to the specified Exchange server over the
standard HTTP port 80, authenticates using Kerberos, and imports all the
cmdlets that the user has rights to use, based on the RBAC role(s)
assigned to the user in Exchange Server.
It’s important to
understand that EMS will only download the appropriate cmdlets for the
RBAC administration role of the user running EMS. For example, a user
running EMS who is a member of the Records Management security group
gets a small subset of Exchange Server cmdlets to work with. If that
same user runs PowerShell using the Windows RunAs command as a user who
is a member of the Organization Management group, almost all the
Exchange Server cmdlets will be available to work with.
The EMS environment is
dynamic. When the remote Exchange Management Shell is closed, the local
cmdlets are cleared from the environment. That means that another user
running EMS from the same computer will not have access to cmdlets that
he doesn’t have rights to run.
Connecting to Another Exchange Server Organization
Connecting to an Exchange
Server 2010 server in a different Active Directory forest is achieved
basically the same way as previously described. The main difference is
that we cannot use Kerberos for authentication. For this, we must use
explicit credentials. Open a PowerShell prompt and enter the following
command:
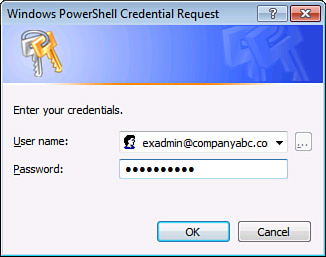
$UserCredential = Get-Credential
This causes PowerShell to invoke the Windows GUI to prompt for a username and password, as shown in Figure 2.

Now we run the
following two PowerShell commands to connect to the remote Exchange
Server 2010 server, authenticate, and create the EMS environment:
$session = New-PSSession -ConfigurationName Microsoft.Exchange -ConnectionUri http://<Exchange2010fqdn>/PowerShell -Authentication $UserCredential
Import-PSSession $session
Notice that the commands are identical to the previous command, except that we are now passing the $UserCredential variable for authentication instead of using Kerberos.
Creating a Shortcut for Remote EMS
Typing the preceding
commands every time you want to run EMS remotely is tedious. The
following procedures explain how to create a PowerShell script that runs
these commands by clicking a shortcut.
First, open a text editor,
such as Notepad, or use the Windows PowerShell Integrated Scripting
Environment (ISE), which is new to PowerShell V2. Then enter the same
commands, as previously entered:
$session = New-PSSession -ConfigurationName Microsoft.Exchange -ConnectionUri http://<Exchange2010fqdn>/PowerShell -Authentication Kerberos
Import-PSSession $session
Save the new file as
EMS.PS1 somewhere on your local computer or a network share, making note
of the path where you saved it. Now create a new shortcut to PowerShell
on the Windows desktop. Rename the new shortcut to Exchange Management Shell. Right-click the shortcut and select Properties. Add the following text to the end of the Target text:
Click OK to save the
shortcut. When you double-click the Exchange Management Console icon on
the desktop, PowerShell opens, launches the EMS.PS1 script, and remains
open after the script executes.