The following keyboard shortcuts have broad usage when applied with layers selected in the Timeline panel:
U toggles all properties with keyframes or expressions applied.
UU
(U twice in quick succession) toggles all properties set to any value
besides the default; or every property in the Timeline panel that has
been edited.
E toggles all applied effects.
EE toggles all applied expressions.
The term “toggle” in the
above list means that not only do these shortcuts reveal the listed
properties, they can also conceal them, or with the Shift
key, they can be used in combination with one another and with many of
the shortcuts detailed earlier (such as the Transform shortcuts A, P, R, S, and T or the Mask shortcuts M, MM, and F). You want all the changes applied to masks and transforms, not effects? UU, then Shift+E. Lose the masks? Shift+M.
The U shortcut is a quick way to find keyframes to edit or to locate a keyframe that you suspect is hiding somewhere. But UU—now that
is a full-on problem-solving tool all by itself. It allows you to
quickly investigate what has been edited on a given layer, is helpful
when troubleshooting your own layer settings, and is nearly priceless
when investigating an unfamiliar project.
Notes
The
term “überkey” apparently plays on Friedrich Nietzsche’s concept of the
“übermensch”—like such an individual, it is a shortcut more powerful and
important than others. |
Highlight all the layers of a composition and press UU
to reveal all edits. Enable Switches, Modes, Parent, and Stretch
columns, and you see everything in a composition, with the exception of
contents of nested compositions, which must be opened (Alt/Opt-double-click) and analyzed individually
locked layers
shy layers (disable them atop the Timeline panel to show all)
composition settings themselves, such as motion blur and frame rate
In other words, this is an effective method to use to understand or troubleshoot a shot.
Dissect a Project
If you’ve been handed an
unfamiliar project and need to make sense of it quickly, there are a
couple of other tools that may help.
Composition Mini-Flowchart,
aka Miniflow (with the Timeline panel, Composition panel, or Layer panel
active, press the Shift key; see Figure 1, bottom) quickly maps any upstream or downstream compositions and allows you to open any of them simply by clicking on one.
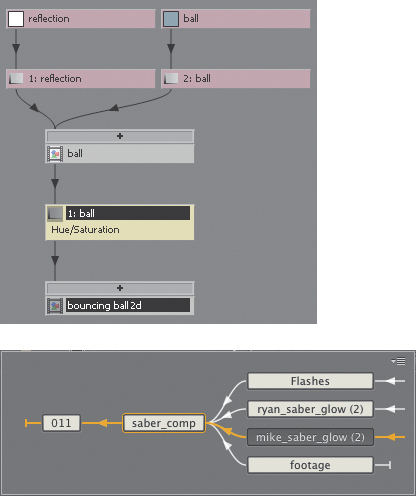
If you’re looking for a whole visual map of the project instead, try Flowchart view (Ctrl+F11/Cmd+F11 or the tree/node icon in the Composition viewer). You have to see it to believe it: a nodal interface in After Effects (Figure 2.11, top), perhaps the least nodal of any of the major compositing applications.
This
view shows how objects (layers, compositions, and effects) are used,
and in what relationship to one another. The + button above a
composition reveals its components; for the cleanest view, toggle layers
and effects off at the lower left. Click the  icon to switch the view to flow left to right, which fits well on a monitor, or Alt-click (Opt-click)
it to clean up the view. You can’t make any edits here, but you can
double-click any item to reveal it where you can edit it—back in the
Timeline panel, of course.
icon to switch the view to flow left to right, which fits well on a monitor, or Alt-click (Opt-click)
it to clean up the view. You can’t make any edits here, but you can
double-click any item to reveal it where you can edit it—back in the
Timeline panel, of course.
Close-up: Nerd-Based Compositing
Flowchart,
the After Effects nodal view, reveals the truth that all compositing
applications are, at their core, nodal in their logic and organization.
However, this particular tree/node view is diagnostic and high-level
only; you can delete but not create a layer. |
Keyframe Navigation and Selection
Although no shortcut can hold a candle to the all-encompassing überkey, there are several other useful essentials:
J and K keys navigate backward and forward, respectively, through all visible keyframes, layer markers, and work area boundaries; hide the properties you don’t want to navigate.
Click Property Name to select all keyframes for a property.
Context-click keyframe > Select Previous Keyframes or Select Following Keyframes to avoid difficult drag selections.
Context-click keyframe > Select Equal Keyframes to hit all keyframes with the same setting.
Alt+Shift+Transform shortcut, or Opt+Shift+Transform shortcut (P, A, S, R, or T), sets a keyframe; no need to click anywhere.
Tip
If
keyframes are “hiding” outside the Timeline panel—you know they’re there
if the keyframe navigation arrows stay highlighted at the beginning or
end—select all of them by clicking the Property Name, Shift-drag a rectangular selection around those you can see, and delete the rest. |
Click
a property stopwatch to set the first keyframe at the current frame (if
no keyframe exists), or delete all existing keyframes.
Ctrl-click (Cmd-click) an effect stopwatch to set a keyframe.
Ctrl+Alt+A (Cmd+Opt+A)
selects all visible keyframes while leaving the source layers, making
it easy to delete them when, say, duplicating a layer but changing its
animation.
Shift+F2 deselects keyframes only.
Read on; you are not a keyframe Jedi—yet.
Keyframe Offsets
To offset the values of multiple keyframes by the same amount in Layer view, select them all, place the current time indicator over a selected keyframe
(that’s important), and drag the setting; all change by the same
increment. If instead you type in a new value, or enter an offset, such
as +20 or +-47, with a numerical value, all keyframes take on the (identical) new value.
Notes
Keyframe multiselection in standard Layer view (but not Graph Editor) is inconsistent with the rest of the application: you Shift-click to add or subtract a single frame from a group. Ctrl-clicking (Cmd-clicking) on a keyframe converts it to Auto-Bezier mode. |
With multiple keyframes selected you can also
Alt+Right Arrow or Alt+Left Arrow (Opt+Right Arrow or Opt+Left Arrow) to nudge keyframes forward or backward in time.
Context-click
> Keyframe Assistant > Time-Reverse Keyframes to run the
animation in reverse without changing the duration and start or end
point of the selected keyframe sequence.
Alt-drag (Opt-drag)
the first or last selected keyframe to scale timing proportionally in
Layer view (or use the transform box in the Graph Editor).
