In Illustrator, the artboard defines the maximum
drawing area that you can print. The artboard is useful as a guide to
where objects on a page belong. The maximum printable size is 227 × 227
inches or 358 square feet (provided that you can find a printer to print
that big). You can define any number of artboards, each can be any
size, and when it comes time to print, you can print them independently
or in any combination.
Commercial printers
print colored artwork using separate plates for each of the primary
colors (typically, they use four plates). An application such as
Illustrator can break down color images into the separations that are used to create these plates. Crop marks
are lines that are printed as an aid to determining where to trim (or
crop) the printed page when the document is printed on oversized paper.
Illustrator's separation setup ignores the artboard and places crop marks around the entire imageable area. The imageable area
is only the area where artwork exists. It may be within the artboard,
but it also may extend onto the pasteboard. When you export an
illustration to another program, such as QuarkXPress or InDesign,
Illustrator uses the artboard as your default bounding box.
1. Choosing the artboard measurement units
You can view a document in
points, picas, inches, centimeters, millimeters, or pixels. The
measurement units affect the numbers on the rulers and the locations of
the hash marks on those same rulers. The measurement system also changes
the way measurements display in the Info panel and in all dialog boxes
where you type a measurement other than a percentage.
You change the measurement system in one of three ways:
Using the Preferences dialog box. Use this method if you want to use all documents that are currently open. To do so, choose Edit (Illustrator) => Preferences => Units & Display Performance.
Press Ctrl+Alt+Shift+U . This cycles through all the available units in your active document.
Using the Document Setup dialog box. Use this method for the currently active document. You open this dialog box by choosing File => Document Setup.
2. Working with the Artboards panel
Choose Window => Artboards to view the Artboards panel, as shown in Figure 1.
Double-clicking the artboard takes you to that artboard in the
document, viewing it at Fit in Window zoom level. Double-clicking the
page icon to its right opens the Artboard Options dialog box for that
artboard.
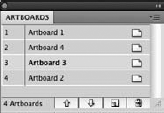
Clicking the New Artboard
icon creates a new artboard at the same size as the currently active
one. The up and down arrows control the artboard number, which is the
order in which the artboards are used for stacking, printing, and when
exporting to PDF. Note that this number can be completely independent of
the name of the artboard.
3. The Artboard tool
The Artboard tool
allows you to change existing artboards and create new artboards. The
Artboard tool is in the lower half of the Tools panel, as shown in Figure 2.
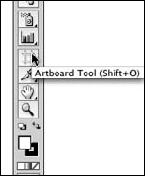
As soon as you select the
Artboard tool, the screen changes, making everything outside the
artboard area darkened and putting a big dashed line around the
Artboard. The Control panel also changes, displaying the options shown
in Figure 3.

From this view of the Control
panel, you can quickly change to preset page sizes (left side) and type
specific dimensions for your existing artboard. You can also quickly
add a new artboard by clicking the New Artboard button.
But what's great about this
tool is that you can now modify an existing artboard or create new ones
with the tool. Just click and drag outside of the existing artboard to
create a new artboard. Click once on any existing artboard to select it
and then grab one of its handles to modify it.
4. Changing the artboard size using the Control panel
Choose the size of the artboard
by selecting one of the following preset sizes in the Size drop-down
list (popup menu) on the left edge of the Control panel, as shown in Figure 4:
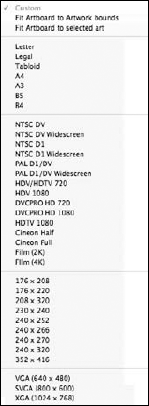
Custom.
Any size you type in the Width and Height fields of the Document Setup
dialog box automatically changes the Size drop-down (popup) to Custom.
Fit Artboard to Artwork bounds. Choosing this option instantly changes the size of the artboard to the size of all the artwork in your document.
Fit Artboard to selected art. Choosing this option instantly changes the size of the artboard to the size of all the artwork you currently have selected.
Letter. 8.5 × 11 inches
Legal. 8.5 × 14 inches
Tabloid. 11 × 17 inches
A4. 8.268 × 11.693 inches (21 × 29.7 centimeters)
A3. 11.693 × 16.535 inches (29.7 × 42 centimeters)
B5. 7.165 × 10 inches (18.2 × 25.4 centimeters)
B4. 10.118 × 14.331 inches (55.7 × 36.4 centimeters)
NOTE
A4, A3, B5, and B4 are paper sizes commonly used outside the United States.
NTSC and so on. The options in this section change the artboard to the size (in pixels) of these video-centric choices.
176 × 208 and so on. Makes your artboard 176 × 208 pixels or the dimension you choose in this section.
VGA and so on. Makes your artboard the appropriate screen size.
4.1. Setting the artboard orientation using the Control panel
You define the
orientation of your artboard by choosing one of the two Orientation
pages. On the left is Portrait orientation, and on the right is
Landscape orientation:
Portrait orientation. You use this when the document is taller than it is wide. You can also think of portrait orientation as the vertical view.
Landscape orientation. You use this when the document is wider than it is tall. You can also think of landscape orientation as the horizontal view.
4.2. The Artboard Options dialog box
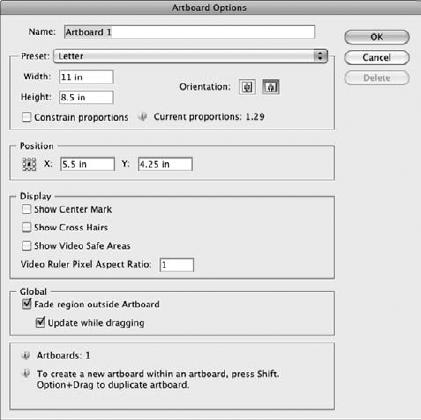
Clicking the Artboard Options button displays the Artboard Options dialog box, as shown in Figure 5.
This dialog box is really useful if you don't have the Control panel
displayed, but I'm sure you do, so the Artboard Options dialog box
becomes much, much less useful. In fact, the only thing you can change
here that you can't change in the Control panel is the Fade option (in
the oddly named Global section). If you have a pre-Intel processor Mac,
you might want to deselect this option with complex documents, but
otherwise, you can safely ignore these options.