Logo
programming4us
programming4us
programming4us
programming4us
Home
programming4us
XP
programming4us
Windows Vista
programming4us
Windows 7
programming4us
Windows Azure
programming4us
Windows Server
programming4us
Windows Phone
 
Windows Vista

Adobe Photoshop CS5 : Working with Layers - Selecting Layers & Creating a Layer Group

- Free product key for windows 10
- Free Product Key for Microsoft office 365
- Malwarebytes Premium 3.7.1 Serial Keys (LifeTime) 2019
3/12/2012 3:37:22 PM

Selecting Layers

Photoshop lets you select multiple layers either in the Layers panel, or directly in the document window, using the Move tool. Say, for example, you want to quickly move two or more layers but you don’t want to spend the time linking, and then unlinking them. You just want to quickly select the layers, and then perform the move. Or, perhaps you want to delete several layers but don’t want to delete them one at a time. The ability to select multiple layers allows you to exert even more control over Photoshop, and that control provides more fuel for your creative energy. A single selected layer is called the active layer.

Select Layers

Open a multi-layered document.

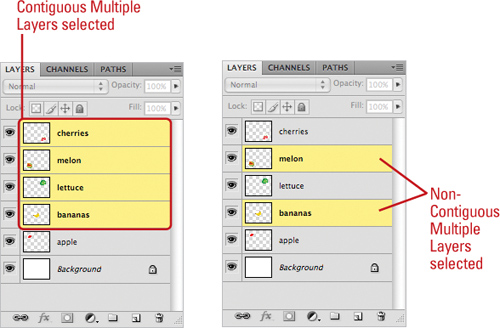
Select multiple layers in the Layers panel using the following options:

  • Contiguous Layers. Click on the first layer, and then Shift+click the last layer to select first, last, and all layers in-between.

  • Non-Contiguous Layers. Click on a layer, hold down the Ctrl (Win)  key, and then click on another layer.

Select layers in the document window using the following options:

  • Single and Multiple Layers. Select the Move tool, choose the Auto-Select Layer or Auto-Select Group in the Options bar, and then click on an object in the document window. The layer holding that object is selected. To add to or subtract layers from the selection, Shift+click (or drag).

Timesaver

Select the Move tool, hold down the Ctrl (Win) key, and then click on an object. Hold down the Shift+Ctrl (Win) , and click on another object to add that object’s layer to the selection.

To deselect all layers, click the Select menu, and then click Deselect Layers.

Creating a Layer Group

Layer groups help to bring organization to large, multi-layered documents. Photoshop layer groups give you control over all the layers within the group at one time. For example, multiple layers within a group can all be hidden or locked with one click of a button. In addition, if you click on the Group name, you can transform or move all the layer objects within the group as one unit. To further help organize your Layers panel, Photoshop lets you create nested groups. Nested groups are groups that are located within other groups. Layer groups can be nested more than five levels deep (New!). When you nest groups, you control all of the groups by clicking on the main group’s name, or you can control the individual groups by selecting the nested group name.

Create a Layer Group or Nested Layer Group

Open a document.

Select the Layers panel.

If the document contains a layer group, click the triangle to expand the group, and then select one of the layers within the group to create a nested group.

Click the Create New Group button on the Layers panel, or press Ctrl+G (Win).

Photoshop creates a layer group.

Timesaver

To quickly create a Layer Group, hold down the Shift key and click the layers you want in the group, click the Layers Options button, and then click New Group from Layers.

To add layers to the group, drag layers from the Layers panel onto the folder icon of the group.

To remove layers from the group, drag them from the group back into the Layers panel.

Other -----------------
- Adobe Photoshop CS5 : Working with Layers - Creating a New Layer
- Configure and Manage Shared Folders : Understand Default Permissions
- Configure and Manage Shared Folders : Create Your Own Shared Folders
- Deploying with Windows DS : Capturing Custom Images & Using Windows DS with BDD 2007
- Deploying with Windows DS : Importing Images & Managing Image Security
- Deploying with Windows DS : Configuring Windows DS & Preparing Discover Images
- Deploying with Windows DS : Installing Windows DS
- Creat a Windows Home Server (part 3) - Configure the Backup Settings & Configure the Windows Home Server Settings
- Creat a Windows Home Server (part 2) - Configure Windows Home Server Settings & Manage Windows Home Server
- Creat a Windows Home Server (part 1) - Run Windows Home Server Setup & Troubleshoot
 
 
Top 10
- Microsoft Visio 2013 : Adding Structure to Your Diagrams - Finding containers and lists in Visio (part 2) - Wireframes,Legends
- Microsoft Visio 2013 : Adding Structure to Your Diagrams - Finding containers and lists in Visio (part 1) - Swimlanes
- Microsoft Visio 2013 : Adding Structure to Your Diagrams - Formatting and sizing lists
- Microsoft Visio 2013 : Adding Structure to Your Diagrams - Adding shapes to lists
- Microsoft Visio 2013 : Adding Structure to Your Diagrams - Sizing containers
- Microsoft Access 2010 : Control Properties and Why to Use Them (part 3) - The Other Properties of a Control
- Microsoft Access 2010 : Control Properties and Why to Use Them (part 2) - The Data Properties of a Control
- Microsoft Access 2010 : Control Properties and Why to Use Them (part 1) - The Format Properties of a Control
- Microsoft Access 2010 : Form Properties and Why Should You Use Them - Working with the Properties Window
- Microsoft Visio 2013 : Using the Organization Chart Wizard with new data
 
programming4us
Windows Vista
programming4us
Windows 7
programming4us
Windows Azure
programming4us
Windows Server