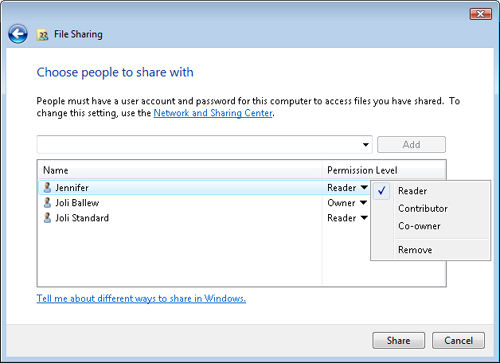
When you create and share a folder, Windows Vista
applies default permissions. The creator and owner of the folder has the
highest-level permission, and people you add later have the lowest. You
can choose from three permission levels: Reader, Contributor, and
Co-Owner, as shown in Figure 1.
Reader
Allows the person or group to view and read the files in a folder but
not modify or delete the files. They can copy data in a file as well as
the file itself. Contributor
Allows the person or group to view the files in the folder, add files,
and change or delete files they add. They have Reader permissions to
files and folders they did not create. Co-Owner Allows the person or group to view, change, add, and delete all files in the shared folder, even ones they did not create.
When sharing a folder using default settings, consider the following:
The owner is the person who creates the file. The owner has full control over the folder and the files in it as do co-owners. Sharing a folder shares everything inside it, including “nested” folders, called subfolders. You can make the folders in a shared folder private by using advanced sharing options, detailed later. Nested
folders, even if made private, can be accessed and modified through the
parent folder, but not if accessed directly through a network share.
Thus, it’s ultimately better to store private data outside any shared
folders. You can hide any folder by typing a $
symbol at the end of the share name during the sharing process. Users
won’t see it or know it exists. However, to access that folder yourself
from another computer on the network, you’ll need to click Start, type Run
in the Start Search box, click Run in the Programs list, and then type
the full path to the folder in the form of
\\computername\hiddensharename.
|
When you share data by
using a Public folder (and turn on file sharing for the Public folder),
anyone with a user account and password on your computer, as well as
everyone on the network, can see all the files in that Public folder and
its subfolders. You cannot let some people view some files in the
Public folder and not view others, and you cannot let some people access
the folder and not let other people. You can, however, decide whether
people can change files or create new ones, but the rules apply to
everyone who can access the data.
Sharing is
different with personal folders. With this type of sharing, you get to
decide everything, including who can make changes to what files, what
kind of changes they can make, and who can access what. You can grant
permissions to groups of people or to an individual (or individuals),
while at the same time completely configuring what each can and cannot
access. You can apply different permissions for everyone. You can’t do
that with Public folder sharing.
Use Public folder sharing if
you want to share files from a single location for ease of management; you want to keep everything you share separate from your personal data; or it’s
okay with you to apply the same permissions for all users of your
network and do not need to apply separate permissions for individuals.
Use personal folder sharing if
you want to share data directly from your personal folders and don’t want to move or copy the data to a Public folder; you
need to apply separate permission for individuals regarding what they
can do once they access your data, or if they can at all; you share large files you don’t want to move or copy; or you frequently change what’s shared.
|
Change Default Permissions
If you gave a user the
Reader permission and have now decided to change that permission, you’ll
need to access the sharing permissions for the folder to make the
change.
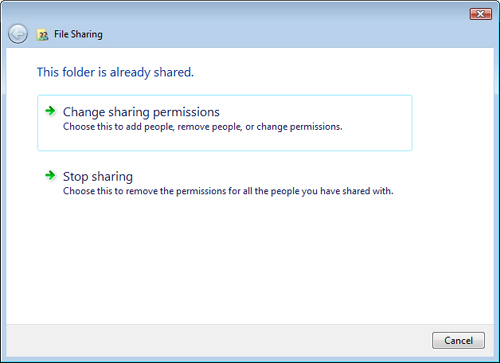
To change a permission already applied to a user for a shared folder, follow these steps:
1. | Right-click the folder you’ve already shared.
| 2. | Click Change Sharing Permissions, as shown in Figure 2.
| 3. | Click the arrow next to the permission to change, and select a new permission in the list.
| 4. | Click Share, as shown in Figure 3.
Note that you can e-mail the links to the shared data or copy the links
onto the Clipboard and paste them into any program. By sharing the
links with others, you can be sure they are aware of the shared data and
where to find it.
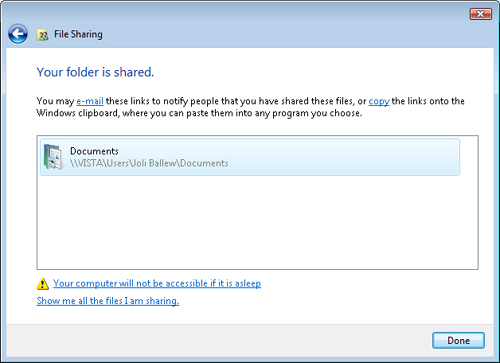
| 5. | Click Done.
|
Caution
Your
user account prevents anyone who is using a standard account on your
computer from seeing your files. It does not prevent other users with
administrator accounts from seeing your files. If there are other
administrator accounts on your computer besides your own, take this into
consideration.
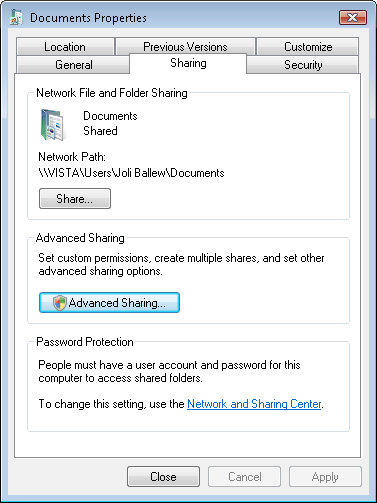
Apply Advanced Sharing
Advanced sharing options
are not available by right-clicking the shared folder and clicking
Share. Instead, you access them by right-clicking the shared folder,
clicking Properties, and selecting the Sharing tab. Figure 4 shows an example. These are often called power user sharing options.
To apply advanced sharing options, follow these steps:
1. | Right-click the shared folder. Click Properties.
| 2. | Click the Sharing tab.
| 3. | Click Advanced Sharing.
| 4. | Click Continue, and in the Advanced Sharing dialog box, select Share This Folder.
| 5. | Choose how many users can have access at the same time. Choose from 1 to 10.
| 6. | Click Permissions.
| 7. | If
desired, click Everyone, and click Remove. By removing everyone from
the group, you can add one individual or one group at a time and
configure them all separately. If you want to apply the permissions to
everyone who has access to the computer, do not click Everyone, and
instead skip to step 9.
| 8. | Click
Add to add a user to the list. Type the user name, and click Check
Names. Continue in this manner until all users have been added. Click
OK.
| 9. | Select a user in the Group Or User Names list, shown in Figure 5.
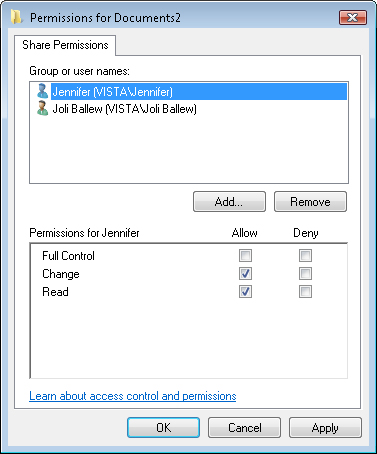
| 10. | Select
the Allow or Deny boxes as desired. Note that if you select Deny for
Full Control, the other two Deny boxes are automatically selected. You
have three choices:
- Full Control Users
have full control over the shared resource, including the ability to see
and read data in it, change existing files and folders, create new
files and folders, and run programs in the folder.
- Change Users can add files to a folder, create folders, change data, and read files.
- Read Users can only read files.
| 11. | Click OK twice, and then click Close.
|
Make a Subfolder Private (Sort of)
The best way to keep
private data private is to keep it out of a shared folder. So, first
things first: If you have private data in a shared folder and it’s
possible to move it out of there, do that now, and then skip to the next
section. If for some reason you must leave data you want to keep
private in a shared folder, your best choice is to hide the folder.
(There are other options, but this is the best option.)
To hide a folder in a
shared folder so others cannot see it on the network or when logged on
to the computer with their own user name and password, follow these
steps:
1. | Right-click the shared folder, and click Properties.
| 2. | On the Sharing tab, click Advanced Sharing. Click Continue.
| 3. | In the Advanced Sharing dialog box, select Share This Folder.
| 4. | Type a share name, and put the $ symbol after it, with no spaces between the file name and the symbol.
| 5. | Click OK and Close. |
|
