Installing Windows Vista
Destination
computers must support booting from the network. Windows DS uses PXE
technology to boot from the network and start the Windows DS client. You
must also ensure that the also ensure that the computer’s BIOS is
configured to boot from the network.
To install Windows Vista from Windows DS
1. | Start or reboot the destination computer.
|
2. | When
the destination computer starts and the Windows DS boot loader prompts
you to press F12, press F12 to download and start the Windows DS client.
Make sure you’ve enabled network boot in the computer’s BIOS.
|
3. | On the Windows Deployment Services page, choose a locale and keyboard layout, and then click Next.
|
4. | When prompted to connect to the Windows DS server, type account and password to use for the connection, and then click OK.
|
5. | On the Select The Operating System You Want To Install page, choose an operating system image, and then click Next.
|
6. | On
the Where Do You Want To Install Windows page, choose a partition on
which to install Windows Vista, and then click Next. To repartition the
disk using advanced options, click Drive Options (Advanced).
|
7. | Windows
Setup will install Windows Vista, prompting for required settings that
are not specified in an unattended-setup answer file. |
Capturing Custom Images
Windows DS can deploy
more than just default images from the Windows Vista media. You can
create custom boot images and install images, and then import them into
Windows DS for automated distribution.
To create a
custom installation image for Windows DS, you must first install an
existing image on a destination computer, customize it, and then capture
the destination computer. Image capture is a two-step process. First,
you must create a Windows PE capture image to support for the
image-capture process. Then you capture an image from a system that has
been prepared for imaging using the Sysprep utility.
To create an image-capture image
1. | Click the Boot Images item in the Windows DS console tree.
Right-click the image to use as a capture image, and then click Create Capture Boot Image.
|
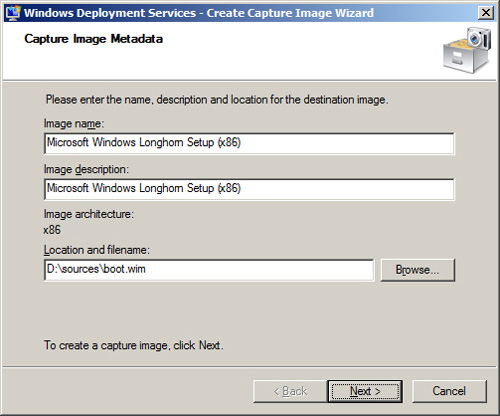
2. | On
the Capture Image Metadata page, type a name and description for the
capture image, and then specify the location and file name of the image
file to create. Click Next to create the capture image.
|
3. | |
4. | Import the custom capture boot image .
|
To create a custom Windows Vista install image
1. | Create
a master installation by installing a Windows Vista image and then
customizing the installation to meet your requirements. You can install
Windows Vista on your master computer either from media or using Windows
DS.
|
2. | From a command prompt on the master computer, change directories to \Windows\System32\Sysprep and run the following command:
sysprep /oobe /generalize /reboot
|
3. | When
the reference computer reboots and the Windows DS boot loader prompts
you to press F12, press F12 to download and start the Windows DS client.
Make sure you’ve enabled network boot in the computer’s BIOS.
|
4. | In Windows Boot Manager, select the capture boot image.
|
5. | On the Windows Deployment Wizard Image Capture Wizard, click Next.
|
6. | On
the Image Capture Source page, choose the volume to capture from the
Volume To Capture list, and then provide a name and description for the
image. Click Next to continue.
|
7. | On
the Image Capture Destination page, click Browse to choose the location
where you want to store the captured image. In the File Name text box,
type a name for the image using the .wim file name extension and then
click Save. Click Upload Image To WDS Server, and then type the name of
the WDS server and click Connect. If prompted for credentials, provide a
user name and password for an account with sufficient privileges to
connect to the WDS server. Choose the image group in which to store the
image from the Image Group list.
|
8. | Click Finish. |
Using Windows DS with BDD 2007
For LTI, BDD 2007 generates
Windows PE boot images that connect to the deployment point and starts
the Windows Deployment Wizard. The Windows Deployment Wizard allows the
user to select an operating build to configure, applications to install,
and so on.
BDD 2007 generates boot
images when you update deployment points. BDD 2007 generates .iso image
files that you can burn to DVD. You then use the DVD to start
destination computers. BDD 2007 also generates Windows PE .wim boot
images that you can add to Windows DS. Starting the BDD 2007 Windows PE
boot images by using Windows DS is more convenient and
quicker than using DVDs. You find these boot images in the BDD 2007
distribution share under the Boot folder.
BDD 2007 can also use
Windows Vista installation images from Windows DS. By doing so, you can
use installation sources that already exist in a Windows DS server
without duplicating the files in a BDD 2007 distribution share. This
requires that you copy Wdsclientapi.dll, Wdscsl.dll, and Wdsimage.dll
from the Sources folder of the Windows Vista media to the folder
C:\Program Files\BDD 2007\bin. It also requires that at least one
Windows Vista source exists within the distribution share and that you
create and update a lab deployment point. BDD 2007 uses the setup
program files from distribution share to install the Windows Vista image
from the Windows DS server.
To add images from Windows DS to a BDD 2007 distribution share
1. | Add a full set of Windows Vista source files to the BDD 2007 distribution share.
|
2. | Copy the following files from the Sources folder of the Windows Vista media to the folder C:\Program Files\BDD 2007\bin:
Wdsclientapi.dll Wdscsl.dll Wdsimage.dll
|
3. | In
the BDD 2007 Deployment Workbench console tree, right-click Operating
Systems under Distribution Share, and then click New to start the New OS
Wizard.
|
4. | On
the Choose The Type Of Operating System To Add page, select Windows
Deployment Services Images, and then click Next to add an image from a
Windows DS server to the distribution share.
|
5. | On
the Select The Windows Deployment Services Server page, type the name
of the Windows DS server from which to add the operating system images,
and then click Next.
|
6. | Deployment Workbench adds all of the installation images it finds in Windows DS to Operating Systems.
|
