Understanding the Layers Panel
With
the Layers panel, you can control elements of a Photoshop design by
assigning separate layers to each individual object. In addition, Layer
effects control the application of everything from drop shadows to
gradient overlays, and adjustment layers let you control color overlays
and image corrections. To access the Layers panel, select the Layers
panel or, if the Layers panel is not visible, click the Window menu, and
then click Layers.
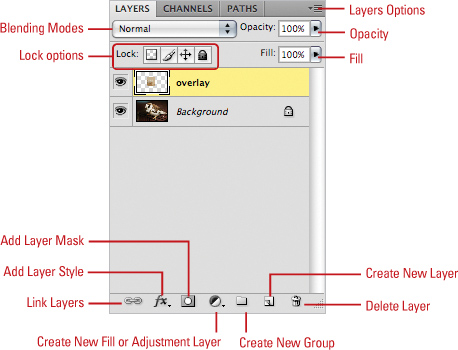
Blending Modes. Select this option to change how two or more layers interact or “blend” together.
Opacity. Select a value from 0% to 100% to change the opacity of the selected layers (New!).
Fill.
Select a value from 0% to 100% to change the opacity of the active
layer without changing the opacity of any applied layer styles.
Lock options. Click the Lock Transparent Pixels, Lock Image Pixels, Lock Position, or Lock All button.
Link Layers. Hold down the Shift key and click to select two or more layers, and then click this button to link the layers.
Add Layer Style. Click this button, and then select from the available layer styles.
Add Layer Mask. Click this button to apply a layer mask to the active layer. Click this a second time to add a vector mask to the active layer.
Create New Fill or Adjustment Layer. Click this button, and then select from the available fill or adjustment layers.
Create New Group. Click this button to create a new group. A group is a folder where you can drag, store, and organize layers.
Create New Layer. Click this button to create a new layer in the active document.
Delete Layer. Click this button to delete the active layer.
Layers Options. Click this button to access a menu of layer-specific commands.
Defining Layer Designations and Attributes
Not
only does Photoshop give you the ability to generate layers, it allows
you to generate layers with different designations. The designation
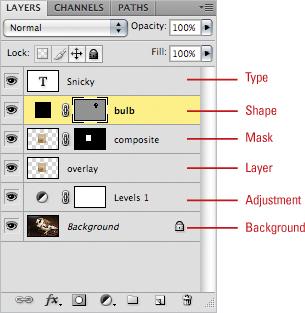
of a layer determines the type of information the layer contains. For
example, a type layer holds editable text, and a mask layer holds image
masks. The ability to control the designation of a layer helps to
organize the different elements that typically make up a Photoshop
image.
Background.
The Background is a unique type of layer element (technically, it’s not
called the Background layer, just the Background). Backgrounds are
always positioned at the bottom of the layer stack and they cannot be
moved. In addition, the Background does not support transparency.
Layer.
Clicking the Create New Layer button creates Photoshop layers. New
layers are always inserted directly above the active layer. All of
Photoshop’s drawing and shape tools, as well as opacity and fill and
blending mode options, are available to use on layers created with this
method, except for type. These “traditional” layers can be moved up and
down in the layer stack by dragging them where you want them.
Type.
To create a Type layer, select one of Photoshop’s Type tools, click in
the active document and begin typing. Photoshop automatically creates
the Type layer directly above the active layer in the Layers panel.
Mask.
Masks are applied to a layer by clicking the Add Layer Mask button on
the Layers panel. Masks serve a function; they create transparent areas
in the visible image. Use masks to remove elements of an image without
physically erasing them.
Shape.
Shape layers control vector data by the use of a vector mask. You can
create a shape layer in one of several ways: select the Pen tool from
the toolbox, click the Shape Layer button (located on the Options bar)
and begin drawing, or select any of Photoshop’s shape tools using the
Shape layer option.
Adjustment.
Adjustment layers let you control everything from contrast to color. To
create an Adjustment layer, click the Create New Fill or Adjustment
Layer button, and then select from the available options. The adjustment
layer is placed directly above the active layer and controls the
information in all the underlying layers. You can also choose from one
of the 15 icons in the Adjustments panel.
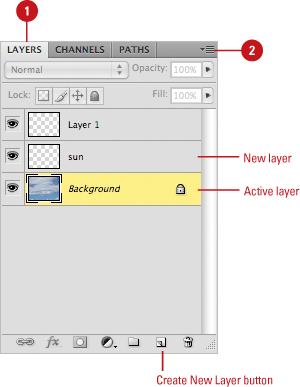
Creating a New Layer
Layers
give you control over the design elements of your document, so Adobe
Photoshop makes sure you have plenty of layers available to you (up to
8,000). While that may be more layers than you would ever use in a
single document, that flexibility guarantees that you have the creative
options to carry your designs to any level you desire. To create a new
layer, you must first have an open document. A new image in Photoshop
has a single layer. If you have more than one document open, make sure
the active image is the one to which you want to add a layer. You can
quickly add a layer using a menu or button, or add a layer and select
options using a dialog box. You can select options to name the layer,
designate it as a clipping group, or even change its color Blending
mode, and Opacity. If you want to add the contents of a file to a
document as a new layer, you can drag it directly from the Finder (Mac)
or Windows Explorer (Win) to the active document in Photoshop (New!).
Add Layers to an Active Document
 Select the Layers panel.
|
 Click the Layers Options button, and then click New Layer.
Timesaver
Click the Create New Layer button on the Layers panel to quickly add a layer.
Did You Know?
You can drag and drop a file to create a new layer. Drag a file from the Finder (Mac) or Windows Explorer (Win) onto an open Photoshop document (New!).
You can move a layer in the stacking order.
Press the Ctrl (Win) , and then use the Left/Right Bracket keys ([ ]). The Left
Bracket key moves the layer down and the Right Bracket moves the layer
up.
You can hide all layers except the clipping mask layer and the layer to which it is clipped.
Press the Alt (Win) or Option (Mac) key, and then click the layer’s visibility icon.
|
Add Layers and Select Options
When you create a new blank
layer in Photoshop, the size of the file does not increase. It’s only
when you begin painting, or adding information to the layer that the
size of the Photoshop document will begin to grow. For example, creating
a blank layer in a document with a file size of 10 MB does nothing to
increase the size of the file. However, opening a 10 MB file, and
creating a copy of the original document layer, will create a file size
of 20 MB. Layers are great creative tools, but you only want to use them
when you need them. Remember, performance is directly related to the
size of the active document file, and the bigger the file size, the
slower Photoshop performs.
