1. Setting Up a New Document
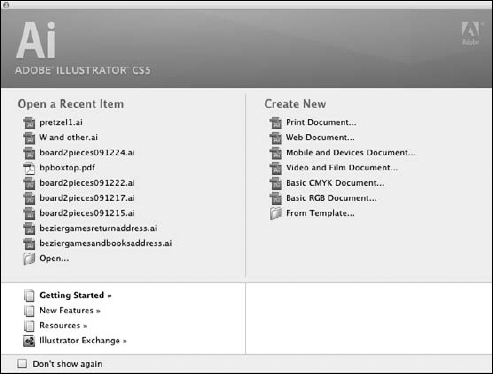
When you first load Illustrator, you see the Illustrator Welcome Screen, as shown in Figure 1,
which allows you to choose to create a new document from scratch or
from an existing Illustrator template. Alternatively, you can choose to
open an existing document so that you can do some additional work with
that document.
NOTE
The Illustrator
Welcome Screen lists recently opened files, allowing you to open them
directly with a single click on the name of the file and also allowing
new documents to be quickly created from the list of document profiles
on the right.
If you have Illustrator
already up and running without the Welcome Screen showing, you can
create a new document by choosing File => New or by pressing Ctrl+N . This new document now becomes the active document. An active document means that the document is in front of any other documents.
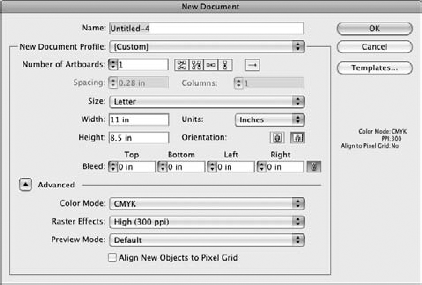
The New Document dialog box, as shown in Figure 2, offers several settings you can set before you start working on a new document:
Name. You can type a name for your new document.
New Document Profile. This is a named set of all the settings in this box. By choosing a different named set, all the values below will update.
Number of Artboards.
The first field lets you set how many artboards will appear initially
when you create your document. The buttons to the right of this field
control how the artboards are positioned relative to each other.
Size. This allows you to choose standard preset dimensions, such as Letter or Legal, for your document.
Width and Height. Instead of selecting a preset size, you can specify exact dimensions in the Width and Height text fields.
Units.
You can select the units you prefer to work in. Most artists choose
points, but some prefer working in picas, inches, millimeters,
centimeters, or pixels.
Orientation.
You can choose the orientation of the page. The orientation options are
portrait (meant to be viewed vertically) and landscape (meant to be
viewed horizontally).
Bleed. This controls the bleed settings for the document (how far outside the edges of the defined document artwork will print).
Color Mode. You can choose from the CMYK and RGB color modes.
Raster Effects.
This is the resolution that raster-based effects (like drop shadows)
will use. Print documents should have at least 150 (although 300 is
preferred), while Web-based documents should use 72.
Preview Mode.
You can choose to automatically preview your document in Pixel Preview
mode (showing pixels at 100% or closer) or Overprint Preview mode
(showing the results of objects set to Overprint).
Align New Objects to Pixel Grid. If you select this option, all objects will be automatically aligned to the pixel grid, reducing jaggies and blurries.
The document window
initially appears at Fit in Window size. In the title bar at the top of
the window, you see Untitled-1 (or another number, depending on how many
new documents you have started during this particular session of
Illustrator) and the percentage zoom the document is displayed at. As
soon as you save the document, the title bar contains the name of the
document.
You can't change the way
that some of the panels or presets appear when you first start
Illustrator. For example, the Selection tool is always selected in the
Tools panel. Another unchangeable item is the initial paint style with
which you begin drawing: a fill of White and a stroke of 1-point Black.
The character attributes are always the same: 12-point Myriad Roman,
auto leading, flush-left alignment.
2. Modifying the Setup of a Document
After you create a document, choose File => Document Setup to display the Document Setup dialog box (shown in Figure 3). Here you can change almost anything about the document structure and how you work with that document.
At the top of this dialog
box is a list box (a popup menu on the Mac) that includes sections of
options for Bleed and View, Transparency, and Type.
NOTE
Document Setup no
longer contains Artboard options. Instead, you need to either click
Edit Artboards in the Document Setup dialog box or select the Artboard
tool from the Tools panel.
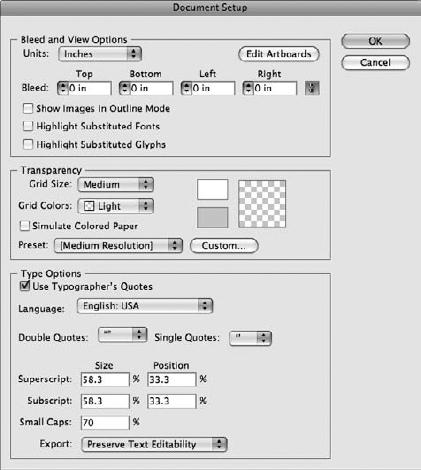
2.1. Adjusting the Bleed and View Options
At the top of the Document
Setup dialog box is a section called Bleed and View Options, although
it could just as easily have been called miscellaneous options we didn't
know where else to put. This section contains the following settings:
Units.
This sets the unit of measurement for this document. All basic
measurements that are displayed in Illustrator use this setting for the
current document.
Edit Artboards.
This button is a little unusual. It simulates choosing the Artboard
tool. It's most likely here for those of us who instinctively press
Ctrl+Alt+N +Option+N) to change the Artboard size and then remember that the Artboard options aren't here anymore.
NOTE
To quickly access the
Artboard tool (and thus the Control panel options to let you quickly
change the page), press Shift+O, which selects the Artboard tool and
throws you instantly into Artboard mode so you can access the Control
panel.
Bleed.
This sets the amount of outside gutter around the edge of the printed
page (or PDF) that appears. It's useful for projects where backgrounds
and artwork extend off the edges of the page.
Show Images In Outline Mode.
Instead of seeing the glorious detail in your placed images, selecting
this option puts a very neat late-1980s box frame in its place, as shown
in Figure 4.
Highlight Substituted Fonts. When a font isn't available, Illustrator substitutes another font for it. This highlights those substituted fonts.
Highlight Substituted Glyphs.
When a glyph isn't available, Illustrator substitutes another character
or a space for it. Selecting this option highlights those temporarily
changed characters.
2.2. Working with Transparency options
Transparency options refer to
making a transparent background screen. Many users like to use a
transparent grid to see the opacity of their objects. On a white
background, the opacity isn't easy to see. Just as in Photoshop, you can
see a checkered grid that shows the opacity of the objects in front.
The Flattener settings let you pick a resolution for the object when you
change it to a rasterized (pixel) object when it's flattened — that is,
converted into a single layer with all overlapping objects combined.
The Transparency options are also found in the Document Setup dialog
box.
Grid Size. This list box (popup menu) lets you can change your grid size to small, medium, or large.
Grid Colors. You can customize your own grid colors.
Simulate Colored Paper. Selecting this check box makes the Artboard color match the darker of the two grid colors you've chosen.
Preset. Select a preset (high, medium, or low resolution) from the Preset list box (popup menu) or choose a Custom setting.
2.3. Changing Type Options
In the Document Setup dialog box, you can also change these Type Options:
Use Typographer's Quotes. Select this option to use smart (curved) quotes rather than the dumb (straight) ones.
Language.
Choose a desired language from the menu. You can choose from a variety
of languages, including English, French, and Finnish, but you must have
the language set up on your system to be able to use that language.
Double Quotes.
Choose the style from the drop-down list (popup menu). You have a
variety of quotes to choose from. Some users like the curved quotes
rather than the straight ones.
Single Quotes. Choose the style from the drop-down list (popup menu). The choices of single quotes are the same as the double quotes.
Superscript, Subscript, and Small Caps. Choose the Size and Position for Superscripts, Subscripts, and Small Caps as a percentage of the original size.
Export.
In this list box (popup menu), choose from Preserve Text Editability
and Preserve Text Appearance. In this case, you either choose to be able
to edit the text (but it may not look like you intended) or let the
text look like it should (but make it so you can't edit it).
