Windows Vista includes an updated implementation of
Microsoft's remote management infrastructure: Windows Remote Management
(WinRM). The Vista Event Log uses WinRM along with the Windows Event
Collector service as the engines for collecting events from remote
machines and sending them to a central event collector system. This
feature makes it very easy to troubleshoot problems or otherwise be
aware of the type of events that occur on multiple systems because you
only need to look at the collector system to review all events.
WinRM relies on WS-Management or Web Services
Management, which is a special protocol that integrates a series of
operations within a Web services architecture. This architecture is an
industry standard that allows organizations to perform management
operations over commonly used TCP/IP protocols such as the HyperText
Transfer Protocol (HTTP) or secure HTTP (HTTPS). The advantage of
WS-Management is that the common protocols on which it relies are often
open in firewalls for other purposes. Therefore, you can manage remote
systems without turning your firewall into Swiss cheese. This Vista
feature is very valuable.
Several tasks must be completed to prepare systems for event collection:
Each system that will forward events must be running one service: WinRM.
Each
system that will receive events must be running two services: WinRM and
the Windows Event Collector. These services are set to manual by
default.
WinRM must be configured on both the forwarding computers and the collector computer.
The Windows Event Collector service must be configured on the collector system.
Access rights must be granted to the collector system on each of the forwarding computers.
Then, after each of the above steps is performed, you can move to the creation of an event subscription.
Of course, elevated rights are required to
perform the operation. Remember that because of User Account Control
(UAC), all users, even administrative users, run with a standard user
token. Therefore, you must make sure you use elevated rights when
running these commands.
If you are working with machines that are part of an Active Directory (AD), then use the following procedure:
Log on to the source computer or the computer that will forward events.
Right-click
on the Command Prompt and select Run as Administrator. Provide
appropriate credentials, usually domain credentials that have local
administrative privileges.
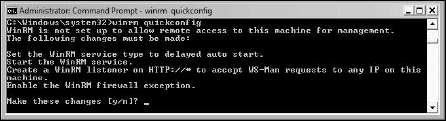
Using the newly elevated command prompt, type the following command:
winrm quickconfig
Then, press the Y key followed with Enter to make the changes.
This command sets up the source system to accept
WS-Management requests from other computers. In fact, this will set the
WinRM service to delayed autostart, start the service, create a WinRM
listener on HTTP, and enable WinRM exceptions in the Windows Firewall as
shown in Figure 1.
Next, you need to add the collector computer's
account to the local Administrator's group. There are two ways to do
this. Either add the collector computer account by itself to the
Administrator's group or create a new group in AD, add the computer
account to this group, and then add this group to the local
Administrator's account. The second method is the preferred method since
it will allow you to add more collector systems in the long run simply
by adding them to the group in AD. Here's how:
Open
AD Users & Computers with a Run as Administrator command and apply
the appropriate credentials for administrative rights in AD.
Locate the appropriate organizational unit (OU) and if one is not available, create one. This OU should be designed to contain computer groups.
Create a new security group. Name it Event Collection Systems.
Add the computer account of the collection system to this group.
Use
Computer Management, under Local Users & Groups to add the Event
Collection Systems group to the local Administrator's group.
Repeat Steps 1 to 4 on each source system.
Move to the collection system. Repeat the WinRM command used in Step 3. Doing this allows you to control bandwidth usage or latency of the event forwarding process.
Next, using the same elevated command prompt, run the following command:
wecutil qc
Press Y followed with Enter to make the changes. This configures the Windows Event Collector service to delayed autostart and start the service.
Now you're ready to prepare your first subscription.
Open the Event Viewer by using Run as Administrator and provide the proper credentials.
Go to the Subscriptions item in the Tree pane.
Right-click on the Subscriptions item to choose Create Subscription You can also use the command in the Action pane.
Name your collection and provide a description.
Identify the destination log. By default, all collected events go to the ForwardedEvents log.
Click
the Add button to select computers from AD. Add all the computers you
want to collect events from. You can also use the Test button to verify
that communication works between the forwarders and the collector.
Click Select Events to identify which events to collect. This step launches the Query Filter dialog box. Set the options to collect the events you need or use an existing filter.
Click the Advanced button. This step opens the Advanced Subscriptions Settings dialog box. This dialog box allows you to control three settings:
The account used for collection: Leave this as is since the machine account is often best to use.
Event
Delivery Optimization lets you either control bandwidth used or
increase the bandwidth used to ensure prompt delivery of the events:
The Normal mode is a pull mode — the collector pulls events from
forwarders. The other two modes are push modes — the events are pushed
from the forwarders or source systems to the collector. If latency is
not an issue, then select Minimize Bandwidth.
The protocol to use — HTTP or HTTPS:
If events are forwarded in your network, then HTTP is probably fine,
but if events have to go over open connections or if they contain
sensitive data, then use HTTPS. This will encrypt all data between
forwarders and collectors, but additional configuration will be
required.
Click OK when done to finish the preparation of the collection. If they exist on the source computers, selected events will begin accumulating almost immediately.
If you choose to configure HTTPS as the transport
protocol, you will need to enable port 443 in the Windows Firewall.
Pull or Normal subscriptions only need this setting on the source
computers. Push subscriptions need this port enabled on both forwarders
and collectors.
If you do not have an Active Directory and are
working in a workgroup, you need to be aware of some limitations and
special configuration requirements.
Workgroup subscriptions only work in pull or normal mode.
Windows Firewall exceptions for Remote Event Log Management must be enabled on each system.
Because
computer accounts do not trust each other in workgroups, you must
create a special account on each system. Use the same account name and
password on each system.
You must also tell the collector system to trust each source computer. Once again, this is done through the WinRM command.
There you have it. Central event management
through Windows Vista. You can now track the changes you manage through
Group Policy.
