3. Working with GPO tools
GPOs are managed through a series of different
tools. You've already had a look at the Local Security Policy console
and you've created a custom console for the management of multiple LSPs.
Each of these tools gave you a foretaste of central GPO management.
Now, you can access the best GPO management tools.
NOTE
You must run the GPMC from a Vista computer
if you want to control all of the settings that apply to Vista. You can
also rely on the GPMC found in Windows Server 2008, but it is rare that
organizations rely on servers to manage GPOs.
The first tool is the Group Policy Management
Console (GPMC). Prior to Service Pack 1, the GPMC was located on every
Vista system in your network. It did not however have an available
shortcut, even in Administrative Tools. To start the GPMC, you needed to
type GPMC.MSC in the Search box
under the Start Menu and press Enter. Doing so launches a UAC prompt.
Accept the prompt to open the console. Remember that you must use a
domain account to do so.
In Vista SP1, you must download and install the
GPMC separately because Service Pack 1 removes the GPMC from Vista PCs
when it is applied. You must then install the Remote Server
Administration Tools (RSAT) update to get access to this console once
more.
As shown in Figure 8,
the GPMC is divided into several different sections. By default, the
GPMC opens with the current AD forest selected. To view its contents,
you must expand the forest in the Tree pane. After it is expanded, the
GPMC Tree pane lists the following items:
Domains: They contain normal domain contents.
OUs: The main structure you use to apply GPOs.
Group Policy Objects: The container for all GPOs.
WMI filters:
The container that includes filters you can assign to GPOs based on
Windows Management Instrumentation queries or queries that let you
identify systems based on specific selection criteria. Criteria can
include available disk space, model type, manufacturer name, and any
other object you can use to identify systems.
Sites: The container that lists all of the sites in your AD structure.
Group Policy Modeling: Allows you to perform "what if" scenarios with GPOs to help determine how systems or users would be affected by GPO changes.
Group Policy Results:
Lets you view Resultant Set of Policy (RSoP) results on a specific
object. This tool is very valuable when you try to determine why systems
are not behaving as you would expect.
In addition to the listed items, the GPMC
includes GPO Links. Links are differentiated from actual GPOs by their
icon. The link icon includes a small arrow to show that it is a shortcut
to the actual GPO. All actual GPOs are stored in the GPO container and
cannot be removed from this container. To apply a GPO to a given object,
you need to link it to that object. Both links and GPOs will contain
properties, but these properties will differ between the two. For
example, the Enforced attribute is not actually applied to a GPO, it is
applied to a GPO Link. You can however edit a GPO's content and
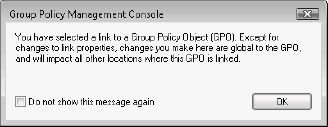
properties by editing a link. The GPMC will alert you that you are
working with a link instead of the actual GPO as shown in Figure 9.
Do not check the Do not show this message again if you want to know
each time you are working with a link instead of a GPO option.
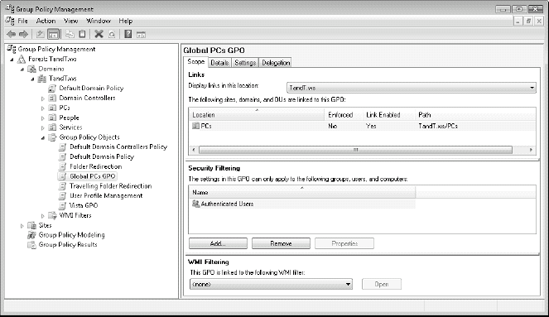
The items in the Details pane vary with the
objects you select in the Tree pane, but when a GPO or a GPO Link is
selected, the GPMC will list four tabs in the Details pane. These tabs
outline various details for each GPO. Scope will outline how the GPO is
applied. It lists where the GPO is linked, which Security Filter is
applied and which WMI Filter is applied. By default, all GPOs are
filtered to Authenticated Users, a special group that includes both user
and computer accounts, and do not include any WMI Filter. You can
control the application of a GPO by modifying the group to which it
applies under Security Filtering. For example, if you wanted a GPO to
apply only to the Finance Users group, you would modify its Security
Filtering by removing Authenticated Users and adding a security group
named Finance Users.
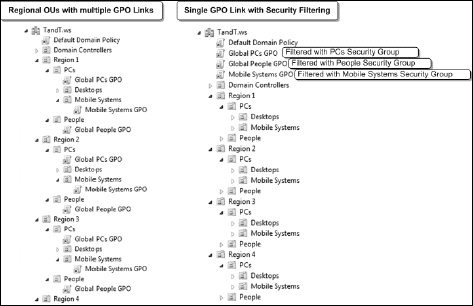
Security filtering is also useful when you do
not want to create multiple links for a GPO. For example, in an
organization with multiple regional sites, you might create an OU for
each region and create the corresponding PCs and People structures
inside each Regional OU. When it comes to linking GPOs to this OU
structure you have two choices. First, you can choose to link the GPO to
each appropriate OU, creating as many links as required and having to
manage all of these links. Second, you can create a security group that
regroups all objects of one type — PCs, Desktops, Mobile Systems, and
People — and then link the appropriate GPO to the entire domain so that
all objects are affected, but filter this GPO with the appropriate
security group. Only the members in this group will have access to the
contents of the GPO, all others will ignore it. The difference between
both strategies is shown in Figure 10. Ideally, you will create a central OU structure and limit the use of Security Filtering or the creation of multiple GPO links.
The second tab of the Details pane of the GPMC,
Details, lists the name of the GPO, its owner, when it was created and
modified, its version, unique ID, and status. The Settings tab lists the
settings that have been enabled in the GPO. The Delegation tab lets you
view who can control this GPO. For example, PC-related GPOs should be
delegated to PC administrators.
The GPMC offers several GPO management features:
You can create and link GPOs.
You can backup, restore, and otherwise protect GPOs.
You can create OUs to better manage GPO application, but you cannot control the contents of the OU.
You can create WMI Filters and apply them to GPOs.
You can view AD sites and assign GPOs to them, but you cannot create new sites.
You can perform "what if" GPO modeling.
You can troubleshoot GPO settings by performing Resultant Set of Policy analyses.
You can generate reports on your GPOs.
You can import settings from GPO templates into GPOs.
You can migrate GPOs from one domain to another.
You can link to other domains or forests in your network.
You can delegate portions of the console to other groups so that they can manage GPO contents and/or application.
Overall, this tool provides powerful GPO management features.
Creating a Group Policy Object
The creation process for GPOs is relatively simple:
Right-click the Group Policy Objects container and select New.
In
the New dialog box, name the GPO with a clear name outlining its
purpose and click OK. At this point, the GPO is created inside the GPO
container, but it does not include any modified settings and it is not
applied to any object.
Now
that the GPO is created, right-click on it and select Edit. Doing this
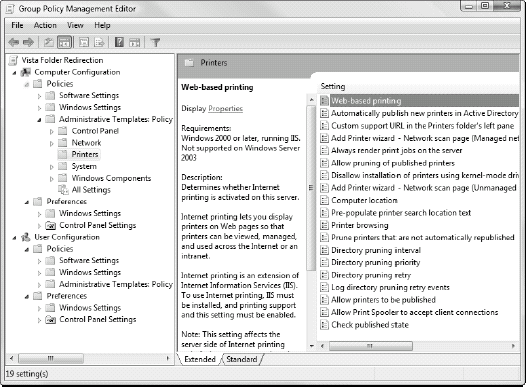
opens another GPO management tool, the Group Policy Editor (GPEdit).
GPEdit lets you view all of the settings you can control in the policy
as shown in Figure 11.
As mentioned before, each policy is divided into two sections: computer
settings and user settings. GPEdit is a live editing tool. There is no
save feature. Each time you make a change, you've modified the GPO. This
is one more reason why you need to be careful when working with GPOs.
To
make modifications, navigate to the portion you want to modify through
the Tree pane, move to the setting you want to control in the Details
pane, and double-click on it. Choose the setting you want in the dialog
box and click OK.
When
a section includes multiple settings, you can simply move from one to
the next by using the Next Setting button. This automatically makes your
modification and moves to the next setting. Also note that each time
you select a setting, its description will be displayed in the Details
pane.
When
you have completed your modifications, close GPEdit and return to the
GPMC. Review the changed settings by clicking on the policy name in the
GPO container, then moving to the Settings tab in the Details pane. Make
sure that all of the settings you wanted to modify have been updated
before proceeding. If something is amiss, then launch GPEdit again.
Now,
you're ready to apply the GPO. To do this, you need to link it to a
container. Drag and drop the GPO to a destination container, whether it
is a site, a domain, or an OU. Make sure that the destination for the
link exists before you try to link it. When you link the GPO, GPMC will
ask if you are sure; click OK to continue and generate the link.
NOTE
GPOs are not "live," that is, they do not
affect any objects until they are linked to a destination container.
This means you can create GPOs in the Group Policy Objects container in
the GPMC, edit them as much as you need, and when you feel you have them
right, link them to their final destination. This provides a form of
change control over the GPOs you create.
Now
that the GPO is linked, you can modify the link properties. Possible
changes include applying the Enforced attribute, disabling Computer or
User sections of the GPO, and so on. For example, you should disable the
User section if the GPO is targeted at PCs and vice versa when it is
targeted at users.
Review
the container's properties. Remember that containers such as OUs can
also include attributes that affect GPOs. For example, you might need to
apply the Block Inheritance attribute to the OU. Blocking inheritance
is useful when you want to store objects in your container and you want
to give them different settings than those that are set globally.
NOTE
Use the Enforced and Block Inheritance attributes sparingly because they can greatly complicate your GPO management efforts.
That's it. Simple, isn't it? Yet, GPOs provide
one of the most powerful management capabilities in Windows. Take the
time to explore the various settings that are available in each GPO.
Make sure that you use a Vista PC to run the GPEdit tool, otherwise you
will not have access to all of Vista's GPO settings.
It is easily possible to apply any number of
GPOs to objects. It is also easy to become confused with GPOs. The
organizational unit structure has a direct impact on how GPOs are
applied. Rely on it to keep your GPO application structure straight.
Also, backup each of the GPOs you create each
time you create or modify a GPO. Store the backups in a safe place.
You'll need to rely on them to restore your policies in the event of a
system breakdown.
Working with Windows Server 2008 Group Policies
In Windows Server 2008, Microsoft has added even
more functionality to Group Policy. In addition to the standard
division between computers and users, each section of a Group Policy
Object now includes two subsections as shown in Figure 12.
The first, Policy, contains the actual policy contents. This changes
the path to all policy settings. For example, in previous versions of
Windows, the path to Software Settings was Computer
Configuration\Software Settings. In Windows Server 2008, the path is now
Computer Configuration\Policy\Software Settings.
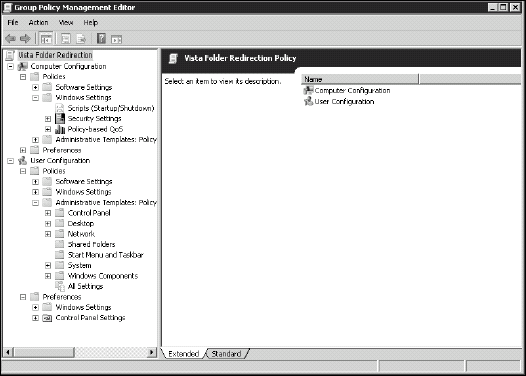
The reason for the change is the new second
section of GPOs: Preferences. This section now controls specific
client-side settings and can be used to reduce post-installation
configuration tasks. Preferences includes two subsections: Windows
Settings and Control Panel Settings. You use each to remotely configure
system settings on any Windows XP Service Pack 2, Windows Server 2003
Service Pack 1, Windows Vista, or Windows Server 2008 machine.
The contents of the Preferences section and the components you can control through it are described in Table 3.
The big difference between Preferences and Policies is that users are
allowed to reset the changes made to their computers through the
Preferences section. Changes made by the Policies section are permanent
unless modified centrally. However, using the Preferences section can
often greatly reduce the need for logon scripts. Using the Preferences
section is, after all, much easier than writing a Visual Basic or even a
PowerShell script.
Table 3. The Preferences Section of a WS08 GPO
| Preferences Subsection | Setting | Application |
|---|
| Windows Settings | Applications | Lets
you configure multiple application-specific settings through custom
plug-ins. For example, plug-ins for Microsoft Office are available at (http://go.microsoft.com/fwlink/?LinkId=90745). A Group Policy development kit is available at (http://go.microsoft.com/fwlink/?LinkId=144). |
| | Drive Maps | Create, modify, delete or hide dynamic drive mappings using the user's credentials or alternate credentials. |
| | Environment | Create,
modify, or delete user or system environment variables. Variables can
also be used as conditions for other preference settings. |
| | Files | Copy, modify, or delete a file on a system. Also modifies the attributes of a file. |
| | Folders | Copy, modify, or delete a folder on a system. Can rely on conditions. For example, you can delete a folder only if it is empty. |
| | INI Files | Add, replace, or delete settings in existing .ini or .inf files or even delete an entire .ini or .inf file. |
| | Network Shares | Create,
modify, or delete a file share on a system. Can also modify user
limits, Access-based Enumeration settings, or comments on a share. |
| | Registry | Create,
replace, or delete entries in the registry. Can also copy multiple
settings from one system and add them to other systems. Relies on a
wizard to create multiple entries. |
| | Shortcuts | Create, modify, or delete a shortcut. |
| Control Panel Settings | Data Sources | Create, modify, or delete data sources. |
| | Devices | Enable
or disable different device classes or specific hardware types on
target systems. For example, can be used to control USB device classes. |
| | Folder Options | Configures folder options and file associations. |
| | Internet Settings (IE) | Configure IE settings. Supports IE 5, 6, and 7. |
| | Local Users and Groups | Control the contents of the local users and groups contained in member servers and PCs belonging to the domain. |
| | Network Options | Configure virtual private network (VPN) or dial-up networking connections. |
| | Power Options | Configure
power settings on Windows XP or Windows Server 2003. To configure Power
Options for Vista and WS08, use the Administrative Templates | System |
Power Management section of either Computer or User Policy settings. |
| | Printers | Configure multiple printer connections for a system. |
| | Regional Options | Control regional options. |
| | Scheduled Tasks | Create,
modify, or delete scheduled tasks. Can be used to run commands as soon
as GPOs refresh, automate recurring tasks, wake computers from sleep
mode, or even launch processes when users log on without requiring a
script. |
| | Services | Modify the configuration of existing services. |
| | Start Menu | Control
the structure and the options of the Start menu. Can also be used to
add read-only sections of the Start menu while letting users control the
read-write sections. Supports Start menu standardization. |