1. Automating Windows PE
Most Windows PE automation is done by
customizing Unattend.xml, the Windows Vista unattended answer file. Use
the Windows System Image Manager (Windows SIM) to create and edit this
file. Unattend.xml allows you to control
automation tasks in all the major installation passes. You can put it in
the root of your Windows PE media to automate the installation process.
Automating with Unattend.xml
Windows SIM is the primary tool for creating and
modifying Unattend.xml. It is designed to validate each automation step
against the actual files in an image to ensure that you use proper
syntax to build the automation. This provides an extra measure of
assurance that unattended installations will work as planned.
When beginning the process of creating
an answer file, be sure to create a catalog file if necessary to allow
Windows SIM to validate your choices against the image file. Add answer
file options to the answer file by right-clicking a component and
choosing Add Setting To Pass 1 windowsPE. The setting will then appear
in the answer file pane, where you can configure it. When you complete
answer file customization, you can validate the answer file by clicking
Tools, and then choosing Validate Answer File. Any settings that are not
configured or that use invalid configuration settings will be listed in
the Messages pane. When you are satisfied with the answer file, save it
to the root folder of your Windows PE media. When you boot a system
using this media, the answer file is automatically detected and will
control the operation of Windows PE.
Adding Images to Windows DS
When you have completed building a Windows PE
image, you can use Windows DS to deploy it to clients. This allows you
to use the PXE boot automation services of Windows DS to replace
portable media as the primary method of initiating Windows Vista
installations.
To add a Windows PE boot image to Windows DS
1. | In the Windows DS Administration Console, expand your Windows DS server and right-click Boot Images.

|
2. | Click Add Boot Image to launch the Add Image Wizard.
|
3. | Follow the instructions in the wizard to select and import your custom Windows PE image.
|
2. Using Windows PE with BDD
BDD 2007 provides an infrastructure solution for
automating the deployment of Windows Vista. Part of the infrastructure
is the support for customizing and building Windows PE images. You
manage the actual process of building the Windows PE image files by
using wizards and scripting, greatly simplifying the process of adding
device drivers and packages, automating settings, and prepping and
capturing the deployment image.
You use Deployment Workbench to manage
most operations regarding the creation and deployment of Windows Vista
images and applications. This scripted environment is able to
dynamically update Windows PE as updates are made to the Windows Vista
distribution.
Deployment
points (other than Microsoft Systems Management Server 2003 Operating
System Deployment Feature Pack deployment points) automatically generate
Windows PE images when you update them. As shown in Figure 1,
you can customize a deployment point’s Windows PE image and choose
which types of Windows PE images the deployment point generates when you
update it. Table 1 describes Windows PE settings that you can customize for each deployment point.
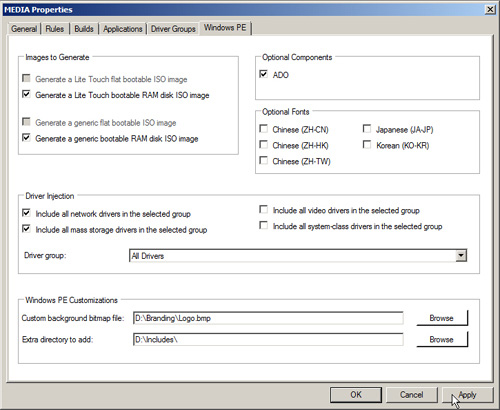
Table 1. Windows PE Settings in a Deployment Point
| Area | Settings |
|---|
| Images to Generate | Generate A Lite Touch Flat Bootable ISO Image Select this option to generate flat bootable ISO images. Generate A Lite Touch Bootable RAM Disk ISO Image Select this option to generate ISO images that start from RAM disk. Generate A Generic Flat Bootable ISO Image Select this option to generate a generic Windows PE flat bootable image that does not contain BDD 2007. Generate A Generic Bootable RAM Disk ISO Image Select this option to generate a generic Windows PE bootable image that starts from RAM disk and does not contain BDD 2007.
|
| Driver Injection | Include All Network Drivers in the Selected Group Select this option to inject all network drivers found in the distribution share into the Windows PE boot images. Include All Mass Storage Drivers in the Selected Group Select this option to inject all mass storage drivers found in the distribution share into the Windows PE boot images. Include All Video Drivers in the Selected Group Select this option to inject all video drivers found in the distribution share into the Windows PE boot images. Include All System-Class Drivers in the Selected Group
Select this option to inject all system drivers (such as motherboard
drivers) in the distribution share into the Windows PE boot images.
You can limit the device drivers that Deployment Workbench
includes in the Windows PE image by selecting a driver group from the
Driver Group list. |
| Optional Components | |
| Optional Fonts | Select
the font support to add to the Windows PE boot images that Deployment
Workbench generates. You must add these fonts when performing a lite
touch deployment of Windows Vista images when the setup files are
Japanese, Korean, or Chinese. The Optional Fonts area provides the
following options:
Chinese (ZH-CN) Chinese (ZH-HK) Chinese (ZH-TW) Japanese (JA-JP) Korean (KO-KR)
Adding additional fonts to Windows PE boot images increases the
size of the images. Add additional fonts only if necessary.
|
| Windows PE Customizations | Custom Background Bitmap File Type the path and file name of a bitmap file to use as the Windows PE background. Extra Directory To Add Type the path of a folder containing extra files and subfolders to add to the Windows PE bootable images.
|
