Logo
programming4us
programming4us
programming4us
programming4us
Home
programming4us
XP
programming4us
Windows Vista
programming4us
Windows 7
programming4us
Windows Azure
programming4us
Windows Server
programming4us
Windows Phone
 
Windows Vista

Using Voice and Sounds : Customizing Speech Recognition, Talking to the Mouse

- Free product key for windows 10
- Free Product Key for Microsoft office 365
- Malwarebytes Premium 3.7.1 Serial Keys (LifeTime) 2019
3/17/2013 11:43:13 AM

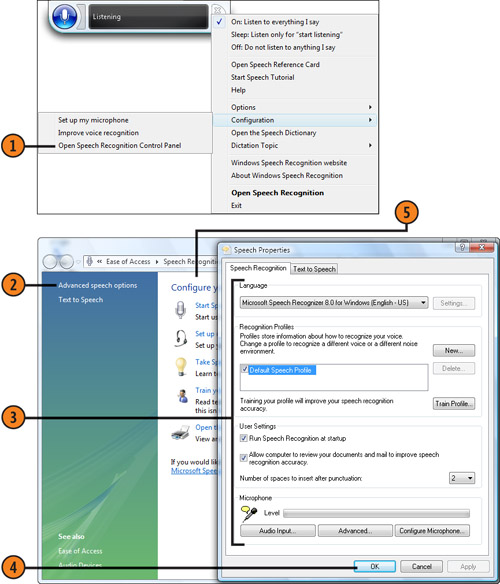
1.Customizing Speech Recognition

You can customize the way the speech-recognition program works so that it adjusts to your preferences, including the language you want to use, the way it spaces sentences, and its ability to recognize someone else’s voice or different background sounds.

Customize Speech Recognition

1. If you want to change the way the speech-recognition program works, say “Show speech options.” On the shortcut menu that appears, say “Configuration” to open the submenu, and then say “Open speech-recognition control panel.”

2. In the Speech Recognition Options Control Panel, say “Advanced speech options.”

3. On the Speech Recognition tab of the Speech Properties dialog box, make the modifications you want:

  • Select the language for the speech recognition.

  • Create a new profile or select a different profile.

  • Do additional training to improve speech recognition.

  • Specify the way you want speech recognition to start, learn, and space sentences.

  • Adjust the microphone.

4. Say “OK” to close the dialog box.

5. Make any other changes using the Control Panel, and then say “Close.”


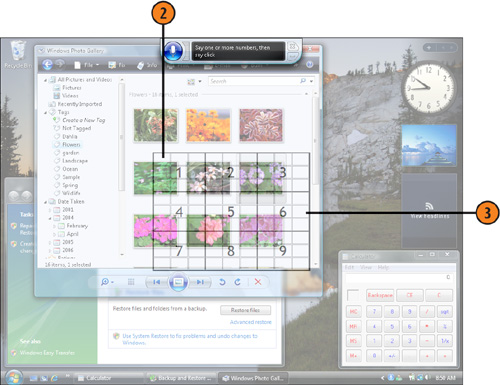
2. Talking to the Mouse

If you want to work with the mouse when you’re using voice commands, you use a large grid that encompasses the entire screen to specify where you want the mouse to go. Using the grid is especially useful if you have any problems with navigating around the screen and making windows or other areas active.

Use the Grid

1. With speech recognition running and listening, say “Mouse grid” to display the large grid.

2. Say the number that identifies the region you want to work in to display a small grid for that region.

3. In the smaller grid, do any of the following:

  • Say “Click” to click in the middle of the grid.

  • Say a number on the grid to show a detailed grid of that region.

  • Say a number and then say “Click” to click in the center of that region.

  • Say “Back” to move back to the larger grid.

  • Say “Cancel” to remove the mouse grid.

  • Say a number and then say “Right-click” to right-click in that region.

Tip

Most voice commands, except those used with the mouse grid, aren’t recognized while the mouse grid is displayed. The mouse grid will remain on the screen if you type any information, but it will go away if you click the mouse, press the Windows key, or say an appropriate voice command.


Other -----------------
- Using Voice and Sounds : Directing Your Computer with Voice Commands, Dictating Text
- Using Voice and Sounds : Controlling the Volume
- Preparing Windows PE : Working with Windows PE (part 3) - Customizing Windows PE
- Preparing Windows PE : Working with Windows PE (part 2)
- Preparing Windows PE : Working with Windows PE (part 1) - Adding Optional Components
- Maintaining Security : Restricting Content in Windows Media Center, Creating Trusted Contacts, Installing Critical Fixes
- Maintaining Security : Restricting Content in Windows Media Center, Creating Trusted Contacts
- Maintaining Security : Restricting DVD Movies in Windows Media Player, Preventing Access While Using Windows Media Player
- Maintaining Security : Maintaining High Security, Setting Internet Explorer Security
- Maintaining Security : Restricting Access on the Computer
 
 
Top 10
- Microsoft Visio 2013 : Adding Structure to Your Diagrams - Finding containers and lists in Visio (part 2) - Wireframes,Legends
- Microsoft Visio 2013 : Adding Structure to Your Diagrams - Finding containers and lists in Visio (part 1) - Swimlanes
- Microsoft Visio 2013 : Adding Structure to Your Diagrams - Formatting and sizing lists
- Microsoft Visio 2013 : Adding Structure to Your Diagrams - Adding shapes to lists
- Microsoft Visio 2013 : Adding Structure to Your Diagrams - Sizing containers
- Microsoft Access 2010 : Control Properties and Why to Use Them (part 3) - The Other Properties of a Control
- Microsoft Access 2010 : Control Properties and Why to Use Them (part 2) - The Data Properties of a Control
- Microsoft Access 2010 : Control Properties and Why to Use Them (part 1) - The Format Properties of a Control
- Microsoft Access 2010 : Form Properties and Why Should You Use Them - Working with the Properties Window
- Microsoft Visio 2013 : Using the Organization Chart Wizard with new data
 
programming4us
Windows Vista
programming4us
Windows 7
programming4us
Windows Azure
programming4us
Windows Server