The User State Migration Tool
(USMT) is used to migrate user accounts during large deployments of
Windows Vista operating systems (and Microsoft Windows XP). USMT
captures user accounts, including desktop and application settings as
well as user files, and then migrates them to a new Windows
installation. Similar to Windows Easy Transfer, you can use USMT for
both side-by-side and wipe-and-load migrations.
USMT is intended
for administrators who are performing automated deployments. If you are
only migrating the user states of a few computers, you can use the
Files and Settings Transfer Wizard for computers running Windows XP, or
Windows Easy Transfer for computers running Windows Vista. USMT enables
you to do the following:
Configure the migration for your needs.
Using the migration rule files, you can control exactly which user
accounts, files, and settings are migrated and how they are migrated.
Automate the migration.
Use the two USMT command line tools, which control collecting and
restoring the user files and settings. These two tools provide the core
functions of USMT:
1. Requirements
USMT supports Windows
2000, XP, and Vista. However, LoadState (the tool used on the
destination computer) does not support Windows 2000. Therefore, you can
migrate from Windows 2000, but your destination must be Windows XP SP2,
Vista, or later. Windows Server is not supported.
NOTE
Both 32 and 64
bit editions of Windows XP and Vista are supported. When migrating
between 32 and 64 bit editions, you can migrate from 32 to 64 bit, but
you cannot migrate from 64 to 32 bit.
Naturally, the target system also requires space to
accept the restoral. In fact, it requires at least two times the space
required by the largest backed up file plus the size of the uncompressed
store. The reason is that when LoadState runs on the destination
computer it migrates each file one at a time from the store to a
temporary location on the destination computer. It then transfers the
file to the target location and deletes the temporary copy before moving
onto the next file.
2. Understanding USMT limitations
We have discussed things
that can be migrated, but every tool has a number of things for which
various reasons cannot be migrated by USMT. Such items include:
Mapped network drives
Local printers
Network printers (if the destination computer is running Window XP)
Microsoft Project settings (when migrating from Office 2003 to Office 2007)
Taskbar settings (when migrating from Windows XP to Vista)
Customized icons for shortcuts
Permissions for shared folders (shares are normally maintained on servers)
Files
and settings between installations with different languages (both
source and destination computer must have matching languages of Windows)
Settings
from older versions of applications (with the exception of Microsoft
office, the version of the application being migrated must be the same
on the source and destination computer)
Hardware settings and drivers
Passwords
Application
installations (some settings may be migrated, but the applications must
first be installed on the target system through a separate mechanism)
3. Customizing migration with USMT
Although the
command line options discussed later in this section dictate what
actions are performed by the ScanState and LoadState tools, the
XML-based configuration files dictate what is backed up.
Some default migration files are provided that suffice for many environments, including:
MigUser.xml: Specifies user files and settings
MigSys.xml: Specifies system settings to be migrated
MigApp.xml: Specifies application settings to be migrated
Creating your own configuration files for USMT
It is best to use the
included default migration files as models for your own custom migration
files. To migrate user data files, model your custom .xml file on
MigUser.xml. To migrate operating system settings to a computer running
Windows XP, model your .xml on MigSys.xml. And to migrate application
settings, start with MigApp.xml. However, these files are very large,
and simply adding your own code to them can make changes difficult to
read and edit. Therefore, it is recommended that you create your own
separate XML files instead of adding to the existing ones. Plus, if you
were to reinstall USMT, the default files would be overwritten and your
changes would be lost.
We also recommended
that you do not alter the operating system settings (MigSys.xml) file.
These settings are migrated by manifests that should not be modified. If
you have a need to exclude certain operating systems settings from
migration, you should create and modify a Config.xml file.
NOTE
You can use the
asterisk (*) wildcard character in migration XML files, but you cannot
use the question mark (?) wildcard character — it is unsupported.
Modifying user files
and settings is straightforward and will be discussed later in this
section. A more challenging task is to create a custom configuration
file that handles the migration of an application not supported by the
default MigApp.xml. Creating a configuration file for USMT to migrate
application settings may be realized by executing the following steps:
Verify the correct version of the application is installed.
Identify what settings should be migrated.
Identify how to apply the migrated settings.
Author a migration component for the application.
Test the application settings migration.
Each of these steps is covered in the following section.
Verifying that the correct version is installed
Although we have
established that it is not advisable to migrate application settings for
an application that will not be installed on the target system, it is
also important to make sure that the version of the application is the
same on both the source and target systems. A newer version of the
application may not store settings in the same place, which could result
in problems on the destination computer.
Although you can
normally look to the About box under the Help menu of an application for
version information, not all applications easily provide version
information. Minor version changes in particular can be hard to
determine within the application. A couple of ways to identify the
version of the application are to check the registry's uninstall key and
to check the version information on the application's executable file.
To check the uninstall key, launch RegEdit and browse to the following:
HKEY_LOCAL_MACHINE\Software\Microsoft\Windows\CurrentVersion\Uninstall
Here you find a subkey
for each installed application which may be identified by a friendly
name or GUID. In this subkey is normally a value specifying the version
number of the application that may be used to ascertain the exact
version number of the installed application in question.
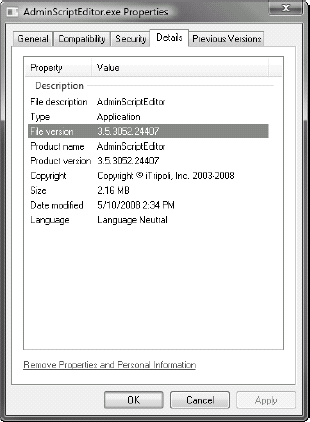
You can also look to the
application's executable file and view its properties to see the version
number of the application, as shown in Figure 1.
To view the file version properties, follow these steps:
Locate the executable for the program in File Explorer.
The file is typically named close to that of the application's title
and stored under the Program Files folder in an easily identifiable
subfolder.
Right-click the file and choose Properties.
Click the Details tab (in Windows XP, the tab to choose is titled Version).
Record the full version number for comparison.

Of course, if you
are migrating to a new system you will be installing the applications on
the system after Windows Vista has been applied (or the application may
be part of your custom image). In either case, simply ensure that the
version you plan to install as part of your migration matches that of
the existing application from which you will be migrating.
If you are
upgrading an application as part of your migration to Windows Vista, you
need to determine how to best proceed. You can upgrade the existing
operating system to the latest version of the application to be sure
there will not be an issue in application setting migration, or you can
consciously migrate from one version to the next and then perform
testing to ensure everything functions as desired.
Identifying settings that should be migrated
The most tedious
step is to identify what settings should be migrated. It is best to have
a subject matter expert on the application with which you are working
to help identify settings of importance. In order to identify where
these settings are storing their values it is necessary to go through
each setting in the application and modify it while running a file and
registry monitor utility, such as Process Monitor.
The following steps take you through identifying where application settings may be stored:
Shut down as many applications as possible to reduce the activity on the computer. Process Monitor will record all file and registry activity so the less work the system is doing the less Process Monitor will be taxed to record.
Launch the application for which you are working to identify migration settings.
Launch Process Monitor immediately to stop the capture process by choosing File =>
Capture Events (or press Ctrl+E).
Process Monitor begins automatically, and it is important to first
filter what is captured so it is easier to determine the changes with
which you are working to identify.
Choose Filter =>
Filter from the menu at the top of the window to launch the Process Monitor Filter dialog.
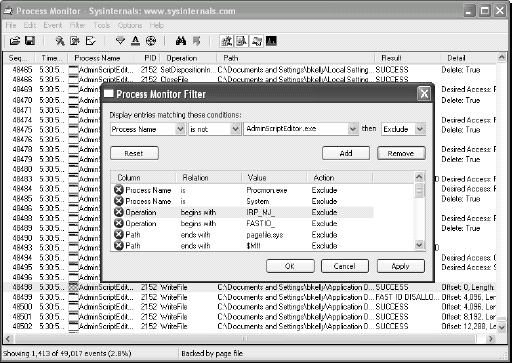
To
limit what is captured to the application with which you are working,
choose Process Name, for an operator choose not a process name, choose
that of your running application, and click the Add button (as shown in
Figure 2).

Next, restart the monitoring process by again selecting File =>
Capture Events (or by pressing Ctrl+E).
In
the application, change and apply any changes you wish to migrate and
then view Process Monitor to see where the change is being applied to
the system. In this way, you should be
able to identify any registry entries or files that require inclusion in
your migration in order to support this application.
NOTE
Some
applications store information in the user profile that should not be
migrated (for example, installation paths, computer name, and other
computer-specific information). You should make sure to exclude such
files and registry keys from the migration.
Identifying how to apply the migrated settings
In most cases, the target
location is the same as that of the source computer. USMT automatically
uses environment variables to determine destination paths. So for
example, if you have a file collected from a Windows XP profile path (C:\Documents and Settings\User1\My Documents), the Vista destination folder will automatically be handled as its new location under the Users folder (C:\Users\User1).
However, there may be cases when you need to modify the location of
some settings, and USMT configuration files allow you to support these
cases if they are encountered.
Testing the application settings migration
Perform the actual
migration using test systems and verify the desired files and settings
are transferred in the process. Launch the application on each system
and compare settings to verify each was included as desired.
Excluding files and settings
To exclude files and settings, you can create a custom .xml file by using the <include> and <exclude> elements to exclude options with conditions. When specifying <exclude> you should always specify a corresponding <include>. The reason is that without an <include> there is no reason to exclude it (it would not be included to begin with).
For example, perhaps
you know users have mp3 files in folders that you might otherwise be
migrating. The solution would be to include all files from C:\
except
.mp3 files. For example, to get all files excluding mp3 files, you can
use the following custom XML configuration file contents:
<migration urlid="http://www.microsoft.com/migration/1.0/m">
    <component type="Documents" context="System">
        <displayName _locID="miguser.sharedvideo">MP3 Files</displayName>
        <role role="Data">
            <rules>
                <include filter='MigXmlHelper.IgnoreIrrelevantLinks()'>
                    <objectSet>
                        <pattern type="File">C:\* [*]</pattern>
                    </objectSet>
                </include>
                <exclude>
                    <objectSet>
<pattern type="File">C:\* [*.mp3]</pattern>
                    </objectSet>
                </exclude>
            </rules>
        </role>
    </component>
</migration>
NOTE
The pattern elements
you see here are written as regular expressions. Although regular
expressions can be fairly intimidating to the uninitiated, they provide a
powerful way to identify elements. The examples included here, online,
and on user support forums will likely get you what you are looking for,
but you may find a need to write your own. Should you need to write
your own regular expressions, you could use some helpful tools, such as
Expresso from Ultrapico, which is a free tool to help write and test
regular expressions. Download Expresso from www.ultrapico.com/Expresso.htm.
Another, arguably easier, way you can exclude items is to use a Config.xml file (discussed later in this section).
Including files and settings
If you are aware of a
specific area of the registry you would like to migrate, you can specify
a subkey, value, or a subkey and its child subkey. To migrate a set of
registry keys and its subkeys, the following XML file contents may be
used:
<migration urlid="http://www.microsoft.com/migration/1.0/m">
     <component type="Application" context="System">

   <displayName>Component to migrate all ApplicationName HKCU subkeys and values
   </displayName>
          <role role="Settings">
          <rules>
               <include>
                    <objectSet>

   <pattern type="Registry">HKCU\Software\Company\ApplicationName\* [*]</
   pattern>
                    </objectSet>
               </include>
          </rules>
          </role>
     </component>
</migration>
There may be a data
folder or perhaps a folder specific to an application you are working to
include in the migration. To specify the inclusion of a folder from a
specific drive (and from any location) on a computer, the following XML
file contents may be used:
<migration urlid="http://www.microsoft.com/migration/1.0/m">
<component type="Documents" context="System">
  <displayName>Component to migrate all ApplicationNameData folder contents on
   any drive on the computer </displayName>
  <role role="Data">
    <rules>
        <include>
           <objectSet>

  <script>MigXmlHelper.GenerateDrivePatterns ("\ApplicationNameData\* [*] ",
  "Fixed")</script>

  <script>MigXmlHelper.GenerateDrivePatterns ("*\ApplicationNameData \* [*] ",
  "Fixed")</script>
      </objectSet>
         </include>
   </rules>
  </role>
</component>
</migration>
Rerouting files and settings
There may also be
files and settings you want to migrate, but you want to specify an
alternate target location as part of the transfer process. For example,
to migrate all .jpg files and have them restored to a folder named
Images on the destination computer, the following XML file contents may
be used:
<migration urlid="http://www.microsoft.com/migration/1.0/m">
<component type="Documents" context="System">
  <displayName>All .jpg files to Images</displayName>
  <role role="Data">
    <rules>
      <include>
        <objectSet>
          <script>MigXmlHelper.GenerateDrivePatterns ("* [*.jpg]", "Fixed")</
  script>
        </objectSet>
      </include>
      <locationModify script="MigXmlHelper.Move('C:\Images')">
        <objectSet>
          <script>MigXmlHelper.GenerateDrivePatterns ("* [*.jpg]", "Fixed")</
  script>
        </objectSet>
      </locationModify>
    </rules>
  </role>
</component>
</migration>
Working with Config.xml
Config.xml is an optional
file you can create by using the /genconfig option of the ScanState
tool. If you want to exclude certain elements of a migration, this is
the preferred way to do so. This file does not contain any migration
rules, just a list of system components, applications, and user
documents that may be migrated.
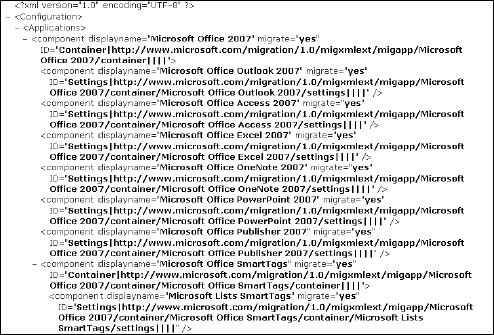
Running the following
command on a machine causes the config.xml file to be built containing
every component that can be migrated. The components are organized into
sections: <Applications>, <WindowsComponents>, and
<Documents>. To choose not to migrate a component, simply change
its entry to migrate="no" as shown in Figure 3.

To create a Config.xml
file in the current directory run the following command (note: this does
not create a store, just the Config.xml file):
ScanState /i:migapp.xml /i:miguser.xml /genconfig:config.xml
To make use of this same Config.xml when creating a migration package, run the following command:
ScanState \\server\share\store /i:migapp.xml /i:miguser.xml /o /config:config.xml