Creating a New Identity
Outlook Express already has a default identity in place, and it’s called Main Identity (I show you how to rename identities a bit later). Follow these steps to set up another identity:
1. | Select File, Identities, Add New Identity. Outlook Express displays the New Identity dialog box.
|
2. | Type the name of the new identity in the Type Your Name text box.
|
3. | To
protect the identity with a password, activate the Require a Password
check box. Outlook Express displays the Enter Password dialog box. Type
the password in both the New Password and Confirm New Password text
boxes, and then click OK to return to the New Identity dialog box.
|
4. | Click OK. Outlook Express asks whether you want to switch to the new identity.
|
5. | Click
Yes. Outlook Express closes, restarts, and launches the Internet
Connection Wizard to set up the initial account for the new identity.
|
6. | Run through the wizard’s dialog boxes .
|
When the wizard is complete, you’re dropped off
at the Outlook Express window, which is logged on to the new identity.
To reiterate, being logged on to an identity means the following:
Only that identity’s accounts are available.
Only that identity’s messages and folders are visible.
Only that identity’s contacts are listed in the Address Book and Contacts list.
Tip
Although
the logged-on identity sees only its contacts, it’s possible to share
contacts among identities. In the Address Book, add the contacts you
want to share to the Shared Contacts folder. For contacts that already
exist, drag them from the identity’s Address Book and drop them on the
Shared Contacts folder.
That identity can customize Outlook Express and the new settings will affect only that identity’s version of the program.
Switching Identities
To switch from one identity to another, follow these steps:
1. | Select File, Switch Identity. The Switch Identities dialog box appears.
|
2. | Use the list of identities to select the one you want to use.
|
3. | Use the Password text box to enter the identity’s password, if applicable.
|
4. | Click OK. Outlook Express closes and then restarts with the chosen identity logged on.
|
Note
How do you know which
identity is currently logged on? The easiest way to tell is to look at
the Outlook Express title bar. For example, if the Inbox folder is
currently displayed, the title bar will say Inbox - Outlook Express -
Identity, where Identity is the name of the current identity.
Managing Identities
If you need to change the name or password for
an identity, delete an identity, or perform some other identity
maintenance, follow these steps:
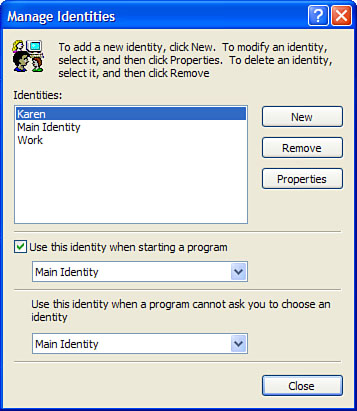
1. | Select
File, Identities, Manage Identities. (Alternatively, click the Manage
Identities button in the Switch Identities dialog box.) Outlook Express
displays the Manage Identities dialog box, shown in Figure 1.
|
2. | Use the Identities list to select the identity you want to work with.
|
3. | In
addition to the New button (which enables you to create a new identity
from here), there are two other command buttons available:
| Remove | Click this button to delete the selected identity. Note that you can’t delete the Main Identity. | | Properties | Click this button to change the selected identity’s name or password. |
|
4. | Other
programs might also be identity-aware (an example is the Windows
Messenger program that ships with Windows XP). To determine which
identity is logged on when you start those programs, make sure that the
Use This Identity When Starting a Program check box is activated, and
then use the drop-down list to choose which identity you want logged on.
|
5. | If
an identity-ignorant program needs to request that Outlook Express
create a new email message, the program won’t be able to ask you (or
Outlook Express) which identity to use. For these situations, pick out
the default identity from the Use This Identity When a Program Cannot
Ask You to Choose an Identity list.
|
6. | Click Close.
|
Logging Off Your Identity
As a convenience, Outlook Express leaves you
logged on to your identity when you exit the program in the usual way
(that is, by selecting File, Exit or by pressing Alt+F4). This means
Outlook Express uses your identity the next time you start the program.
However, if someone else starts the program in
the meantime, they’ll be logged on to your identity and will have access
to all your accounts and messages. That obviously defeats the purpose
of identities. To prevent this from happening, always log off your identity when you shut down Outlook Express. You do that by selecting File, Exit and Log Off Identity.
Note
Another
way to log off Outlook Express is to select File, Switch Identities and
then click the Log Off Identity button in the Switch Identities dialog
box.
The next time you (or
anyone else) launches Outlook Express, the first thing that appears is
the Identity Login dialog box. Select the identity you want to use, type
a password, if necessary, and click OK.
Identities—Storage Locations and the Registry
I mentioned earlier that Outlook Express maintains a .dbx file for each folder. To see these files, first go to the following folder:
%UserProfile%\Local Settings\Application Data\Identities
Here you find a subfolder for each Outlook
Express identity. Unfortunately, the folder names are obscure
32-character user IDs that bear no resemblance to the identity name. How
do you know which folder applies to which identity (say, for backup
purposes)? The only way to tell is to head for the following Registry
key:
HKEY_CURRENT_USER\Identities
There you find subkeys that use the same 32-character user IDs. Select the subkey you want and then look for the Username setting, which tells you the identity name. When you know which folder is which, open it and head for the Microsoft\Outlook Express subfolder, which is where the .dbx files are stored.
