Silverlight
presents an entirely new programming model for Web sites. ASP.NET
programming traditionally involves managing a collection of ASP.NET
controls that emit HTML to the client. ASP.NET has a whole
infrastructure for managing session state and view state (necessary for
HTML over HTTP).
Silverlight content is generally disconnected from the rest of the Web site. Ways exist to integrate with
the HTML on the client side through the Document Object Model, and you
can pass parameters into your Silverlight content before sending it off
to the client. However, support for connecting with the rest of the Web
site is not built-in as much. To communicate with the rest of the Web
site, Silverlight usually uses Windows Communication Foundation (WCF)
services provided by the Web site.
Here's an exercise that
shows how Silverlight works with WCF. This example shows how you can
add a Silverlight-enabled WCF service to your Silverlight Web site. The
Web site exposes a collection of products through a Web service. The
Silverlight control queries the service for a list of products, and then
looks them up one at a time when the end user selects a product from a
list box. This exercise illustrates how to create a WCF service, expose data through the WCF service, and data bind to a ListBox and a TextBlock.
Using Silverlight with ASP.NET and WCF
Create a new Silverlight application named SilverlightAndWCF. Have Visual Studio create an ASP.NET Web Project along with the Silverlight application. Add a Silverlight-enabled WCF service. Name it ProductsService. Create a ProductInfo
class in the Web project to hold individual products. Right-click the
SilverlightAndWCF project in Solution Explorer and click Add, New Item.
Select Class from the available templates. Name the class ProductInfo.
It should include properties for the name of the product, a description
of the product, and the price of the product. It's important that these
members be exposed as properties because the Silverlight client will
use data binding to connect to the properties. Use the DataContract and DataContractFormat attributes to enable this class to be exposed through the WCF service. Use the DataMember
attribute before each property so that the members show up as
properties in the proxy (to be produced for use on the client). You need
to use the System.Runtime.Serialization and the System.ServiceModel namespaces to resolve the attributes. Remember, this is still in the Web Service project. [DataContract]
[DataContractFormat]
public class ProductInfo
{
string product;
[DataMember]
public string Product
{
get { return product; }
set { product = value; }
}
string description;
[DataMember]
public string Description
{
get { return description; }
set { description = value; }
}
double price;
[DataMember]
public double Price
{
get { return price; }
set { price = value; }
}
}
Create a collection of ProductInfos (derive from the generic List
class). You can either have Visual Studio create the class for you, or
you could add it directly to the ProductInfo.cs file. Write a
constructor that adds some ProductInfo
objects to the collection. They can be any kind of products. I'm a
guitar enthusiast, so I added a guitar to the product list you see here: public class Products: List<ProductInfo>
{
public Products()
{
ProductInfo productInfo = new ProductInfo();
productInfo = new ProductInfo();
productInfo.Product = "Solidbody";
productInfo.Description = @"Flame maple top " +
"mahogany body. Rosewood fingerboard. " +
"One piece mahogany neck. Two humbucking " +
"pickups. With case.";
productInfo.Price = 2500.00;
Add(productInfo);
// add more products...
}
}
Open the file ProductsService.svc.cs (remember—this is all going in the Web Service project right now). Add a static instance of the Products class. Add two methods to the service: one to get the entire list of ProductInfos, and one to look up a particular product. The ServiceContract attribute usually stipulates a namespace. I left it out in this case for the sake of brevity. You also need to use the System.ServiceModel.Activation namespace. [ServiceContract(Namespace = "")]
[AspNetCompatibilityRequirements
(RequirementsMode =
AspNetCompatibilityRequirementsMode.Allowed)]
public class ProductsService
{
static Products products = new Products();
[OperationContract]
public Products GetProducts()
{
return ProductsService.products;
}
[OperationContract]
ProductInfo GetProduct(string key)
{
return ProductsService.products.Find(
delegate(ProductInfo productInfo)
{
if (productInfo.Product == key)
{
return true;
}
else
{
return false;
}
}
);
}
}
Edit the MainPage.xaml XAML file to produce a layout. Add four rows to the LayoutRoot. The first three rows should resize to their content (that is, the RowDefinitions should use Auto as the Height). Add three columns. The first column should size automatically (that is, the ColumnDefinition should use Auto as its Width). <Grid x:Name="LayoutRoot"
Background="White">
<Grid.RowDefinitions>
<RowDefinition Height="Auto"/>
<RowDefinition Height="Auto"/>
<RowDefinition Height="Auto"/>
<RowDefinition Height="*"/>
</Grid.RowDefinitions>
<Grid.ColumnDefinitions>
<ColumnDefinition Width="Auto"/>
<ColumnDefinition />
<ColumnDefinition />
</Grid.ColumnDefinitions>
</Grid>
Now add content to the grid. Add a TextBlock to the top row and first column (row 0, column 0) to serve as a header for the Details section. It should span two columns. Add a TextBlock to the first row, third column to serve as a header for the list box. Add three TextBlocks down the first column to serve as labels. The TextBlock in row 2 should say "Product:", the TextBlock in row 3 should say "Price:", and the TextBlock in row 4 should say "Description:". Add three TextBlocks down the second column to display the product info. The TextBlock in row 2 should use the Binding markup extension to bind the Text property to the ProductInfo Product property. That is, assignment of the Text property should look like this: Text =" {Binding Product}". The TextBlock in row 3 should bind its Text property to the ProductInfo Price property, and the TextBlock in row 4 should bind its Text property to the ProductInfo Description property using the same binding statement as the one used for binding the Product property. Finally, add a ListBox to row 1, column 2. Make it span three rows. Name it "theListBox". Assign a handler to the SelectionChanged event. When you type SelectionChanged in the tag, Visual Studio stubs one out for you. Assign the DisplayMemberPath property the string "Product". That way, when the collection of ProductInfos is bound to the ListBox, the ListBox will show the Product property.
<Grid x:Name="LayoutRoot"
  Background="White">
   <!--grid row and column definitions are here  -->
   <TextBlock Grid.Row="0"
    Grid.Column="0"
    Grid.ColumnSpan="2"
    FontSize="24"
    Text="Details:"/>

   <TextBlock Grid.Row="0"
    Grid.Column="2"
    FontSize="24"
    Text="Select Product:"/>

   <TextBlock Grid.Row="1"
    Grid.Column="0"
    FontSize="18"
    Text="Product:" />

   <TextBlock Grid.Row="2"
    Grid.Column="0"
    FontSize="18"
    Text="Price:" />

   <TextBlock Grid.Row="3"
    Grid.Column="0"
    FontSize="18"
    Text="Description:" />

   <TextBlock Grid.Row="1"
    Grid.Column="1"
    FontSize="14"
    Text="{Binding Product}"
    Margin="5"/>

   <TextBlock Grid.Row="2"
    Grid.Column="1"
    FontSize="14"
    Text="{Binding Price}"
    Margin="5"/>

   <TextBlock Grid.Row="3"
    Grid.Column="1"
    FontSize="14"
    Margin="5"
    TextWrapping="Wrap"
    Text="{Binding Description}"/>

   <ListBox x:Name="theListBox"
    Grid.Row="1"
    Grid.Column="2"
    Grid.RowSpan="3"
    DisplayMemberPath="Product"
    SelectionChanged=
    "theListBox_SelectionChanged">
   </ListBox>
</Grid>
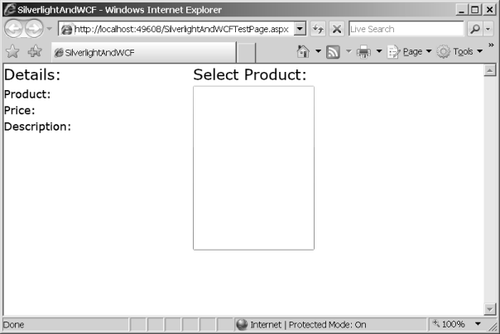
Run the application. It should look something like this:
Add a service reference for the WCF service to the SilverlightAndWCF project. Right-click the SilverlightAndWCF project in Solution Explorer, and click Add
Service Reference. Visual Studio will display the following dialog box
to get information about the service. Click the Discover button in the
upper right-hand corner. Visual Studio will find the ProductsService service for you.
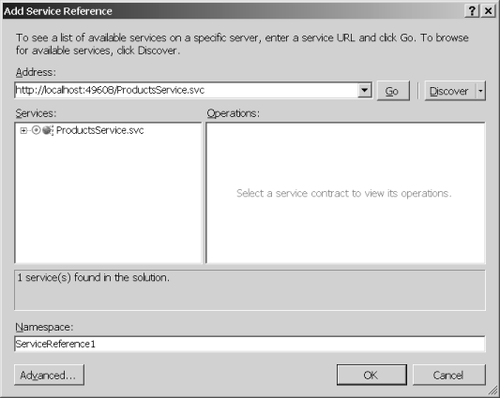
Click
the expansion symbol next to the ProductsService.svc service to expand
the node so that you can see details about the service. Click OK (leave
the namespace the same: ServiceRefernce1). Visual Studio will write a proxy for you to use in the Silverlight control. Include a using clause to scope the new service reference. Declare an instance of the ProductsServiceClient class as a member of the MainPage class. Create an instance of the client so that the MainPage
can talk to the Web site. You use the proxy to issue calls to the
service to get all the products and to look up singular products. using SilverlightAndWCF.ServiceReference1;
public partial class Page : UserControl
{
ProductsServiceClient productsService =
new ProductsServiceClient();
public MainPage()
{
InitializeComponent();
}
}
Silverlight-enabled WCF proxies work asynchronously. When you call the GetProducts and the GetProduct
methods, they run on a different thread. You need to add event handlers
to the service client to harvest the results when the service call is
finished. Write a method named GetProductsCompleted to harvest the collection of products. The first argument is of type object (the sender) and the second argument is a GetProductsCompletedEventArgs (defined within the proxy code generated by Visual Studio). GetProductsCompletedEventArgs includes a Result property representing the collection. GetProductsCompleted should assign that collection to the ListBox ItemsSource property. Because the ListBox DisplayMemberPath property is set to "Product", the ListBox displays the Product property of each ProductInfo in the collection. In addition, add a method named GetProductCompleted to harvest the results of the singular product lookup. The method should take an object (the sender) as the first parameter and a GetProductCompletedEventArgs (also generated by Visual Studio) as the second parameter. GetProductCompletedEventArgs holds the selected product in its Result property. Set the LayoutRoot DataContext property to the ProductInfo returned by the service. Because the TextBox controls in the Grid are bound to the Product, Price, and Description properties, this data appears in the TextBlocks automatically. public partial class MainPage : UserControl
{
public MainPage()
{
InitializeComponent();
}
void GetProductscompleted(object sender,
GetProductsCompletedEventArgs ea)
{
if (ea.Error == null)
{
this.theListBox.ItemsSource = ea.Result;
}
else
{
System.Diagnostics.Debug.WriteLine(ea.Error.InnerException);
this.theListBox.Items.Add("Gibson Les Paul Standard");
}
}
void GetProductCompleted(object sender,
GetProductCompletedEventArgs ea)
{
ProductInfo pi = ea.Result as ProductInfo;
if (pi != null)
{
this.LayoutRoot.DataContext = pi;
}
}
}
Connect the GetProductCompleted and GetProductsCompleted handlers to the ProductsService proxy in the MainPage constructor, and then call ProductsService.GetProducts to fetch the collection of products. Implement the ListBox SelectionChanged handler. Get the SelectedItem property from the ListBox and use it when calling the proxy's GetProduct method (that is, pass the currently selected item as the key). When the service completes its work, the result ends up in the GetProductCompleted method. public partial class MainPage : UserControl
{
public MainPage()
{
InitializeComponent();
productsService.GetProductsCompleted +=
GetProductscompleted;
productsService.GetProductCompleted +=
this.GetProductCompleted;
productsService.GetProductsAsync(this);
}
// Asynchronous handlers here...
private void theListBox_SelectionChanged(object sender,
SelectionChangedEventArgs e)
{
string key =
(theListBox.SelectedItem as ProductInfo).Product;
productsService.GetProductAsync(key, this);
}
}
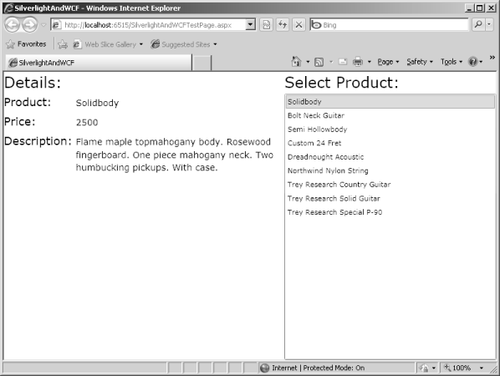
Run
the program. When the browser opens, you can see a collection of
products on the right-hand side. When you select a product, the details
appear on the left-hand side.
|
