5. Troubleshooting Wireless Connections
Occasionally, things don't work as planned. There are a few things you can check to troubleshoot the connection:
Signal strength
Security settings
Network diagnostics
5.1. Signal Strength
If the signal strength of
the wireless network is low, your computer may not be able to connect to
it. If you're unable to connect, you can easily check the signal
strength.
As background,
wireless technologies often advertise specific speeds. For example,
802.11g advertises speeds of 54 Mbps. However, this is not the
guaranteed speed. Instead, this is the fastest speed it can achieve
without errors.
When a wireless system
connects with the wireless device, it attempts to connect at the fastest
speed without errors. If the WAP and the wireless client are close,
they may use the maximum speed. However, if distance and barriers such
as walls separate the two devices, the speed may be substantially
slower.
NOTE
Hobbyists and attackers
have played around with methods to increase the range of wireless
networks for a long time. One well-known method uses a directional
Pringles potato chip can. A wire is attached to the base of an empty
Pringles can and then to the wireless NIC. The Pringles can is then
pointed to the wireless network. Some people have reported getting a
signal from more than a mile away using this method.
At some point, the devices
will determine that the signal is just not strong enough and they can't
connect. You can check the signal strength by clicking Connect To A
Network from the Network and Sharing Center. You can hover your mouse
over any of the connections to see additional details. Figure 9 shows the display.
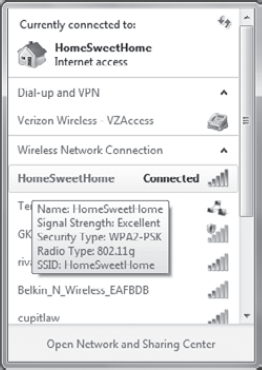
Although not apparent in a
black-and-white picture, the strength is shown by colored bars. The more
colored bars, the better the signal strength. If the signal is not
readable, it will be listed as No Signal.
In the figure, I've
hovered over the HomeSweetHome connection. It shows Signal Strength as
Excellent. Notice that it also shows Security Type, Radio Type, and
SSID.
5.2. Security Settings
In addition to checking the
signal, you can also verify the security settings of the wireless
profile.
The simplest thing to do is double-check the settings.
You can access the settings for
a wireless profile after clicking Manage Wireless Networks from the
Network and Sharing Center. You can also access these profiles by
launching Control Panel, entering Wireless in the Control Panel Search
box, and selecting Manage Wireless Networks. Right-click any profile and
select Properties.
Double-check the following settings:
Network Name
Security Type
Encryption Type
Security Key
|
A common problem you may see
with mobile computers is that the wireless capability is turned off.
Some mobile computers do this automatically to save power. You can
usually turn it on from a switch somewhere on the laptop. For example,
my HP Pavilion laptop has a touch switch. When I touch it, it turns
orange indicating it's off. If I touch it again, it turns blue
indicating it's on.
|
|
5.3. Network Diagnostics
Network Diagnostics in Windows
7 can identify and resolve many problems with network connections. This
includes both wired and wireless connectivity issues.
Some of the troubleshooting
wizards in earlier Windows versions didn't always provide real help for
professional administrators. They may have been useful for basic users
but not for the professionals. However, the Network Diagnostics tool is
clearly valuable to both basic users and advanced troubleshooters.
Microsoft mentions
that the Network Diagnostics tool can diagnose more than 180 different
issues. I'm stressing this because you may think of the older wizards
and overlook this tool. This and other troubleshooting wizards are truly
valuable.
|
You can also launch Network
Diagnostics from the Network and Sharing Center. Click the Troubleshoot
Problems link in the Change Your Network Settings section.
|
|
Network Diagnostics works best
with native Wi-Fi drivers. You can check to ensure that your system is
using native drivers with the following command prompt command: netsh wlan show drivers.
The type should be listed as Native Wi-Fi Driver. If it is listed as
Legacy Wi-Fi Driver, you should update the driver to get the best
performance from the diagnostics.
Launch the Network and Sharing Center. Click Start => Control Panel => Network And Internet => Network And Sharing Center.
Click
Change Adapter Settings. Select your wireless connection. Your display
will look something like the following graphic. Note that the commands
available on the toolbar change based on the connection you select.
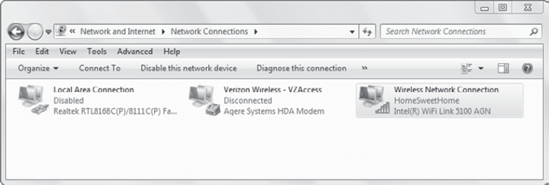
Select
Diagnose This Connection. This will run a wide range of diagnostics and
lead you through the steps needed to resolve the problem.
If
you're unable to resolve the problem with the diagnostics, check the
System log in Event Viewer. The Network Diagnostics Wizard logs events
with a source of Diagnostics – Networking.
