3. Connecting to a Wireless Network
If you're running Windows 7
and want to connect to a wireless network, you'll need to create a
wireless profile. First, ensure you have the correct information on the
wireless network. You'll need to know the following:
The name of the wireless network
The security type used by the wireless network
The encryption type used by the wireless network
The security key if one is used
|
The name of the wireless
network is also called the Service Set Identifier (SSID). Wireless
devices come with default names such as Linksys. However, it's common
for administrators to rename the SSID.
|
|
Figure 6
shows the screen used to create a wireless profile. For this figure,
the network name is WileyNetwork. It is using WPA2-Personal and AES. The
PSK is IL0veWindows7.
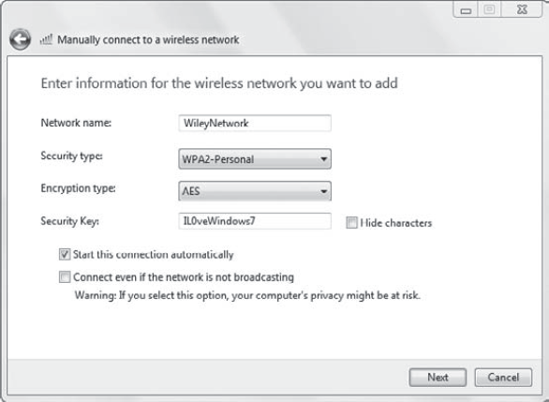
Notice in the figure that the
Start This Connection Automatically box is checked. This will ensure
that Windows 7 will connect to this wireless network when it is in
range. If WileyNetwork is configured to broadcast the SSID, the Windows 7
system will detect the broadcast and automatically connect.
You can get to the screen shown in Figure 6 by clicking Control Panel => Network And Internet => Network And Sharing Center. Click Manage Wireless Networks. Click Add and select Manually Create A Network Profile.
Once you have created the wireless profile, you can access it from the Network and Sharing Center. Figure 7 shows the Network and Sharing Center with a computer named DRG connected to a wireless network named HomeSweetHome.
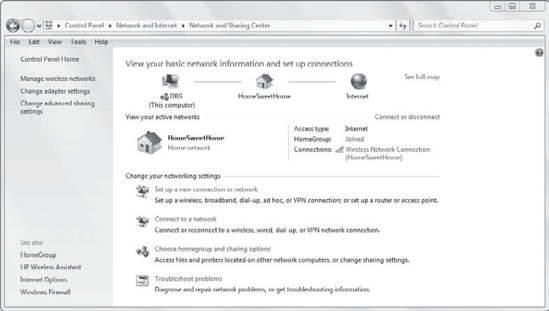
You can click the Connect Or
Disconnect link to connect to another wireless network. If the system
wasn't connected, this link would be labeled Connect To A Network. You
can also click the Connect To A Network link in the Change Your
Networking Settings section.
As a reminder, the extra menu
item in the left pane, Manage Wireless Networks, will appear only if the
computer has a wireless adapter installed. If your computer doesn't
have a wireless adapter, you won't see it.
Launch the Network and Sharing Center. Click Start => Control Panel => Network And Internet => Network And Sharing Center. Click Manage Wireless Networks. Click Add. Click Manually Create A Network Profile. Enter the name of the wireless network (SSID) in the Network Name text box. Select
the security type used by the wireless network. This can be WEP,
WPA-Personal, WPA-Enterprise, WPA2-Personal, WPA2-Enterprise, or 802.1x. Select the encryption type. This is also dependent on the wireless network settings. If
the security type requires a security key, enter it in the Security Key
text box. This is also known as the pre-shared key, or PSK. If you want to connect to this network whenever it is in range, ensure that Start This Connection Automatically is checked.
|
4. Setting Up Connections
The Network and Sharing
Center includes other tools to make the setup and connection of
wireless networks easy. You can click Set Up A New Connection Or Network
in the Change Your Networking Settings section.
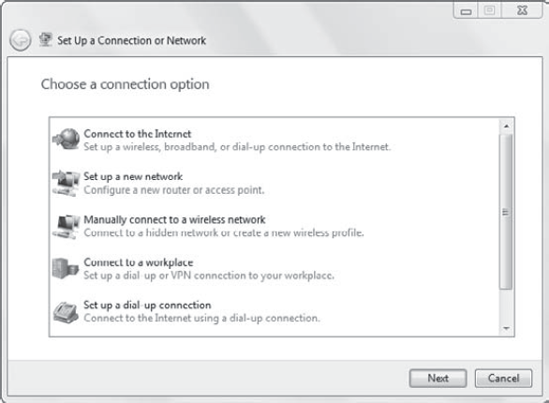
Figure 8
shows this screen. You can use this to launch several different wizards
for different types of connectivity. Some of these wizards are for
wireless connections. Some are for remote access connections.
This screen gives the following choices:
- Connect To The Internet
You would use this to set
up a broadband or dial-up connection. Broadband includes digital
subscriber line (DSL) or cable connections. Dial-up includes traditional
phone lines and the faster Integrated Services Digital Network (ISDN)
connections.
- Set Up A New Network
You can use this to
configure some wireless routers or access points. While this may work,
you'll probably have better luck following the directions of the
manufacturer for the wireless device.
- Manually Connect To A Wireless Network
You can use this to
connect to a hidden network, connect to an ad hoc network, or create a
new wireless profile. A hidden network is one where the SSID is not
broadcasting. You saw this screen earlier in Figure 6.
This is just a different path to get to the same place. After you enter
the network name, the security type, encryption type, and security key
(if used), you'll be able to connect.
- Connect To A Workplace
You can use this to create a
connection to a remote access server. It allows you to create either a
dial-up connection to your workplace or a VPN connection.
- Set Up A Dial-up Connection
You can use this to
create a dial-up connection to your Internet service provider. You'll
need to have the phone number and credentials provided by the ISP.
Although most urban areas have high-speed Internet access, many rural
areas are still using dial-up.
- Set Up A Wireless Ad Hoc (Computer-To-Computer) Network
You can use this option to
create the ad hoc network from this wizard, and then other users can
connect using the Manually Connect To A Wireless Network option. This
choice is not shown in the figure but can be viewed by scrolling down.