2. Special Permissions
Each basic permission is actually a set of
special permissions. Because of this, whenever you
allow or deny a basic permission, Windows 7 works behind the scenes to
manage the related special permissions for you. Table 2 lists the special
permissions related to each basic permission.
Table 2. Basic permissions and the related special permissions
| Basic
permission | Related special
permissions |
|---|
| Read | List Folder/Read
Data |
| | Read
Attributes |
| | Read Extended
Attributes |
| | Read Permissions
Synchronize |
| Read & Execute or
List Folder Contents | All special permissions
for Read listed previously |
| | Traverse Folder/Execute
File |
| Write | Create Files/Write
Data |
| | Create Folders/Append
Data |
| | Write
Attributes |
| | Write Extended
Attributes
Read Permissions
Synchronize |
| Modify | All special permissions
for Read listed previously |
| | All special permissions
for Write listed previously |
| | Delete |
| Full
Control | All special permissions
listed previously |
| | Delete Subfolders and
Files |
| | Change
Permissions |
| | Take
Ownership |
2.1. Viewing and modifying existing special permissions
You can view and set special permissions for a file or a folder
by completing the following steps:
In Windows Explorer, right-click the file or folder you want
to work with and then select Properties.
In the Properties dialog box, select the Security tab and
then click Advanced. In the “Advanced Security Settings for” dialog box, the
permissions are presented much as they are on the Security tab.
The key difference is that you now have additional advanced
options.
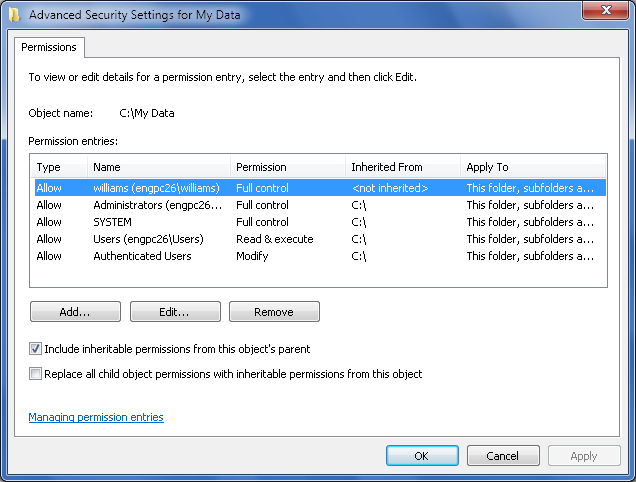
On the Permissions tab, click Change Permissions. This opens
an editable view of the Permissions tab in a new dialog box, as
shown in Figure 3.
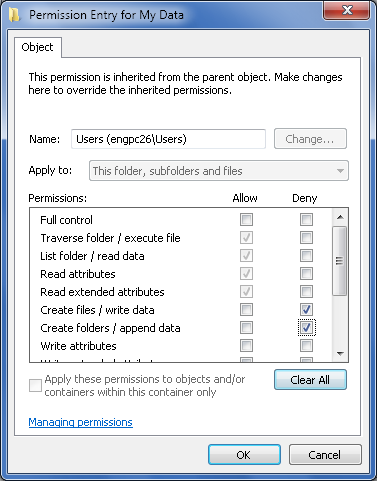
Click the existing user or group whose permissions you want
to modify, and then click Edit. This displays an editable
“Permission Entry for” dialog box (see Figure 4). If any
permissions are shaded (unavailable), they are being inherited
from a parent folder. You can override the inherited permission,
if necessary, by selecting the opposite permission, such as Deny
rather than Allow.
To modify existing permissions, use the Allow and Deny
columns in the Permissions For list. Select checkboxes in the
Allow column to add permissions, and clear checkboxes to remove
permissions.
To prevent a user or a group from using a permission, select
the appropriate checkbox in the Deny column. Denied permissions
have precedence over other permissions.
Click OK to save your changes.
2.2. Adding new special permissions
You can add new special permissions to a file or folder by
completing the following steps:
In Windows Explorer, right-click the file or folder you want
to work with and then select Properties.
In the Properties dialog box, select the Security tab and
then click Advanced. This opens the “Advanced Security Settings
for” dialog box.
On the Permissions tab, click Change Permissions. This opens
an editable view of the Permissions tab in a new dialog
box.
If a user or group whose permissions you want to assign
isn’t already listed, click Add to display the Select User or
Group dialog box.
Type the name of a user or a group account. Click Check
Names and then do one of the following:
If a single match is found for each entry, the dialog
box is automatically updated as appropriate and the entry is
underlined.
If multiple matches are found, you’ll see an additional
dialog box that allows you to select the name you want to use,
and then click OK.
If no matches are found, you’ve probably entered an
incorrect name. Modify the name in the Name Not Found dialog
box and then click Check Names again.
In the “Permissions Entry for” dialog box, configure
permissions for the user or group you added by allowing or denying
access permissions as appropriate.
Click OK to save your settings.
2.3. Removing new special permissions
You can add new special permissions to a file or folder by
following these steps:
In Windows Explorer, right-click the file or folder you want
to work with and then select Properties.
In the Properties dialog box, select the Security tab and
then click Advanced. This opens the “Advanced Security Settings
for” dialog box.
On the Permissions tab, click Change Permissions. This opens
an editable view of the Permissions tab in a new dialog
box.
Click the existing user or group whose permissions you want
to remove, and then click Remove.
Click OK to save your changes.
