3. Using the Application Compatibility Manager
At this point you have already learned how the
Microsoft Assessment and Planning (MAP) toolkit can be used to identify
what applications and drivers are out there in your desktop and laptop
network. It gives you a lot of information that you can use to identify
drivers and applications that can cause blocking issues with a Windows 7
deployment. What you are going to learn about now is how to use ACM, a
component of ACT, to discover the applications on your network.
|
In addition to discovering applications, ACM can do the following:
|
3.1. Gathering Application Compatibility Data
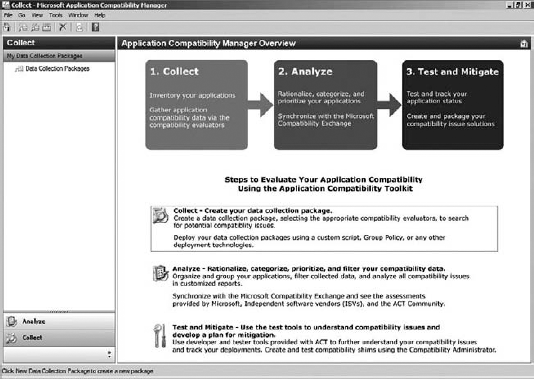
At this point you should have ACM open and be viewing the screen shown in Figure 11.
The detail pane illustrates what you need to do to
use ACM. You need to create a DCP to collect data for ACM to use. From
this, you can analyze the data and generate reports. Then you can use
the other ACT tools to test any applications with issues and create
shims to make them work on Windows 7.
You will now create a DCP. This is an MSI (Windows
Installer) file that you will deploy to PCs. It will run as a service on
those PCs and gather information. A file will be periodically sent to
the ACT log share for the Log Processing Service to use.
You can create a DCP by clicking on the link in this
introductory screen or by double-clicking in the detail pane of the
Collect window. That opens the screen shown in Figure 12.
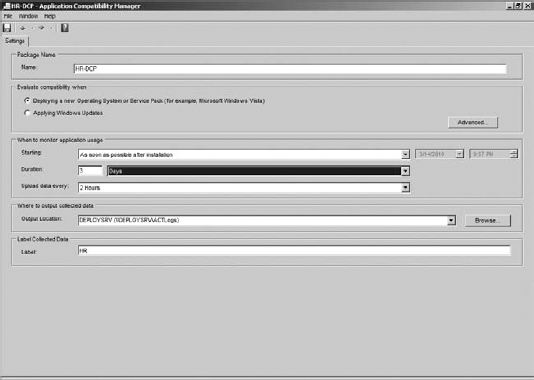
The first thing you need to do is name the DCP. Note
that ACM will also assign this name to the MSI installer file it
creates. You should use a descriptive name that suits the PCs you are
targeting with this collection.
You now need to specify why you are performing this
analysis. In a Windows 7 deployment project, choose Deploying A New
Operating System Or Service Pack (for example, Microsoft Windows Vista).
You can also deploy a DCP to perform application compatibility analysis
when deploying Windows updates.
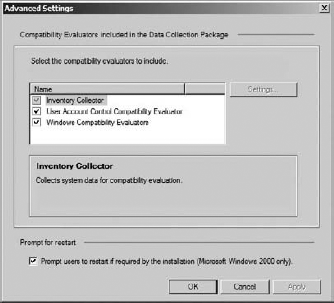
Click the Advanced button to open the dialog box shown in Figure 13.
The Advanced Settings dialog box allows you to select which evaluators
you want to enable in the DCP—that is, what sort of data the DCP will
collect. Notice that you can do the following:
At the bottom of the Advanced Settings dialog box is a
check box named "Prompt users to restart if required by the
installation (Microsoft Windows 2000 only)." Other operating systems are
not affected by this check box.
Back on the DCP creation screen in Figure 12,
you can configure the monitoring of application usage. Normally you
will want to start monitoring as soon as the DCP is able to. However,
you can alter that. For example, maybe you want to pre-deploy the DCP
and specify that it start working at a later date and time. The DCP will
have a limited shelf life. It will stop functioning after a specified
number of minutes, hours, or days, as defined by you in the Duration
field.
Be careful with the Upload Data Every setting. This
setting defines how often the DCP will upload collected data to the ACT
log share. The file may only be a few hundred kilobytes, but imagine
hundreds or thousands of computers all uploading that data at once. It
could become a distributed denial-of-service (DDoS) attack on your
network or file server! Plan this carefully, taking into account
placement and selection of log shares, numbers of PCs, and the choice of
upload frequency.
You can specify the location of the log share in the
Where To Output Collected Data area. You can use this ability to specify
a log share location in a branch office scenario. For example, your ACT
server might be in Chicago. You might be creating a DCP for an office
in Dublin, Ireland. Using the Output Location pull-down, you can
configure PCs in Dublin to use a local share. You can then configure
some controlled way to get the log share data back to the log share on
the ACT server for the Log Processing Service to use.
The final setting is Label. You can use this setting
to tag the collected data. You can later use this tag to filter data for
reporting and analysis reasons.
In this example, the DCP will be deployed to the
Human Resources (HR) department. The DCP is named HR and the label is
configured as HR so the data for this department can be easily
retrieved.
When you are finished, you can choose one of two
actions from the File menu. You can save the DCP to the database,
allowing you to revisit it later. The DCP will not be created and it
will not gather any data. You could think of it being in a draft state.
You can double-click on it to edit it again.
You can also save and create the DCP. This will
create the MSI file to a location of your choice. This approach allows
you to install the DCP.
How you install the DCP depends on your organization
and what you are doing with it. The DCP is an MSI file and that gives
you lots of options, including but not limited to the following:
Use "sneaker net."
Someone will run from PC to PC to install the DCP
by hand. This might be OK in small organizations, small departments, or
in a lab, but it will be an ordeal for larger networks.
Use Active Directory startup scripts.
You can run the installer using a startup script
that is defined in an Active Directory Group Policy Object that applies
to the computers of your choosing.
Use Active Directory Group Policy.
You can create a Group Policy Object to assign the MSI file to the computers of your choice.
Use System Center Configuration Manager.
This will likely be the choice for many larger
organizations. A package can be quickly created from the DCP MSI file
and advertised to a collection that contains the targeted computers.
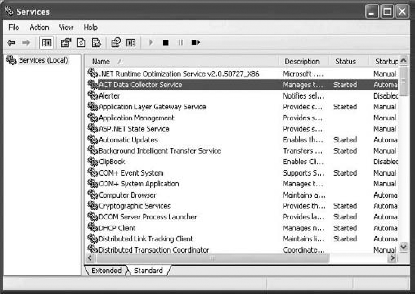
A new service is created when you install the DCP on a computer. You can see this in Figure 14, where we have deployed the HR DCP to a Windows XP computer.
|
When you are testing and trying out the process of
creating a data collection provider, you might want to force the DCP to
generate logs on an as-needed basis rather than according to the
configured schedule. You can do this by manually restarting the ACT Data
Collector Service on the PC.
|
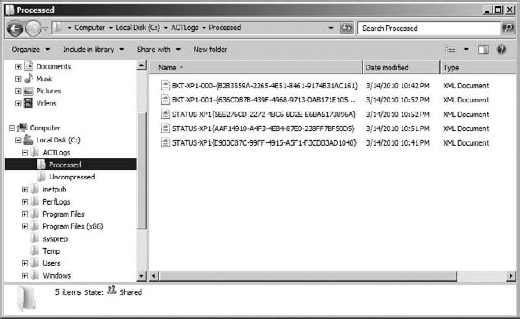
After a while you will start to see files added to the log share, as shown in Figure 15.
The DCP will upload two XML cabinet files to the log share. These files
are compressed and may be even less than 100 KB. The first is quite
small and gives a status update. The second contains the inventory from
the DCP. The Log Processing Service will expand these files and move the
contents into the \Processed folder as the files are processed.
|
You probably won't have a Log Processing Service that
directly processes the DCP data in the branch office ACT log shares.
You can transport or replicate those files to the central ACT log share
for the Log Processing Service to use.
|
You can safely delete these files as long as the ACT
SQL database is reliably backed up. You can use these files to re-create
the ACT database if you lose it.
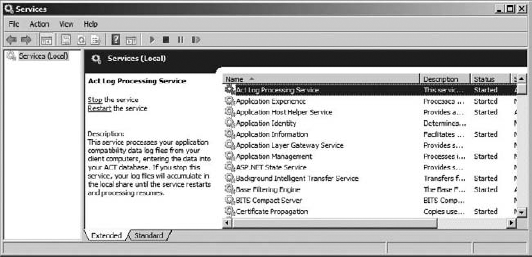
The Log Processing Service can be managed in the Services snap-in (Figure 16).
Check that this service is running if you notice that the DCP data is
no longer being processed. A failed service will be noticeable if XML
cabinet files are not being moved from the root of the ACT log share
into the "processed" subfolder.
Once you reach this point, you should have data in
the ACT database that you can start to use. We'll now look at viewing
this data and making use of it.
3.2. Using the Application Compatibility Data
Once your data collection packages start returning
data, you can begin viewing, analyzing, and using that data in the ACM.
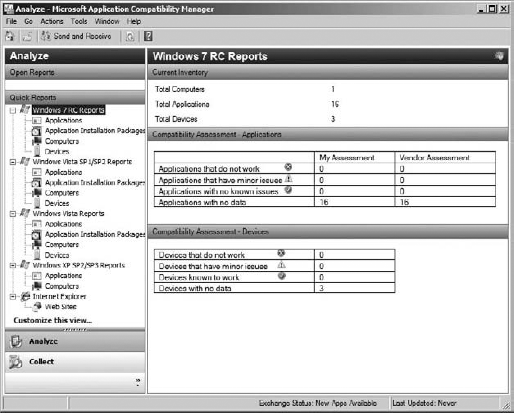
To do this, you will go into the Analyze view (Figure 17).
The navigation pane called Quick Reports on the left
side of the screen allows you to do compatibility analysis and tracking
for Windows 7 and for older operating systems such as Windows Vista and
Windows Vista with SP1 or SP2. Under each operating system, you can see
the applications, application installation packages, computers, and
devices that were found. Drilling into each one gives you more
information. We will focus on the Applications report data for Windows
7. Click on that in the Quick Reports navigation pane and the
Application Report, and you'll see the screen shown in Figure 18.
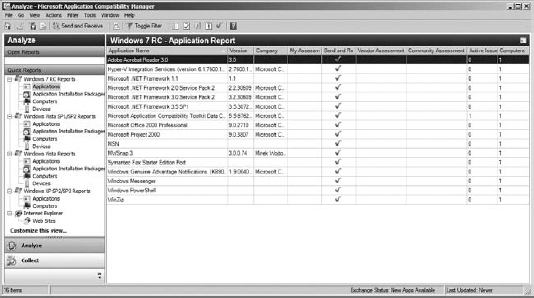
The view presents a number of columns by default. You
can right-click on the column names to add or remove columns to show
your preferred data.
Each row shows an individual application version that
was found in your scans. The network that was used in this example is
small but is obviously dated; you can see applications such as Office
2000 Professional and Project 2000 are running on the XP computer in the
lab network. You can see the application name, the version, and the
publisher. The rest of the columns are where things get interesting!
There's possibly going to be a lot of data here.
Using the Toggle Filter button on the toolbar, you can restrict what is
shown in the Application Report. This reveals a way of creating a
Boolean algebra statement based on the columns of data and values that
were gathered by the DCP. You could restrict the view to applications
that have a specific vendor or community assessment. Or you could filter
the view to data with one of your DCP labels. You can see an example of
that in action in Figure 19.

At this point you might be thinking, "I have hundreds
[or thousands] of applications. Do I have to test every single one?"
That's a pretty daunting project. Here's the great news: the work may
have already been done by Microsoft, the application vendor, and others
like you who have already gone through this process and shared their
data. What you will do now is see how to get those assessments into your
database, thus vastly reducing the amount of work you need to do.
On the toolbar you can see a Send And Receive button.
If you click this button, you can exchange data with Microsoft, where
those preexisting assessments are stored. You might have some
applications that you do not want to share data about. That's fine; if
you right-click on the application you can set the Send And Receive
Status to either Do Not Send To Microsoft or Send To Microsoft. Click
Send And Receive when you are ready to share your assessment data (if
you have any) and to download other assessments. A pop-up window appears
to let you know that data, including applications, your assessments,
your IP address, and your device list, will be uploaded. You can review
this data before sending it. You can even save it to a text file.
When you click Send in the Send And Receive Data
wizard, you'll see the progress of the upload and download. The
Application Report will be updated with the various assessments' data
when that completes.
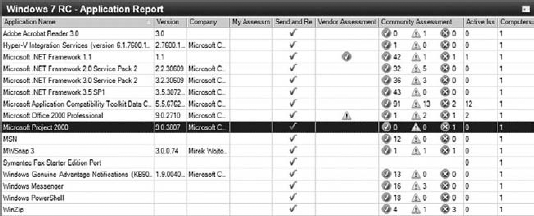
You can see in Figure 20
that only two of the applications have an assessment by their vendors.
But check out the Community Assessment column. That's the work that has
been done by other people like you. They've already tested these
applications on Windows 7 and submitted the overall result:
Green Check Mark
The test was successful.
Amber Exclamation Point
The application works but has some sort of
problem. Or maybe there is a workaround of some kind. Double-clicking on
Microsoft Office 2000 Professional reveals that Microsoft recommends an
upgrade.
Red X
The application could not be made to work.
|
Microsoft made a big effort to improve the
documentation associated with all the deployment technologies in the
buildup to the release of Windows 7. We strongly recommend that you read
this documentation. In the case of ACT, you can find it in the help
file.
|
You can view more detailed information by double-clicking on the application to open the window shown in Figure 21.
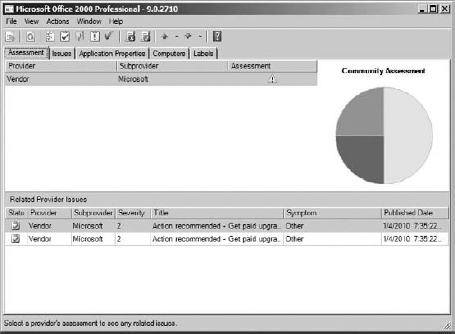
The window is split into a number of tabs. The
Assessment tab reveals the summary data. The vendor (the original
publisher) assessment is visible in the top pane if the data is made
available by the vendor. The pie chart shows what results the community
got with their testing. The Related Provider Issues pane at the bottom
shows what actions might be necessary to get the application working.
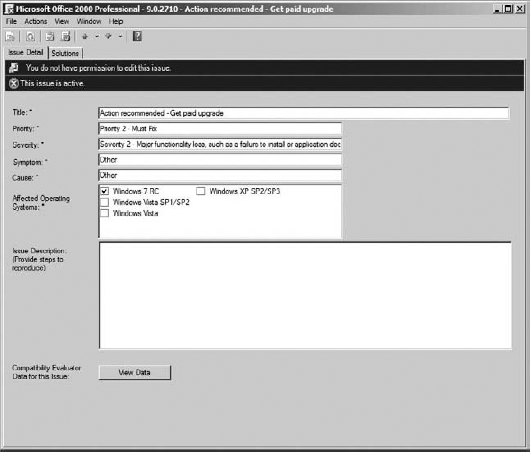
The Issues tab also shows the issue summary information, and you can double-click on it to get a more detailed view (Figure 22).
Back in the application assessment window, you will also find these tabs:
Application Properties
This tab reveals details about what the
application looks like when it is installed. This includes file
information, the associated MSI (installer) file(s), any entries in
Add/Remove Programs (or Programs and Features in newer operating
systems), shell extensions, Registry values, and any associated
services.
Computers
This tab shows the computers on which the DCP detected this application.
Labels
This tab lists the labels that you created in
your DCP to track your DCP usage and data. This label would be present in all data
produced by that DCP. This allows you to track the locations of
incompatible applications based on your labeling and targeted
installations of the DCP.
At this point you are ready to start creating
required mitigations and testing your applications. You can use the
downloaded assessment data to plan your testing. How you do this depends
on your organization, but here's one suggestion:
Applications with a 100% OK (check-mark) Status
You will either perform no testing or just the most basic of tests.
Applications with a Warning (Exclamation Point) Status
You will do any recommended actions or create required shims before performing in-depth tests on the application.
Applications with a Mostly or 100% Status
You either need to find an alternative application or look at using XP Mode to run the application on Windows 7 PCs.
When you create your test and mitigation plan, you
can assign a priority to each application. Do so by right-clicking on
the application and selecting Set Priority. The values here vary from
Unspecified, Priority 4 - Unimportant, all the way up to Priority 1 -
Business Critical.
3.3. Testing Application Compatibility
You can deploy Windows 7 PCs or virtual machines to your application testing team. Consider the following:
It's a good idea to use template machine
images that are redeployed every time you run a test or create a shim.
That way, one application will not contaminate another. This strategy
allows you to identify any basic application/Windows 7 compatibility
issues.
There's a good chance that you'll
want to test the applications on Windows 7 machines with no software
and Windows 7 machines with typical software configurations for
different departments. That approach will reveal complex issues if they
exist.
Please don't forget to test the
applications using a user account that truly represents the end user.
For example, most of your tests will probably be done as a
nonadministrative user.
As the project moves along, your team can use ACT on
their computers and connect to the ACT database. That means no one needs
to log directly into the ACT server. Just ensure that each person has
the required database permissions as we discussed earlier. Each team
member will be able to set the assessment by right-clicking on the
application and choosing Set Assessment. Here are the possible
assessment values for an application:
Green check mark: The application works.
Amber exclamation point: There are problems or there are solutions.
Red X: The application will not work.
Also, as progress is made you will right-click on the application and select Set Deployment Status. You can choose from:
Not Reviewed
Testing
Mitigating
Ready To Deploy
Will Not Deploy
At the end of this phase of the project, you will
have an assessment that you can use for your "go/no go" decision making.
In large organizations, you will sit down or communicate with each
application owner to decide a course of action for that application. Do
you deploy it as is, deploy it with a fix, or not deploy it? The latter
will probably require an alternative application to be sourced and
tested. Note that the deployment status of each application should
either be Ready To Deploy or Will Not Deploy.
|
We all know that project managers love reports. You can quickly produce an Excel spreadsheet using File => Export Report in the Application Compatibility Manager. You can then manipulate or format the data for your reports.
|
You've gone from knowing what applications you have
to being ready to deploy applications. Next we'll look at the process of
creating workarounds to the problems that were found.
System Center Configuration Manager (ConfigMgr) is
Microsoft's medium and large organization solution for managing hundreds
or thousands of computers. It normally contains a repository of
information about the computers, operating systems, and software that it
has detected and is able to manage. Microsoft has a free download,
Application Compatibility Toolkit Connector (ACT Connector), that allows
you to integrate ConfigMgr with ACT 5.6. You can download it from www.microsoft.com/down1oads/en/detai1s.aspx?Farrri1yID=567be755-1d64-471d-8376-6b463491654b&disp1ay1ang=en.
When you install ACT Connector, you will need to
grant the ConfigMgr service account access to the ACT database. You can
then configure ConfigMgr to integrate into the ACT database. This allows
you to run a number of reports from the ConfigMgr reporting site that
will contain information from ConfigMgr and from ACT.
You can also use ConfigMgr to distribute
your DCP. Unfortunately, it does not provide an alternative way to
gather DCP data. That data will still be uploaded to the DCP file share
that you configured when you created the DCP. However, this is a cool
way to provide delegated people with access to your application
compatibility reports.
