3.4. Backing Up the Entire PC: System Image
Backing up and restoring
data files is important and should occur on a regular basis; but over
the past few years, a new type of backup utility that backs up entire PC
systems using system images
has become quite popular. These types of backups protect against a
hardware disaster: if your hard drive completely fails, for example, you
can purchase a new drive and use the system image to restore the PC to
its previous state.
System imaging utilities
aren't actually all that new; corporations have been using them for
years. But now that consumer-oriented system imaging utilities have
gained in popularity, Microsoft has created its own version, which it
includes with Windows 7.
NOTE
The system image utility was called Windows Complete PC Backup in Windows Vista.
NOTE
System imaging
utilities typically compress the data on your hard drives so that the
image file takes up a lot less space than the original installation.
Various solutions use different compression schemes, but you may be
interested to know that Windows 7 uses the tried-and-true Virtual Hard
Disk (VHD) format that Microsoft also uses in Windows Virtual PC and its
server-based Hyper-V virtualization solutions. That means system images
created with Windows 7 will be supported for a long time to come.
NOTE
System images
contain complete PC environments. You can't arbitrarily restore only
parts of a system image, as you can with data backups. Instead, when you
restore a system image, it restores the entire PC and overwrites any
existing operating system you may already have on it. That means you
should be careful before restoring a system image: any data you have on
the disk will be overwritten. Of course, you're using automatic backups,
too, right?
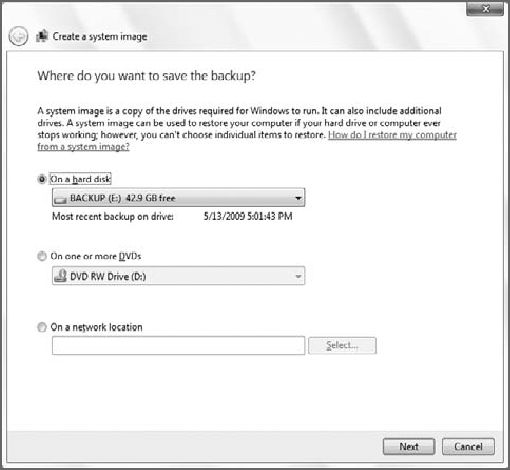
To create a system image,
launch Backup and Restore and click the Create a system image link on
the left. This launches the Create a system image wizard, shown in Figure 16,
which walks you through the steps needed to completely back up your PC
system. You can save system images to hard disks or optical storage
(such as recordable CDs or DVDs), as well as network locations (Windows 7
Professional, Enterprise, or Ultimate only). However, network-based
system images cannot be securely protected, as hard drive–based and
optical disc–based backups can.
NOTE
You can only write a system
image to a hard disk that is formatted with the NTFS file system.
That's because system images often exceed the 4GB file size limit
imposed by the older and less reliable FAT32 file system.
Click Next. As shown in Figure 17,
the wizard will give you a chance to confirm the backup settings and
remind you which partitions are being imaged. It will also provide an
estimate of the amount of space needed to create a system image. The
required storage space varies according to the size and usage of the
hard disk on your PC.
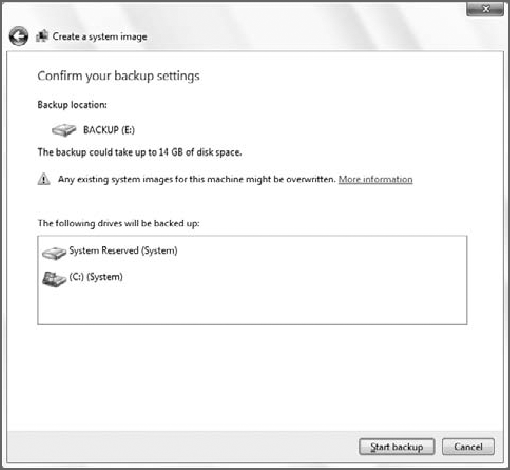
Click Start backup to begin the system image process.
NOTE
Two file system locations must be included in the system image—what Microsoft refers to as the boot partition and the system partition. The boot partition is always C:\, whereas the system partition is the drive with the Windows 7 Windows
directory. This is typically C:, but if you installed Windows 7 in a
dual-boot setup with a previous Windows version, the system partition
might be in a different location. If you have other drives or
partitions, you can optionally choose to include them in the system
image as well.
As the image is created, Windows Backup will provide an ongoing progress indicator, as shown in Figure 18.
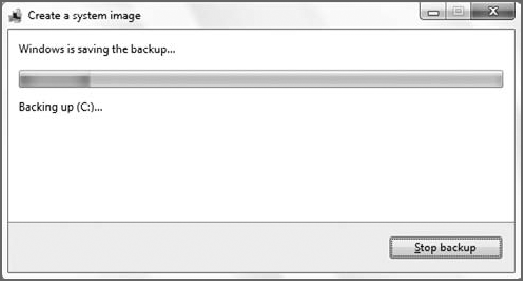
This process could take
some time, especially on a heavily used PC. When it's done, Windows
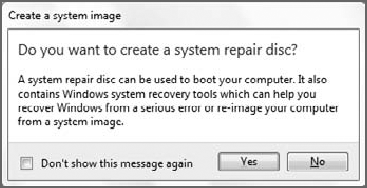
Backup will prompt you to create a system repair disc (see Figure 19).
You should do so: While Windows 7 does install recovery files directly
into the boot partition, in some instances, these files will not boot
the PC. If that happens, you can use the system repair disc to boot your
PC, a requirement for restoring the entire PC with the system image (as
you'll see in the next section).
NOTE
You can use any writeable CD or DVD for a system repair disc.
NOTE
If you have both 32-bit and
64-bit versions of Windows 7 on different PCs, you cannot use the same
system repair disc for each. Instead, you must create separate system
repair discs for 32-bit and 64-bit systems.
