3.5. Restoring the Entire PC
If a catastrophic
hardware or software failure has rendered your computer untenable, and
you simply want to return to a known good system backup, you can use one
of the system images you've previously created. Note, however, that you
typically need to boot your PC into the Windows Recovery Environment to
make this happen, either using the boot files on your PC or using the
system repair disc that you previously created. Note, too, that
restoring your PC in this fashion will wipe out all of the data and
settings changes you've made since the last system image, so this should
not be undertaken lightly.
Follow these steps to restore your entire PC using a system image:
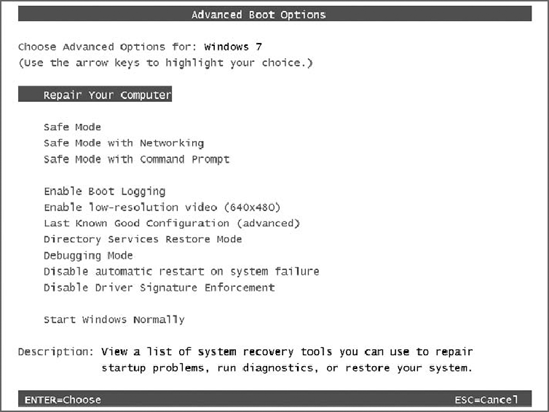
If
you are using a system repair disc, boot the PC with that. Otherwise,
after your PC has finished its BIOS sequence, hold down the F8 key.
Choose Repair Your Computer from the Advanced Boot Options screen (see Figure 20) and tap Enter.
After the Loading files screen, choose the correct language and keyboard input method and then click Next.
If
you booted from the hard drive, you will need to choose System Image
Recovery from the System Recovery Options window that appears.
Otherwise, System Recovery will examine the hard drives attached to your
PC and look for Windows installs. When it's done, it will list the
install(s) it found and give you the opportunity to use Windows 7's
built-in recovery tools to fix problems with Windows or you can restore your PC to an earlier time using a system image. Choose that latter option and click Next.
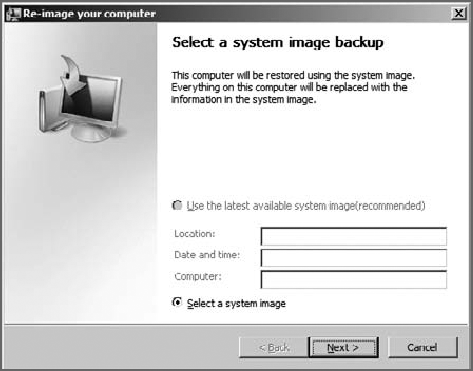
The Re-image your computer wizard begins, as shown in Figure 21.
In the first phase of this wizard, you can choose the latest image
available (the default) or you can select a different system image. When
you've chosen, click Next.
In
this step, you can choose to format the PC's hard drive and repartition
disks (as Windows 7 Setup would do) to match the layout of the system
image. Generally speaking, you should enable this option. Click Next to
continue.
In
the final phase of the wizard, you can verify your selections and click
Finish to continue. Note that restoring an entire PC from a system
image can be a time-consuming process.
4. Recovering Old Versions of Data Files
One of the most useful new features for information workers in Windows Server 2003 was Volume Shadow Copy, which silently and automatically created tiny backups, called snapshots,
of data files stored on the server every time a user made any changes.
In a managed environment like those based on Windows Server, Volume
Shadow Copy is a wonderful feature, because users who save documents on
the server can easily recover older document versions without having to
summon an administrator to restore an old backup from a tape or a hard
drive.
With Windows 7, Microsoft has added Volume Shadow Copy to its client operating system as well, renaming it Previous Versions.
This means that any Windows 7 user can take advantage of this amazing
bit of functionality and recover seemingly lost versions of files they
have mistakenly edited. No server operating system is required.
The trade-off, of
course, is disk space. Because Windows must store multiple copies of
your data files, Previous Versions does eat up a bit of disk space; but
because Previous Versions saves only the parts of files that have
changed, or what Microsoft calls the delta changes, the disk space loss is not as bad as it would be otherwise. In fact, you probably won't even notice it's happening.
Unlike with Windows Server, you
can't really manage how much disk space Volume Shadow Copy uses, or
even the drives on which it is enabled. Instead, Microsoft enables the
service across all drives, folders, and data files on a Windows 7 PC.
NOTE
Previous Versions
is yet another Windows 7 reliability feature that requires certain
Windows 7 product editions. Previous Versions is available on Windows 7
Business, Enterprise, and Ultimate editions only; users with Windows 7
Home Basic and Home Premium need not apply.
To access this feature, find a
document that you have changed a lot recently, right-click it, and
choose Properties. Then, navigate to the Previous Versions tab. As shown
in Figure 22, Windows maintains a number of previous versions, each of which you can restore if needed.
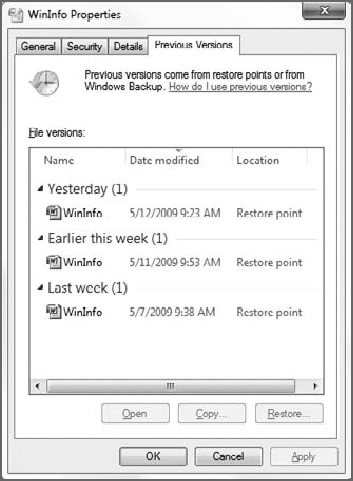
To restore an older
version of a file, select the file version you want and click the
Restore button. As with any other file copy operation, you are prompted
to replace the existing file, keep the existing file, or keep the
existing file and rename the newly recovered version.
NOTE
The number of
previous versions shown in this dialog depends on a number of factors,
including how long your system has been up and running and how many
times the document has been edited. In some cases, you may see no
previous versions. If so, ensure that the System Restore service is
running. We'll show you how in the very next section.
NOTE
What happens when you
delete a file or folder, either accidentally or otherwise? Can you use
Previous Versions to restore that item? Actually, you can. Here's how:
using Windows Explorer, navigate to the folder that contained the
deleted item, right-click the containing folder, and choose Restore
previous versions. (This method does not work with Libraries.) Then,
find a previous version of the containing folder; copy it from the
Previous Versions tab of the Properties window for that folder to your
desktop or some other location. Then, navigate into the folder structure
on the desktop (or wherever) and find the folder or file you are
looking for.
