5. Upgrading from Windows XP to Windows 7
Since the upgrade option
from Windows XP to Windows 7 is not available, you can use Windows Easy
Transfer to integrate settings from Windows XP to Windows 7 on the same
computer.
The first step in this
migration process is to copy your files to removable media such as an
external hard drive or thumb drive or to a network share. After the
installation of the Windows 7 operating system, you can then migrate
these files onto the Windows 7 system.
Exercise 4 shows how to accomplish the goal of migrating Windows XP to Windows 7.
|
First, copy files using Windows Easy Transfer.
Insert the Windows 7 DVD while running Windows XP. If the Windows 7 installation window opens automatically, close it. Open Windows Explorer by right-clicking the Start menu, and then clicking Explore. Browse to the DVD drive on yourcomputerandcltckmigsetup.exe in the Support Migwiz directory. When the Windows Easy Transfer window opens, click Next. Select an external hard disk or USB flash drive. Click This Is My Old Computer. Windows Easy Transfer scans the computer. Click
Next. You can also determine which files should be migrated by
selecting only the user profiles you want to transfer or by clicking
Customize. Enter a password to protect your Easy Transfer file, or leave the box blank, and then click Save. Browse
to the external location on the network or to the removable media where
you want to save your Easy Transfer file, and then click Save. Click Next. Windows Easy Transfer displays the file name and location of the Easy Transfer file you just created.
Then, use the Windows 7 DVD to install the operating system.
Start Windows 7 Setup by browsing to the root folder of the DVD in Windows Explorer and then double clicking setup.exe. Click
Go Online To Get The Latest Updates (Recommended) to retrieve any
important updates for Windows 7. This step is optional. If you choose
not to check for updates during Setup, click Do Not Get The Latest
Updates. Read
and accept the Microsoft Software License Terms. Click I Accept The
License Terms (required to use Windows), and then click Next. If you
click I Decline (cancel installation), Windows 7 Setup will exit. Click Custom to perform an upgrade to your existing Windows installation. Select the partition where you would like to install Windows. To move your existing Windows installation into a
Windows.old folder and replace the operating system with Windows 7,
select the partition where your current Windows installation is located. Click Next and then click OK. Windows 7 Setup will proceed without further interaction.
Finally, migrate files to the destination computer.
If you saved your files and settings in an Easy Transfer file on a removable media such as a UFD rather than on a network share, insert the removable media into the computer. Click Start, click All Programs, click Accessories, click System Tools, and then click Windows Easy Transfer. The Windows Easy Transfer window opens; click Next. Click an external hard disk or USB flash drive. Click This Is My New Computer. Click Yes, Open The File. Browse to the location where the Easy Transfer file was saved. Click the filename, and then click Open. Click
Transfer to transfer all files and settings. You can also determine
which files should be migrated by selecting only the user profiles you
want to transfer or by clicking Customize. Click Close after Windows Easy Transfer has completed moving your files.
|
After the migration process is complete, you should regain the disk space used by the Windows XP system by deleting the Windows.old directory, using the Disk Cleanup tool. The following steps show you how to use the Disk Cleanup tool.
Open Disk Cleanup. Click Start, click All Programs, click Accessories, click System Tools, and then click Disk Cleanup.
Click Clean Up System Files.
Previous
installations of Windows are scanned. After they are scanned, select
Previous Windows Installation(s) and any other categories of files you
want to delete.
Click OK and then click Delete Files.
|
Another important
decision that should be considered is whether to upgrade your Windows XP
clients to Windows Vista first and then upgrade the machine to Windows
7.
As you have seen, you can
migrate your users' data, but let's say you have software installed and
you can't locate the CD/DVD for that software package. It may be
beneficial to a user or organization to upgrade the Windows XP machine
to Windows Vista. After that installation is complete, upgrade the Vista
machine to Windows 7.
This is just another option that is available to you when migrating your users to the Windows 7 operating system.
|
6. Supporting Multiple-Boot Options
You may want to install Windows 7 but still be able to run other operating systems. Dual-booting
or multibooting allows your computer to boot multiple operating
systems. Your computer will be automatically configured for dual-booting
if there was a supported operating system on your computer prior to the
Windows 7 installation, you didn't upgrade from that operating system,
and you installed Windows 7 into a different partition.
One reason for dual-booting is to
test various systems. If you have a limited number of computers in your
test lab and you want to be able to test multiple configurations, you
should dual-boot. For example, you might configure one computer to
multiboot with Windows XP Professional, Windows Vista, and Windows 7.
Here are some keys to successful dual-boot configurations:
Make sure you have plenty of disk space.
Windows 7 must be installed on a separate partition in order to dual-boot with other operating systems.
Install
older operating systems before installing newer operating systems. If
you want to support dual-booting with Windows XP and Windows 7, Windows
XP must be installed first. If you install Windows 7 first, you cannot
install Windows XP without ruining your Windows 7 configuration. This
requirement also applies to Windows 9x, Windows 2000, and Windows Vista.
Never,
ever upgrade to Windows 7 dynamic disks. Dynamic disks are seen only by
Windows 2000, Windows XP Professional, Windows Server 2003, Windows
Vista, and Windows 7 and are not recognized by any other operating
system, including Windows NT and Windows XP Home Edition.
Only
Windows NT 4.0 (with Service Pack 4), Windows 2000, Windows XP, Windows
Vista, Windows 7, Windows Server 2003, and Windows Server 2008 can
recognize NTFS file systems. Other Windows operating systems use FAT16
or FAT32 and cannot recognize NTFS. All Windows-based operating systems
can recognize FAT partitions.
If you will dual-boot with Windows 9x, you must turn off disk compression or Windows 7 will not be able to read the drive properly.
Do not install Windows 7 on a compressed volume unless the volume was compressed using NTFS compression.
Files that are encrypted with Windows 7 will not be available to Windows NT 4.
|
If you are planning on
dual-booting with Windows NT 4, you should upgrade to NT 4 Service Pack 4
(or higher), which provides NTFS version 5 support.
|
|
Once you have installed
each operating system, you can choose the operating system that you will
boot to during the boot process. You will see a boot selection screen
that asks you to choose which operating system you want to boot.
The Boot Configuration
Data (BCD) store contains boot information parameters that were
previously found in boot.ini in older versions of Windows. To edit the
boot options in the BCD store, use the bcdedit utility, which can be
launched only from a command prompt. To open a command prompt window,
you can do the following:
Launch \Windows\system32\cmd.exe.
Open the Run command by pressing the [Windows] key + R and then entering cmd.
Type emd.exe in the Search Programs And Files box and press Enter.
After the command prompt window is open, type bcdedit to launch the bcdedit utility. You can also type bcdedit/? to see all the different bcdedit commands. A few bcdedit commands may be needed when dual-booting a machine. Table 2 shows a few of the bcdedit commands that may be needed when dual-booting.
Table 2. Bcdedit commands
| Command | Explanation |
|---|
| /default | Allows you to specify which operating system will start when the time-out expires. |
| /displayorder | Shows the display order that the boot manager uses when showing the display order to the user. |
| /timeout | Specifies the amount of time used before the system boots into the default operating system. |
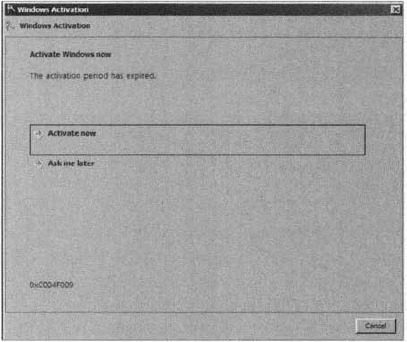
7. Using Windows Activation
Windows Activation is
Microsoft's way of reducing software piracy. Unless you have a corporate
license for Windows 7, you will need to perform postinstallation
activation. This can be done online or through a telephone call. Windows
7 will attempt automatic activation three days after you log on to it
for the first time. There is a grace period when you will be able to use
the operating system without activation. After the grace period
expires, you will not be able to create new files or save changes to
existing files until Windows 7 is activated. When the grace period runs
out, the Windows Activation Wizard will automatically start (see Figure 1); it will walk you through the activation process.