After having just learned about some of the
many excellent ways in which you can collect information and bring
content from anywhere into OneNote.
Indeed, it might be, but I wanted to point out a few additional
features that, depending on your work habits and needs, could come in
really handy in your research work.
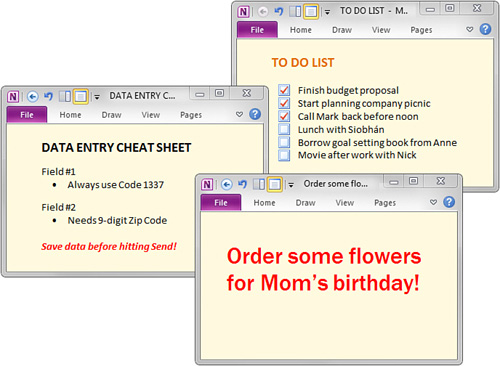
Let’s start with side notes—the electronic
equivalent of little yellow sticky notes that you can create with
OneNote and position all over your monitor (see Figure 1).
What’s the point of side notes? Quite simply, they
are marvelous for keeping important lists, reminders, and reference
information visible at all times while you work in other programs. You
can keep less-important side notes in the background and pin the most
important ones on top so they stay visible even over other windows.
Unlike paper-based sticky notes, side notes come
with all the benefits of a regular notes page in OneNote. You can
format text, make lists, add pictures and screen clippings, add links,
insert audio and video recordings, and tag important notes. Like all
regular notes, side notes are automatically saved as part of your
notebook, so that any information you jot onto them can be recalled
again later and, if you like,
be moved to the appropriate places in your actual notes. Have you ever
tried consolidating all of your paper-based sticky notes in this way?
Other than manually retyping everything, it just doesn’t work. Only
OneNote makes managing sticky notes easy by taking all of the work out
of them.
Using side notes is as simple as pressing a keyboard
shortcut to create them. The canvas of a side note may appear smaller,
but it works the same as a normal page in OneNote. Type some text,
either for important reminders, daily to-do lists, or stuff you want to
have on your screen at all times, and you’re set to go. The uses for
side notes are as unlimited as those yellow sticky notes. In OneNote,
however, they’re not only more convenient, but also much more
environmentally friendly.
Creating Side Notes
To create a new side note, follow these steps:
1. | On any page in your notes, on the ribbon, click View.
|
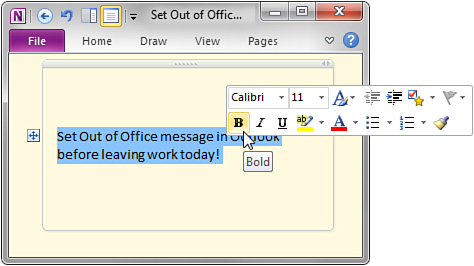
2. | In
the Window group, click New Side Note. A small window with a yellow
background appears. Like any notes page in OneNote, you can click this
note and begin typing (see Figure 2). To quickly format its text, select it, and then make your choices from the Mini toolbar that appears.
|
|
If you have the OneNote Screen Clipper and Launcher
running in your Windows taskbar , you can create a new side note
more quickly by using its keyboard shortcut. Hold down the Windows key
and then press N to create a new side note at any time, even if OneNote
2010 isn’t running. You can create an unlimited amount of additional
side notes at any time—even while you’re in another program or another
side note.
|
To keep a side note visible at all times, do the following:
1. | Switch to the side note that you want to keep on top of all other windows.
|
2. | Click
the View tab at the top of the small side note window. When the ribbon
appears, click Keep on Top. The side note will now stay pinned on top
of any other windows displayed on your monitor. To turn this option off
again, click the View tab once more and then click Keep on Top again to
turn the option off.
|
|
Because side notes work like regular notes in
OneNote, you don’t have to save them. They’re automatically saved for
you the very instant they’re created. Side notes stay saved even if you
click the red X in the upper-right corner to close a side note.
|
To quickly browse through all of your side notes, do the following:
1. | Switch to any side note you currently have open.
|
2. | Click the Pages tab and then click either Previous Page or Next Page.
|
3. | Repeat
step 2 until you find the side note you want. Alternately, you can
press the Ctrl+PgUp (Page Up) keyboard shortcut to skip to the previous
side note, or you can press the Ctrl+PgDn (Page Down) keyboard shortcut
to skip to the next side note.
|
To make things easier, all side notes are sent to a
special section called Unfiled Notes, which is stored in the default
notebook you created when you first installed OneNote 2010. Think of
the Unfiled Notes section as your virtual OneNote junk drawer, where
you can temporarily toss all of the random things you collect until you
later have time to discard what you no longer need and organize what
you want to put where it really belongs.
|
As you use OneNote over time, you’ll likely create
multiple notebooks in which to work and to keep a variety of
information. If you want to change the default location of your Unfiled
Notes section at any time, you can easily do so. Click File and then
click Options. In the OneNote Options dialog box that opens, click Save
& Backup and then click the Unfiled Notes Section path in the list.
Click the Modify button to navigate to and then designate a different
section as your Unfiled Notes section at the location you want. Until
you’re more familiar with this special section and its uses, however,
it’s probably best to leave things as they are for now.
|
As with all organizational features that are
available in OneNote, cleaning out your Unfiled Notes collection is
entirely optional. Even if you never organize it, you’ll still be able
to find everything stored there—including any and all side notes that
you’ve created.
As we’re on the topic of side notes,
though, let me quickly teach you how you can access the Unfiled Notes
section to view and review any side notes that you create.
