When you’re working on Windows Live, you can add
files to a SkyDrive folder. You can add files from your computer drive
by using the Add files link or while you create a new folder. You can
add files from your computer by using two methods: (1) by dragging files
from Windows Explorer (with the Windows Explorer and your browser
window side by side) or (2) by using the Select files from your computer
link. Once a document is stored on Windows Live, you can copy, move, or
rename the file. If you no longer need the document, you can delete it
to save space.
Add Files to a SkyDrive Folder
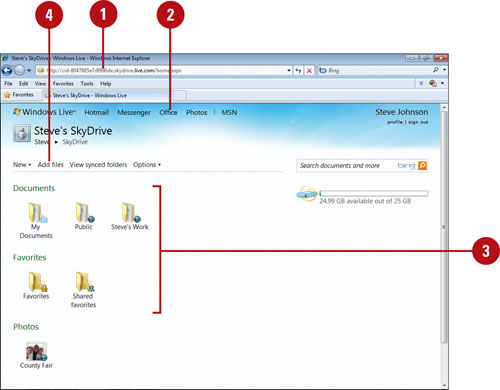
 Open your browser, go to www.live.com, and then sign in to Windows Live. Open your browser, go to www.live.com, and then sign in to Windows Live.
 Navigate to the Windows Live SkyDrive. Navigate to the Windows Live SkyDrive.
 Click a folder icon to navigate to the folder where you want to add files. Click a folder icon to navigate to the folder where you want to add files.
 Click the Add files link. Click the Add files link.
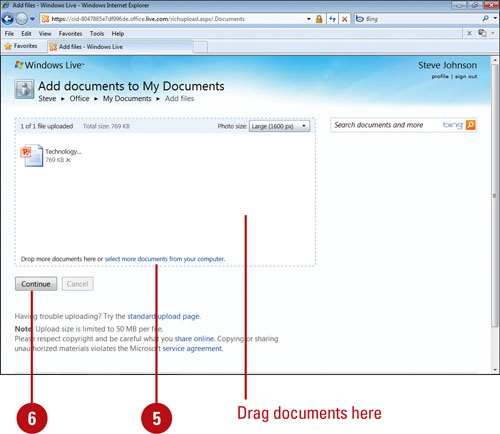
  Drag files from Windows Explorer to the selected area, or click the Select documents from your computer link, select the files to upload, and then click Open. Drag files from Windows Explorer to the selected area, or click the Select documents from your computer link, select the files to upload, and then click Open.
 Click Continue. Click Continue.

Copy, Move, Rename a Document
 Open your browser, go to www.live.com, and then sign in to Windows Live. Open your browser, go to www.live.com, and then sign in to Windows Live.
 Navigate to the Windows Live SkyDrive. Navigate to the Windows Live SkyDrive.
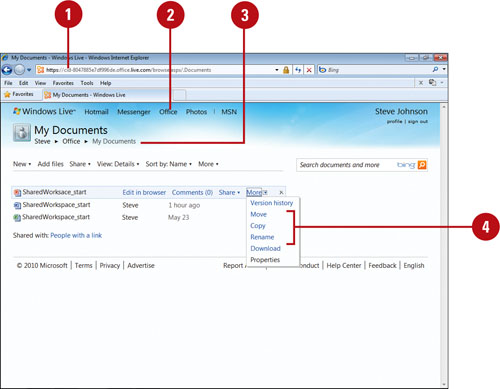
 Click a folder icon to navigate to the document. Click a folder icon to navigate to the document.
 In Details view, point to the document you want, click the More link, and then use any of the following: In Details view, point to the document you want, click the More link, and then use any of the following:
- Move. Click Move, click a folder, and then click Move this file into foldername.
- Copy. Click Copy, click a folder, and then click Copy this file into foldername.
- Rename. Click Rename, enter a new name, and then click Save.

Delete a Document
 Open your browser, go to www.live.com, and then sign in to Windows Live. Open your browser, go to www.live.com, and then sign in to Windows Live.
 Navigate to the Windows Live SkyDrive. Navigate to the Windows Live SkyDrive.
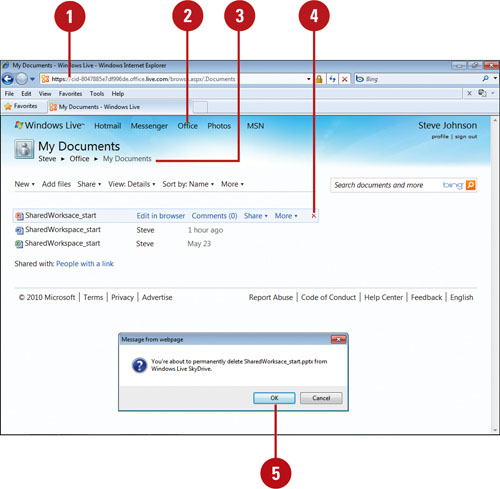
 Click a folder icon to navigate to the document you want to delete. Click a folder icon to navigate to the document you want to delete.
 In Details view, point to the document you want to delete, and then click the Delete link. In Details view, point to the document you want to delete, and then click the Delete link.
 Click OK to confirm the deletion of the file. Click OK to confirm the deletion of the file.

|