Logo
programming4us
programming4us
programming4us
programming4us
Home
programming4us
XP
programming4us
Windows Vista
programming4us
Windows 7
programming4us
Windows Azure
programming4us
Windows Server
programming4us
Windows Phone
 
programming4us
Windows 7

Microsoft Visio 2010 : Using the Organization Chart Wizard with New Data

- Free product key for windows 10
- Free Product Key for Microsoft office 365
- Malwarebytes Premium 3.7.1 Serial Keys (LifeTime) 2019
7/10/2011 5:57:26 PM
If your organization data is not in a format that Visio can read and you would like to type it into a spreadsheet but don’t want to start from scratch, the Organization Chart Wizard can create a preformatted spreadsheet for you.

In this exercise, you will use the Organization Chart Wizard to create an Excel workbook into which you will enter your organization data.


Note:

Click the File tab, and then click New. In the Template Categories section, click Business, and then double-click the Organization Chart Wizard thumbnail.


  1. On the first page of the Organization Chart Wizard, click Information that I enter using the wizard.

    Notice that the description text for this option confirms that you will be creating a new data source.

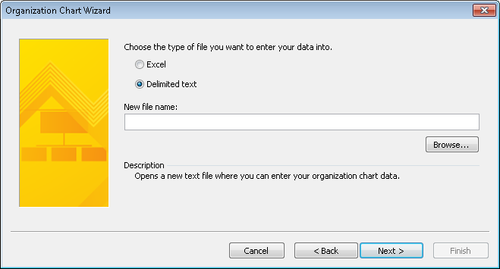
  2. Click Next. The file type selection page appears.

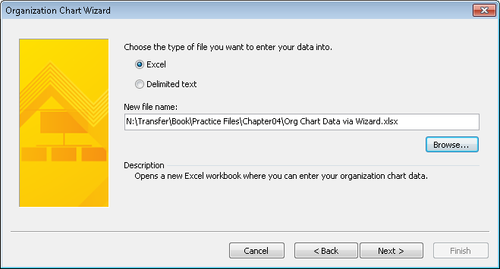
  3. On the file type selection page, click Excel, and then click the Browse button. In the resulting dialog box, select a folder in which to save the file, type Org Chart Data via Wizard in the File name box, and then click the Save button.

    The selected file name appears in the New File Name box on the next wizard page.

  4. Click Next. Visio instructs you to type your data over the sample data provided in the Excel workbook it has created.
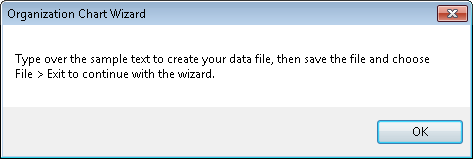
  5. Click OK. 
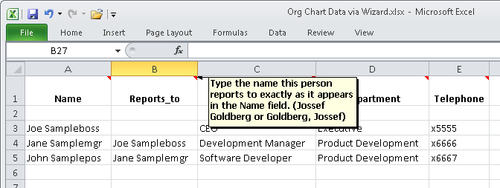
Excel opens to display the formatted workbook. As shown in the following graphic, notice that each column heading includes a comment with instructions for entering data in that column.

  6. Ordinarily, you would type your data into the worksheet at this point; however, for this exercise you will use the sample data, so just close Excel.


    Warning:

    Important

    Closing the worksheet isn’t sufficient; you must close the Excel application.


    When you close Excel, Windows returns the focus to Visio, where you will see the final page of the Organization Chart Wizard.

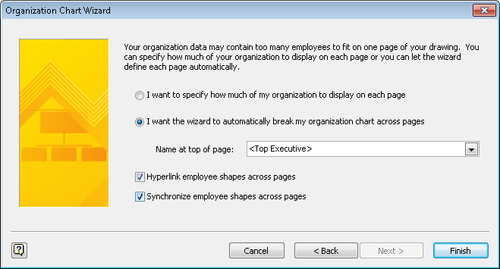
  7. Click Finish to display your org chart.


Note:

Save the sample file if you want to keep it.

Other -----------------
- Configuring the Windows 7 Operating System (part 3) - Understanding the System Icon & Using the Registry Editor
- Configuring the Windows 7 Operating System (part 2) - Configuring Windows Aero & Using Control Panel
- Configuring the Windows 7 Operating System (part 1) - Configuring the Desktop Environment
- Microsoft Visio 2010 : Using the Organization Chart Wizard with Existing Data
- Visual Studio 2010 : Building Smart Client User Interfaces - Laying Out Your Controls
- Visual Basic 2010 : Manipulating Documents and Media - Viewing XPS Documents
- Visual Basic 2010 : Manipulating Documents and Media - Manipulating Documents
- Visual Basic 2010 : Manipulating Documents and Media - Viewing Images & Playing Media
- Automating the Windows 7 Installation : Deploying Unattended Installations (part 4) - Microsoft Assessment and Planning Toolkit
- Automating the Windows 7 Installation : Deploying Unattended Installations (part 3) - Installing the WDS Server Components
 
 
Top 10
- Microsoft Visio 2013 : Adding Structure to Your Diagrams - Finding containers and lists in Visio (part 2) - Wireframes,Legends
- Microsoft Visio 2013 : Adding Structure to Your Diagrams - Finding containers and lists in Visio (part 1) - Swimlanes
- Microsoft Visio 2013 : Adding Structure to Your Diagrams - Formatting and sizing lists
- Microsoft Visio 2013 : Adding Structure to Your Diagrams - Adding shapes to lists
- Microsoft Visio 2013 : Adding Structure to Your Diagrams - Sizing containers
- Microsoft Access 2010 : Control Properties and Why to Use Them (part 3) - The Other Properties of a Control
- Microsoft Access 2010 : Control Properties and Why to Use Them (part 2) - The Data Properties of a Control
- Microsoft Access 2010 : Control Properties and Why to Use Them (part 1) - The Format Properties of a Control
- Microsoft Access 2010 : Form Properties and Why Should You Use Them - Working with the Properties Window
- Microsoft Visio 2013 : Using the Organization Chart Wizard with new data
 
programming4us
Windows Vista
programming4us
Windows 7
programming4us
Windows Azure
programming4us
Windows Server