You’ll often find that you want to share your
documents, pictures,
videos, and other types of files with someone else. One of the most
basic
ways to share your files is to send a file to someone by attaching
it to
an email message. Most instant messaging programs will allow you to
share
files with other people while you are chatting with them as well.
Other
ways to share files include copying the files to a data disk or a
device
with removable storage, such as a USB flash device. Windows 7 offers
other
ways to share your data beyond these basic techniques, and these
built-in
sharing features are the subject of this section.1. Enabling Sharing
Whether your computer is part of a domain,
workgroup, or
homegroup, Windows 7 supports two file-sharing models: standard
folder
sharing and public folder sharing. With standard folder sharing,
you can
share files from any folder on your computer. Because you don’t
need to
move files from their current location, standard folder sharing is
also
referred to as in-place folder sharing.
You can enable standard
folder sharing only on disks formatted
with NTFS. Two sets of permissions determine precisely who has
access to
shared files: NTFS permissions and share permissions. Together,
these
permissions enable you to control who has access to shared files
and the
level of access assigned. You do not need to move the files you
are
sharing.
With
public folder sharing, you share files from a computer’s
Public folder simply by copying or
moving files to the Public folder.
Public files are available to anyone who logs on to your computer
locally regardless of whether he or she has a standard user
account or
an administrator user account on the computer. You can also grant
network access to the Public
folder. If you do this, however, there are no access restrictions.
The
Public folder and its contents
are
open to everyone who can access your computer over the local
network.
Computers
running Windows 7 can use both sharing models at the
same time, and you also have several new sharing options. A key
part of
this is a home networking feature called the homegroup.
Within homegroups, you can
share your libraries automatically.
When you set up a
computer running Windows 7 and are
connected to a home network, the Setup program creates a homegroup
automatically if one doesn’t already exist on your home network.
Setup
won’t create a homegroup if it detects an existing homegroup or if
your
computer is connected to a domain. Don’t worry: you can create a
homegroup or join your computer to an existing homegroup at any
time. To
do so, however, the computer’s network location must be set to
Home.
You can change
the computer’s network location and configure basic
homegroup options by completing the following steps:
Click Start→Control Panel→Network and Internet
→Network And
Sharing Center.
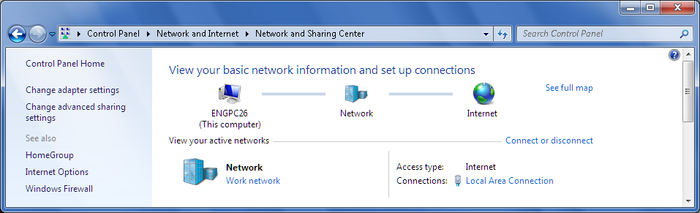
The Network and
Sharing Center appears, showing the current
network type (see Figure 1).
If the current
network type is Work or Public and you
are actually connected to a home network, click the “Work
network”
or “Public network” link.
When
prompted to select a location for the network, click
“Home network.”
Windows will then
start the Create a Homegroup or Join a
Homegroup Wizard. (If you were a member of a homegroup in the
past,
Windows will rejoin that homegroup.)
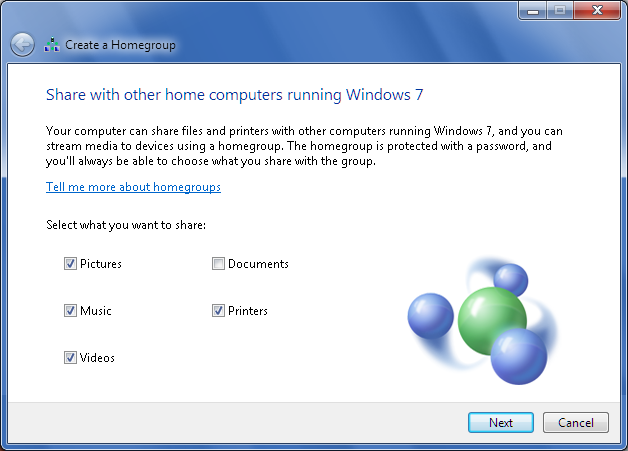
When
you are creating a homegroup, you’ll be able to specify
the libraries to share, as shown in Figure 2. After you specify the
libraries to share, click Next. Windows will then generate a
password for the homegroup. If you want to join other
computers to
the homegroup, enter this password when prompted. Click
Finish.
When you are joining an
existing homegroup, you’ll need to
specify the homegroup password. When you click Next, your
computer
will join the homegroup and you’ll be able to specify the
libraries
you want to share with other computers. Click Finish.
NOTE
Computers running the Starter
or Home
Basic edition of Windows 7 can join a homegroup but
cannot be used to create one.
When your
computer is part of a homegroup, one of the easiest ways
to share folders is simply to include a folder in a shared library
(right-click the folder, select Include In Library and then select
the
appropriate library, such as Documents). In a homegroup, you also
have
the option to share a folder directly with anyone in the homegroup
as
read-only or read-write. In a workgroup or domain, you have the
option
of sharing with specific people.
Another type of sharing is printer sharing.
Windows 7 allows you
to share printers attached to your computer. Windows 7 also allows
you
to share media in your Windows Media Player library. When you
share your
media, you can play media from another computer or from an Xbox
360 or
other networked digital media player, and let others who can log
on to
your computer over the network play media from your computer.
Computers
in a homegroup automatically share printers but do not
automatically
share media.
When
your computer is member of a homegroup, keep in mind that
what is and isn’t shared to members of the homegroup is controlled
using
homegroup settings. However, the overall control for whether
sharing is
permitted or not is still controlled using the advanced sharing
settings.
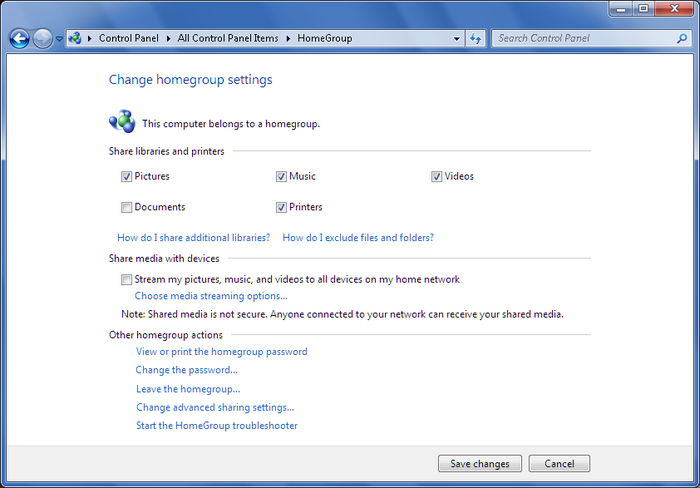
You
can manage the homegroup sharing settings by completing the
following steps:
Click Start→Control Panel→Network and Internet
→Homegroup.
On the “Change homegroup
settings” page, shown in Figure 3, share libraries,
printers, and media as appropriate and then click “Save
changes.”
When you use your
computer in a homegroup, password-protected sharing is enabled
automatically and
any user that wants access to shared data must either be logged on
to a
computer that is a member of the homegroup or have a user account
and
password on your computer. You can enable password-protected
sharing in
workgroup and domain configurations as well. When you do, only
users who
have an account and password on your computer can access shared
data.
You can
manage the various file-sharing features by completing the
following steps:
Click Start→Control
Panel→Network and Internet →Network and
Sharing Center.
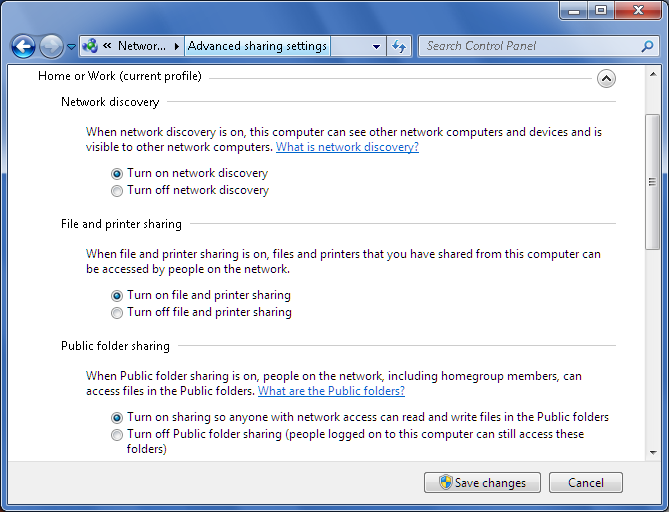
In the
Network and Sharing Center, click “Change advanced
sharing settings” in the left pane.
Windows creates a separate network profile for each network
you use. Use the expand button to display the profile you want
to
work with, as shown in Figure 4.
Network
discovery affects whether a computer can find
other computers and devices on the network and whether other
computers on the network can find this computer. To enable
network
discovery, select “Turn on network discovery.” To disable
network
discovery, select “Turn off network discovery.”
File and printer sharing controls whether a
computer
can share files and printers. To enable file sharing, select
“Turn
on file and printer sharing.” To disable file sharing, select
“Turn
off file and printer sharing.”
Public
folder sharing options control Public folder
sharing on your computer. To enable public folder sharing,
select
“Turn on sharing.” To disable public folder sharing, select
“Turn
off public folder sharing.”
Media streaming allows you to share your Windows
Media
Player library. You can configure media streaming as follows:
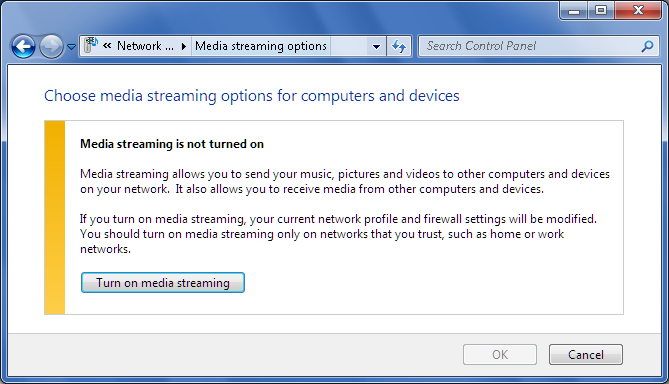
If media streaming is turned off
and you want to enable
it, click Choose Media Streaming Options, click Turn On
Media
Streaming and then click OK (see Figure 5). By default, Windows
streams your Music, Pictures, Recorded TV, and Video
libraries
to all devices on the local network and to media programs
on
your computer and to remote connections to your computer.
To specify the media that is
streamed, click Choose Media
Streaming Options and then click Choose Default Settings.
Under
Choose Parental Ratings, select Only and then select or
clear
checkboxes for media types as appropriate. Under Star
Ratings,
select Only and then specify the star rating or set or
clear the
“Include unrated files” checkbox.
To turn off media streaming, click Choose Media
Streaming
Options and then click Block All.
Windows uses
encryption to securely transfer your shared data.
By default, the encryption level is set to 128-bit encryption.
However, before you enable 128-bit encryption, you’ll want to
ensure
all computers and devices you are sharing with support this
level of
encryption.
NOTE
The procedure you use to determine the level of
encryption
supported depends on the type of device. Generally, all
computers
running Windows 7 will support 128-bit encryption.
Password-protected
sharing allows you to restrict
access so that only people with a user account and password on
your
computer can access shared files, shared printers, and the Public folder. To enable
password-protected sharing, select “Turn on password protected
sharing.” To disable public folder sharing, select “Turn off
password protected sharing.”
In a
homegroup, Windows manages connections to other
homegroup computers automatically. Generally, this is the
preferred
configuration. If you want to revert to the standard workgroup
behavior and require users to have accounts on each computer,
select
“Use user accounts and passwords to connect to other computers.”
Click “Save changes” to
save your settings.
NOTE
In a homegroup,
you should not turn off
password-protected sharing. Computers in a homegroup use the
homegroup
password for password-protected sharing. If you turn off
password-protected sharing, anyone on the network can access
your
data.
For Public folder sharing,
printer sharing, and media sharing, turning on sharing is all you
need
to do. For homegroup sharing, joining a homegroup is all you need
to do.
For folder sharing, however, you have more work to do. You must
specify
files and folders to share, and configure sharing permissions.
