4. Accessing
Shared Folders Offline
An offline folder is a shared folder
designated for use
offline. Offline folders provide an easy way for you to use files
on
shared folders regardless of where you are. You use offline
folders as
follows:
When you are using a laptop computer to access a
shared folder
over the network, you might want to make the shared folder
available
for offline use.
You then designate
the files that your computer should store
so that you can use them while disconnected from the network.
When you later connect to the network, your
computer
automatically synchronizes any changes you make back to the
shared
folder.
NOTE
As with just
about every feature discussed in this book,
it is important to remember that your office administrators can
enable
and disable offline folders. If they have disabled this or
another
feature, they probably did so for a good reason. Offline folders
are
sometimes disabled to prevent problems with multiple users
changing
the same documents, or to protect potentially sensitive
documents.
You
can configure a shared folder so that it is available for
offline use by completing the following steps:
In
Windows Explorer, right-click the folder you want to use
offline and then select Properties.
In
the Properties dialog box, select the Sharing tab. The
details on this tab indicate whether the folder is shared
already.
The folder must be shared to configure it for offline use.
In
the Advanced Sharing dialog box, click Caching.
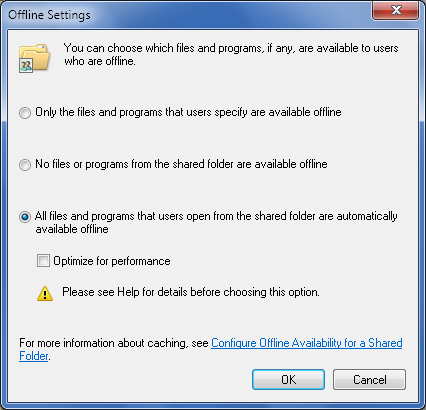
In the Offline Settings
dialog box, shown in Figure
10, select one of the
following options:
Only the files and programs that users
specify are
available offline
With this option, only files you specifically
designated
will be available for offline use.
All files and programs
that users open from the shared
folder are automatically available offline
With this option, all files in the
selected folder will
be available for offline use. Note that the Optimize for
Performance option is only used with Windows XP and
earlier
versions of Windows.
You designate a network file or folder as available
offline by
right-clicking it and selecting Always Available Offline. Once
you’ve
ensured that a folder is available for offline use, you can
specify the
files and folders to use offline.
To include an offline folder in a
library, complete the following steps:
Click Start and
then click Computer. This opens the Computer
console.
Under Network Location,
right-click the shared location,
select Include In Library and then select the appropriate
library,
such as Documents.
5. Working Offline and Syncing
Whenever your computer is not connected to the local area
network (LAN), you are considered to be working offline. When you
are
working offline, you can access only network folders that are
cached on
your computer for offline use. When you reconnect to the network,
Windows 7 automatically will synchronize any changes you’ve made
to the
files while offline.
Windows
7 includes many enhancements for offline files, including
change-only syncing and unavailable file and folder ghosting.
Windows 7
uses change-only syncing to provide fast synchronization at the
file
block level. Thus, rather than syncing all file blocks in a file,
Windows 7 syncs only the changed blocks in a file. Windows 7
creates
ghosted entries of other files and folders to preserve the online
context whenever you make only part of a folder available offline.
When
you are not connected to a remote location, you’ll see ghost
entries for
online items as well as normal entries for offline items.
Sometimes there may be conflicts between changes you’ve
made to
files and changes other people have made to files. You can manage
conflicts and the synchronization process in the Sync Center,
shown in
Figure 11.
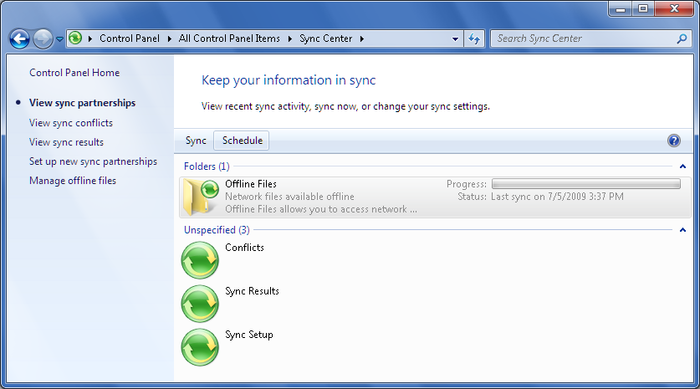
In the Sync Center, you’ll see a sync
partnership for every shared
folder that has locally cached contents. Work with the Sync Center
as
follows:
Click Start→All Programs→Accessories and then
click Sync
Center.
In the Sync Center,
currently defined sync partnerships are
listed according to name, status, progress, conflict count,
error
count, and category.
To
work with offline files, double-click the Offline Files
entry. You can now manage syncing of offline files using the
following techniques:
To manually sync all offline files and folders,
click Sync
All. If you’ve selected a sync partnership, you’ll need to
deselect it by Control-clicking it or clicking in an
unused area
of the list.
To manually sync a specific network share, click the sync
partnership that you want to work with and then click
Sync.
To
check for errors, click “View sync results” under
Tasks. You can use the sync details to determine when
syncing
was started, stopped, or completed, and to determine
whether
there are problems with the synchronization
configuration.
Synchronization conflicts can occur
if you make changes to a file
offline that is updated online by someone else. You can view and
resolve
synchronization conflicts by following these steps:
In
the Sync Center, click “View sync conflicts” under
Tasks.
Any existing conflicts are
listed in the main pane.
Double-click a conflict you want to resolve.
You can now:
Click the version you want to
keep. To keep the local
version and overwrite the network version, click the
version
listed as On This Computer. To keep the network version
and
overwrite the local version, click the version listed as
being
on the shared network location.
Click Keep Both Versions to
write the local version to the
shared network location with a new filename. The new
filename
will be the same as the old filename, but with a numeric
suffix,
indicating the version increment.
NOTE
Devices you’ve used with Windows Media Player can have sync
partnerships with your computer as well. You manage those sync
partnerships in Windows Media Player .
In Windows
7, offline files are synchronized automatically. When
you connect to a network with a latency of more than 80
milliseconds,
Windows 7 uses background synchronization rather than foreground
synchronization. You can control when synchronization occurs in
Sync
Center. In Sync Center, click Offline Files and then click
Schedule.
Select the folders to sync according to a schedule and then click
Next.
You’ll then be able to configure syncing at a scheduled time or
when an
event occurs. For example, you can synchronize folders everyday at
3:00
p.m. or every time you log on to your computer.
