Effect files have the capability to also set these states within their effect pass blocks. When your game calls EffectPass.Apply, if the effect pass contains any state changes, then they will be set on the device.
The default effect file
template that is used when you create a new effect file in XNA Game
Studio add a nice comment to let you know where you can set render
states in the effect pass.
technique Technique1
{
    pass Pass1
    {
        // TODO: set renderstates here.

        VertexShader = compile vs_2_0 VertexShaderFunction();
        PixelShader = compile ps_2_0 PixelShaderFunction();
    }
}
There are many different
states that can be set and the naming of the states and their values
defers from the XNA Game Studio state objects. A listing of all of the
states and values that are supported by an HLSL effect can be found at
the following link:
http://msdn.microsoft.com/en-us/library/bb173347(VS.85).aspx
Note
XNA Game Studio limits some states and values that can be set in order to conform to the Reach and HiDef
graphics profiles. This validation occurs when the effect file is built
using the content pipeline. Reading any error from the build informs
you of any states that are not supported in XNA Game Studio.
Alpha Blending Using Effect States
You can create an example of
how to utilize the effect states by creating a custom effect that uses
alpha blending to render the transparent objects. You utilize the
existing specular sample that you created previously.
First, load a different model
to draw. You use a model that has three separate objects that are close
together so that when you make them transparent, you will see through
each of them into the others. Update the LoadContent method with the following line of code. Also, add the model to your content project.
// Load our model
model = Content.Load<Model>("AlphaDemo");
To display the models with some transparency, update the diffuse colors to contain an extra alpha channel. The diffuseColor array needs to be updated to a Vector4Vector3. Then in the Initialize method, update the diffuseColor array with the following values: from the current
// Set the diffuse colors
diffuseColor = new Vector4[3];
diffuseColor[0] = new Vector4(1, 0.25f, 0.25f, 0.25f);
diffuseColor[1] = new Vector4(0.25f, 1, 0.25f, 0.5f);
diffuseColor[2] = new Vector4(0.25f, 0.25f, 1, 0.7f);
The effect you will create has multiple passes. This
means that you will draw the geometry of the models multiple times, once
for each EffectPass. Update the section of the Draw method, which calls Apply on the EffectPass and draws the primitives that make up the model with the following.
// Loop over all passes since we have more than one
foreach (EffectPass effectPass in
             alphaBlendingEffect.CurrentTechnique.Passes)
{
    effectPass.Apply();

    GraphicsDevice.DrawIndexedPrimitives(PrimitiveType.TriangleList, 0, 0,
                                            meshPart.NumVertices,
                                            meshPart.StartIndex,
                                            meshPart.PrimitiveCount);
}
Because you have more than one pass, loop over all of the passes calling Apply and then drawing the indexed primitives that make up the ModelMeshPart you are currently drawing.
Now in the effect file, you need only a few small changes. The first is to update the pixel shader to use the w component of your diffuse color for the transparency value of the pixel.
// return the final color
return float4(finalColor, DiffuseColor.w);
Now, update the existing effect pass and add another.
technique Technique1
{
    pass Pass1
    {
        AlphaBlendEnable = true;
        SrcBlend         = SRCALPHA;
        DestBlend        = INVSRCALPHA;
        ZWriteEnable     = false;
        CullMode         = CW;

        VertexShader = compile vs_2_0 VertexShaderFunction();
        PixelShader = compile ps_2_0 PixelShaderFunction();
    }

    pass Pass2
    {
        CullMode       = CCW;

        VertexShader = compile vs_2_0 VertexShaderFunction();
        PixelShader = compile ps_2_0 PixelShaderFunction();
    }
}
Because you draw 3D models
with transparency and you want to be able to see through them, you want
to see the inside of the back of the object. Although you normally cull
the backward facing triangles, update the cull mode to clockwise so that
you will draw the inside triangles. The first effect pass also sets the
normal alpha blending states. In the second effect pass, the cull mode
is set back to the default counterclockwise so that you can draw the
front-facing triangles. If you didn’t draw the inside of the objects or
you drew the front first, the blending would not look correct if you
want the objects to appear to be transparent and to have volume.
The states set by the effect
file persists until they are changed either by state objects in the game
code or by another effect pass, which defines the state.
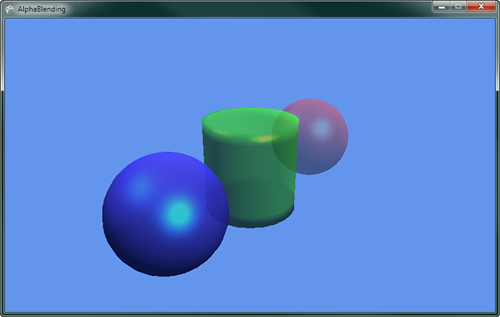
Running the sample now displays two spheres with a cylinder between them. Figure 1
shows the three objects and how the different transparencies among them
enables you to see through the objects to what is behind them.