Emissive Lighting
Some objects not only
receive light but also give off light. Emissive light is the light given
off by the object. The emissive light is added to other light sources.
To add emissive light to the
continuing example is quite simple. You need one additional color value
for each object you want to draw. Add the following to your game class
member variables:
// The emissive color of the objects
Vector3[] emissiveColor;
You will store a separate emissive color for each object like you did for the diffuse color. In the game’s Initialize method, add the following lines of code:
// Set the emissive colors
emissiveColor = new Vector3[4];
emissiveColor[0] = new Vector3(0, 0.75f, 0);
emissiveColor[1] = new Vector3(0, 0, 0.75f);
emissiveColor[2] = new Vector3(0.75f, 0, 0);
emissiveColor[3] = new Vector3(0, 0.75f, 0);
Next, pass this color value into your effect. Just after you set the DiffuseColor, set the EmissiveColor for the effect.
// Set diffuse color for the object
emissiveEffect.Parameters["DiffuseColor"].SetValue(diffuseColor[colorIndex]);
emissiveEffect.Parameters["EmissiveColor"].SetValue(emissiveColor[colorIndex]);
In the effect file, you need an additional global variable that will store the emissive color.
Finally, in the pixel shader, add the emissive color before you return the finalColor.
// Add in emissive color
finalColor += EmissiveColor;
Running the example now shows the objects with an inner glow of the emissive colors like Figure 8.
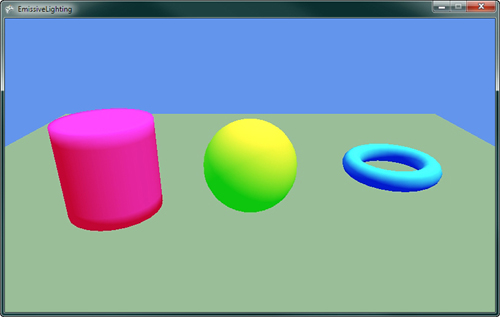
Although the objects
look like they are emitting light, they don’t have any effect on other
objects. This emissive light is used only on the object itself and does
not create a halo around the object.
For the remainder of the article, turn off the emissive lighting by setting the emissive color to zero.
Specular Lighting
In the real world, not all
objects are flat shaded. Some objects are shinny and reflect light very
well. Think of a bowling ball and how shinny it is. If you look at a
bowling ball, notice how there might be bright spots on the ball where
the lights in the bowling alley are better reflected.
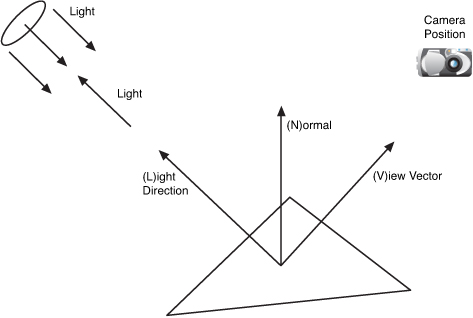
The shinny spots appear
where the angle of the reflected angle from the light about the vertex
normal is close to the vector to the camera position. Figure 9 shows how the specular light on the triangle is dependent on the viewer angle.
Phong Shading
There are a number of ways
to model this shinny appearance of objects. One method is called Phong
shading, which is named after its inventor Bui Tuong Phong.
Phong shading uses two new vectors R and V. R is the unit reflection vector of the light about the vertex normal. V
is the unit vector of the camera position to the vertex rendered called
the viewer vector. The intensity of the specular highlight is then
calculated by taking the dot product between R and V.
Different materials have different levels of shininess to achieve
different results a specular power values are used to raise the R dot V
to different powers. This calculated specular intensity value is then
multiplied by the object’s specular color and then added to the final
color of the pixel.
The equation for the specular shading value using the Phong lighting model is
Specular = (R • V) SpecularPower * (Light Color) * (Object Color)
Blinn-Phong Shading
Calculating
the reflection vector requires a number of calculations. To eliminate
some of these calculations, Jim Blinn created another specular lighting
model based on Phong, called Blinn-Phong in 1977.
Blinn-Phong differs from Phong by using a new vector H called the half vector. The half vector is the vector halfway between the viewer vector V and the light direction L. The half vector can be calculated by adding the view vector V and the light direction L and normalizing the vector to unit length. The H vector is dot multiplied with the vertex normal and raised to a specular power. This is similar to how the R and V vectors are used in the Phong lighting model.
The equation for the specular shading value using the Blinn-Phong lighting model is
Specular = (H • N) SpecularPower * (Light Color) * (Object Color)
Let’s add some Blinn-Phong to the previous example. Add the following member variables to your game:
// The specular color of the objects
// The w component stores the specular power
Vector4[] specularColorPower;
// Specular color of the light
Vector3 specularLightColor;
// The position of the camera
Vector3 cameraPosition;
The first array specularColorPower stores the specular color and specular power for each of the objects. The color uses the X, Y, and Z components of the vector while the W component stores the specular power. The specularLightColor variable stores the specular color of the light source. The final value cameraPosition stores the camera location.
In the game’s Initialize
method, add the following values to set the specular color of the
objects and the light. Also set the camera position that you used to
make the view matrix.
// Set the specular color and power
specularColorPower = new Vector4[4];
specularColorPower[0] = new Vector4(1, 1, 1, 32.0f);
specularColorPower[1] = new Vector4(1, 1, 0, 64.0f);
specularColorPower[2] = new Vector4(0, 1, 1, 32.0f);
specularColorPower[3] = new Vector4(0, 0, 0, 0);

// Set the lights specular color
specularLightColor = new Vector3(1, 0.9f, 0.8f);

// We set the camera position
cameraPosition = new Vector3(0, 1.5f, 3.5f);
These values need to be set on the effect. The SpecularLightColor and CameraPosition can be set with other effect wide properties.
specularEffect.Parameters["SpecularLightColor"].SetValue(specularLightColor);
specularEffect.Parameters["CameraPosition"].SetValue(cameraPosition);
The SpecularColorPower needs to be set with other per object effect values such as the diffuse color.
specularEffect.Parameters["SpecularColorPower"].SetValue(specularColorPower[color Index]);
That is it for the game code changes. Now, you need to update the effect file to add the Blinn-Phong calculations.
First, add some additional global variables to your effect.
float4 SpecularColorPower;
float3 SpecularLightColor;
float3 CameraPosition;
The next change is to the output vertex structure where you add the view vector V, which you calculate in the vertex shader.
struct VertexShaderOutput
{
    float4 Position : POSITION0;
    float3 Normal   : TEXCOORD0;
    float3 View     : TEXCOORD1;
};
In the vertex shader, the View value is calculated by subtracting the calculated world position from the camera position, which is also in world space.
output.View = CameraPosition - worldPosition;
The final change updates the pixel shader to calculate the specular lighting value and adds it to the final pixel color.
// Normalize the interpolated view vector
float3 view = normalize(input.View);

// Calculate half vector
float3 half = normalize(view + LightDirection);

// Calculate N * H
float NdotH = saturate(dot(normal, half));

// Calculate specular using Blinn-Phong
float specular = 0;
if (NdotL != 0)
    specular += pow(NdotH, SpecularColorPower.w) * SpecularLightColor;

// Add in specular color value
finalColor +=  SpecularColorPower.xyz * specular;
The first line normalizes the View
vector, which needs to be unit length and can change as it is
interpolated across the triangle. The next line calculates the half
vector by adding the view and light direction vectors and then
normalizes the result. The dot product of N and H are then taken and clamped between 0 and 1. Finally, its specular value is calculated by using the pow intrinsic function that raises the NdotH value to the specular power, which passed in as the w component of the SpecularColorPower variable and is then multiplied by the light’s specular color.
The last bit of code adds the
specular color to the final pixel color using the calculated secular
intensity and the object’s specular color stored in the xyz channels of SpecularColorPower.
Running the sample now should produce results with a shinny spot on each of the objects in the scene as shown in Figure 10.
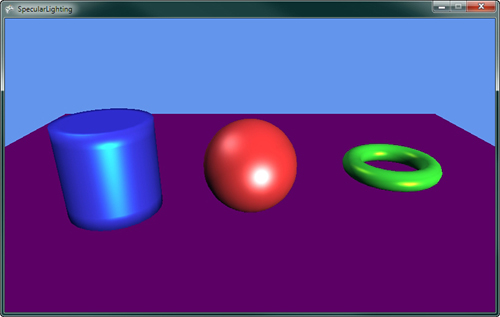
Try adjusting all of the
lighting and color values in the examples thus far and see how they
change the results. Notice that lowering the specular power makes the
specular highlight larger but less crisp around its edges.
