Along with the depth buffer, you can also have a
portion of that reserved for the stencil buffer. This is similar to the
depth buffer in that it is evaluated on a per pixel basis, using a
series of tests. Let’s look at emulating the cutout you did earlier, but
by using the stencil buffer instead.
The Stencil Buffer
Create a new Game project and add the depthmodel.fbx to your Content project. Then, add the following variables to your project:
Model model;
Matrix proj;
Matrix view;
Texture2D grey;
DepthStencilState createCutout;
DepthStencilState renderCutout;
The last two are the states you
use for the stencil buffer—the first to create the cutout, and the
second to use the cutout to render. However, by default, your
application doesn’t even have a stencil buffer; it has only a depth
buffer. Go to your game’s constructor and add the following line to the
end:
graphics.PreferredDepthStencilFormat = DepthFormat.Depth24Stencil8;
This tells the runtime that
you prefer a depth buffer that includes eight bits reserved for the
stencil buffer. This is actually the only stencil buffer available in
the XNA runtime. With that, instantiate your variables in the LoadContent overload:
proj = Matrix.CreatePerspectiveFieldOfView(MathHelper.PiOver4,
    GraphicsDevice.Viewport.AspectRatio, 1.0f, 100.0f);
view = Matrix.CreateLookAt(new Vector3(0, 3, 20), Vector3.Zero, Vector3.Up);
model = Content.Load<Model>("depthmodel");
foreach (ModelMesh mm in model.Meshes)
{
    foreach (Effect e in mm.Effects)
    {
        IEffectLights iel = e as IEffectLights;
        if (iel != null)
        {
            iel.EnableDefaultLighting();
        }
    }
}
grey = new Texture2D(GraphicsDevice, 1, 1);
grey.SetData<Color>(new Color[] { Color.Gray });
// Initialize some data
createCutout = new DepthStencilState();
renderCutout = new DepthStencilState();
createCutout.StencilEnable = true;
createCutout.StencilFunction = CompareFunction.Always;
createCutout.StencilPass = StencilOperation.Replace;
createCutout.ReferenceStencil = 1;
createCutout.DepthBufferEnable = false;
renderCutout.StencilEnable = true;
renderCutout.StencilFunction = CompareFunction.Equal;
renderCutout.ReferenceStencil = 0;
renderCutout.StencilPass = StencilOperation.Keep;
renderCutout.DepthBufferEnable = false;
Unlike the depth buffer,
the stencil buffer is slightly more complicated than a simple comparison
of two values (although, in many cases, it is the same). The basic
formula for computing a stencil value is the following:
(ReferenceStencil & StencilMask) Function (StencilBufferValue & StencilMask)
If your mask value is always
all bits, then this is a comparison of the reference value to the buffer
value. As you see previously, you use the ReferenceStencil
property to dictate what the value is. You have the same compare
functions that you had with depth buffers, but you have a completely new
set of operations you can do if the stencil has passed, found in the StencilOperation enumeration. You can use Replace, to put the reference value into the buffer, and you can use Zero, to put a value of zero in the buffer. You can choose to Keep the current buffer value as it is (the default value of the operation). You can choose to Invert the value in the buffer, or you can Increment or Decrement it. The saturate versions of these methods simply clamp the value at the maximum or zero, respectively.
By default, the stencil
buffer is turned off, and cleared to a value of zero. So, in order to
create the cutout, first turn on the stencil buffer. Then, change the CompareFunction to Always. This means for every pixel that is drawn, you perform the operation in the StencilPass property, which you choose as Replace. This replaces the buffer value with the ReferenceStencil value, which you’ve placed as one now.
This means that when you
render the models later, using this depth state, the stencil buffer
initially is completely zeros, but for every pixel it renders, that
pixel’s stencil buffer value is updated to one. Next, look at the state
you use to render the cutouts.
Again turn on stenciling, but this time set the compare function to Equal. Because your ReferenceStencil
value is zero, any pixel with a stencil value other than zero will
fail, and not be drawn. If the stencil value is zero, you keep the value
because you specified the Keep
operation. This means that when you render the second overlay sprite, it
does not render the pixels where the model used to be because they have
a stencil value of one. Every other pixel has a stencil value of zero.
Now that you have a basic understanding of the stencil buffer and its operation, replace your Draw overload with the following:
protected override void Draw(GameTime gameTime)
{
    GraphicsDevice.Clear(Color.CornflowerBlue);
    GraphicsDevice.DepthStencilState = createCutout;
    float time = (float)gameTime.TotalGameTime.TotalSeconds;
    Matrix rotation = Matrix.CreateRotationZ(time) *
        Matrix.CreateRotationY(time / 4.0f);
    Matrix scale = Matrix.CreateScale(0.5f);
    Matrix transLeft = Matrix.CreateTranslation(-6, 0, 0);
    Matrix transRight = Matrix.CreateTranslation(6, 0, 0);
    model.Draw(scale * rotation * transLeft, view, proj);
    model.Draw(scale * rotation * transRight, view, proj);
    GraphicsDevice.Clear(ClearOptions.Target, Color.CornflowerBlue, 1.0f, 0);
    spriteBatch.Begin(SpriteSortMode.Deferred, null, null, renderCutout, null);
    spriteBatch.Draw(grey, GraphicsDevice.Viewport.Bounds, Color.White);
    spriteBatch.End();
}
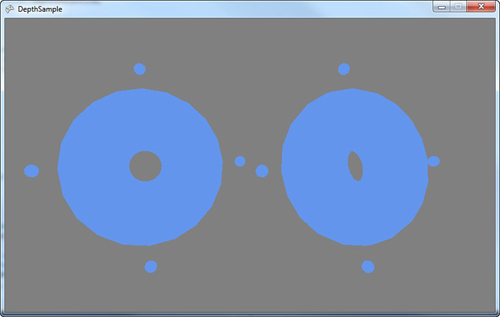
With that, you now render cutouts of your models using the stencil buffer as in Figure 1. It is trivial to update the example you used previously for shadows to mirror this functionality using the stencil buffer.