Faking a Shadow with a Depth Buffer and Render Targets
Why would you want to render
something not on the screen? There are quite a few techniques you can
use with this type of capability. Create a new game project to
get started.
The model you are using so far works well for casting shadows, so add depthmodel.fbx to your content project. For something to render the shadow onto, add dualtextureplane.fbx and ground.jpg to your content project. Open the Content Processor property for dualtextureplane.fbx, and change the Default Effect property to DualTextureEffect, because you will render the shadows as a second texture on the plane. Add the following variables to your game:
Model model;
Matrix proj;
Matrix view;
RenderTarget2D lightmap;
Texture2D lightGray;
Texture2D ground;
Model groundModel;
The render target object is
used to store the shadow data . You also need a small texture to form the
cutout of your objects, along with the ground texture. You can
initialize these in your LoadContent overload:
proj = Matrix.CreatePerspectiveFieldOfView(MathHelper.PiOver4,
    GraphicsDevice.Viewport.AspectRatio, 1.0f, 100.0f);
view = Matrix.CreateLookAt(new Vector3(0, 23, 20), Vector3.Zero, Vector3.Up);
model = Content.Load<Model>("depthmodel");
foreach (ModelMesh mm in model.Meshes)
{
    foreach (Effect e in mm.Effects)
    {
        IEffectLights iel = e as IEffectLights;
        if (iel != null)
        {
            iel.EnableDefaultLighting();
        }
    }
}
lightGray = new Texture2D(GraphicsDevice, 1, 1);
lightGray.SetData<Color>(new Color[] { Color.LightGray });
ground = Content.Load<Texture2D>("ground");
groundModel = Content.Load<Model>("dualtextureplane");
lightmap = new RenderTarget2D(GraphicsDevice, 512, 512, false,
SurfaceFormat.Color, DepthFormat.Depth16);
Most of this should look
familiar. Note the size of the render target. The smaller the size, the
less memory it takes naturally, but you can also get some visual
artifacts for having so few pixels to work with. So instead, a
medium-sized render target is created. Lower the size from 512 to
something much lower (say 64) after the example is complete, and notice
how your shadow appears pixelated. Now, because you render the torus
models a few times, add the following helper method to your class:
private void RenderScene(float time)
{
    Matrix rotation = Matrix.CreateRotationZ(time) *
        Matrix.CreateRotationY(time / 4.0f);
    Matrix scale = Matrix.CreateScale(0.5f);
    Matrix transLeft = Matrix.CreateTranslation(-6, 0, 0);
    Matrix transRight = Matrix.CreateTranslation(6, 0, 0);
    model.Draw(scale * rotation * transLeft, view, proj);
    model.Draw(scale * rotation * transRight, view, proj);
}
This
draw your two models side by side—one to the left and one to the right. . We discussed using the depth buffer and extra clearing to draw
a cutout of an object. This is the basis of your shadows, so you can
draw these onto your render target. Replace your Draw method with the following:
protected override void Draw(GameTime gameTime)
{
    float time = (float)gameTime.TotalGameTime.TotalSeconds;
    GraphicsDevice.SetRenderTarget(lightmap);
    GraphicsDevice.Clear(Color.CornflowerBlue);
    RenderScene(time);
    GraphicsDevice.Clear(ClearOptions.Target, Color.DarkGray, 1.0f, 0);
    spriteBatch.Begin(SpriteSortMode.Deferred, BlendState.AlphaBlend,
        SamplerState.LinearClamp, DepthStencilState.Default,
        RasterizerState.CullCounterClockwise);
    spriteBatch.Draw(lightGray, GraphicsDevice.Viewport.Bounds, null, Color.White,
        0.0f, Vector2.Zero, SpriteEffects.None, 1.0f);
    spriteBatch.End();
    GraphicsDevice.SetRenderTarget(null);
}
After setting the render target to a custom one, clear the buffer as normal and call your RenderScene helper to draw your two models on the screen. Then, clear the color buffer again (but not
the depth buffer) to a dark gray color. This is the color of your
cutouts, because right after this you draw your simple sprite across the
entire render target. If you remember from your LoadContent
method, your sprite texture is a light gray, which means the render
target after this is a light gray solid color with a couple of dark gray
cutouts of your model.
Remember that a common usage of DualTextureEffect
is to render lightmaps onto objects, and your render target now
contains essentially just that. Add the following to the end of your Draw method to complete rendering of the scene:
GraphicsDevice.Clear(Color.CornflowerBlue);
RenderScene(time);
foreach (ModelMesh mesh in groundModel.Meshes)
{
    foreach (DualTextureEffect de in mesh.Effects)
    {
        de.Texture = ground;
        de.Texture2 = lightmap;
    }
}
groundModel.Draw(Matrix.CreateTranslation(0, -20, 0), view, proj);
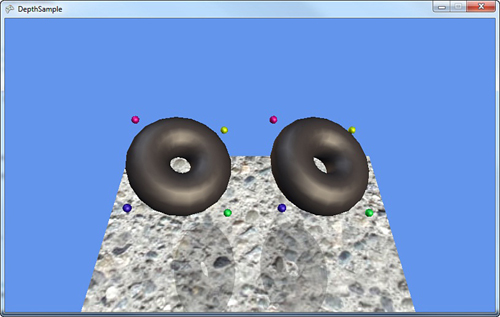
With everything in place, it’s simply a matter of rendering your scene again, setting the textures on your DualTextureEffect
instances on the mesh, and rendering the ground model (that uses those
textures) slightly lower in the scene. Your objects now have real-time
shadow’s as in Figure 2.