If your application accesses sensitive data over the
network, it is critical that this data is encrypted during transit from
the remote location to the Windows Phone 7 device. Similarly, if your
application requires authentication, it is important to implement a
secure authentication mechanism within your application. Windows Phone 7
platform allows you to accomplish both of these objectives. Any time
you have to transmit sensitive data from a remote location, you should
use Secure Sockets Layer (SSL) protocol, an industry standard for
encrypting data. And if your environment requires secure authentication,
it is possible to use digital certificates on a Windows Phone 7 device
for that authentication, eliminating the need for user names and
passwords.
1. Securing Connections with SSL
Secure Sockets Layer
protocol is a sophisticated way of securing connections between the
client (Windows Phone 7 device) and cloud service, and it utilizes the
concepts of asymmetric cryptography and certification authority (CA)
hierarchies. When a Windows Phone 7 device initiates a secure connection
to the remote service, it requests that service's certificate. That
certificate is checked and the certification authority that issued that
certificate is determined. Once the CA of the certificate is known,
Windows Phone 7 client then checks its own installed list of
certification authorities. If it finds a certification authority in its
list, that implies that a trust relationship between the Windows Phone 7
device and the CA has been previously established, and that a secure
connection between the phone and the remote server can be created.
Windows Phone 7 devices
come with several certification authorities pre-installed. This means
that, most of the time, establishing an SSL connection will be a
seamless experience. As long as the remote service obtained its
certificate from a very well-known certification authority (such as
VeriSign, for example), SSL connections can be created both from
Internet Explorer on the phone, as well as from application code. The
following walkthrough demonstrates how to test if you can establish a
secure connection to the remote server (PayPal) that has a certificate
issued by a well-known CA (VeriSign).
2. Testing and Opening an SSL Connection
In this brief walkthrough,
you will test if you can establish a secure connection to a remote
server (PayPal), and then you will write a small Windows Phone 7
application that programmatically loads secure content from the PayPal
web site.
The
quickest way to test whether a connection to a secure web site can be
established is to open up Internet Explorer on Windows Phone 7 Emulator
or a Windows Phone 7 device and type the URL of a secure remote server.
Launch Windows Phone 7 Emulator by clicking Start => All Programs => Windows Phone Developer Tools => Windows Phone 7 Emulator. Once the emulator loads, click the Internet Explorer icon and type in "https://www.paypal.com" to go to the secure PayPal site. You should see the main screen of the PayPal web site.
|
It may get quite
tiresome having to click all of the keyboard buttons on the emulator. To
enable the use of computer keyboard in the emulator window, you can
press the PgUp key once the emulator loads up. To discontinue using the
keyboard in the emulator, press the PgDn key.
|
|
Now,
you will create a small Windows Phone 7 application that will access
the PayPal site via a secure connection. You could access any secure
remote service in a similar manner, but only if that service has a
certificate issued by a CA that Windows Phone 7 device trusts.
As
usual, launch Visual Studio 2010 Express for Windows Phone and create a
new Windows Phone 7 Application project. Name that project SSLConnectionMainPage.xaml is presented in the Designer. and click OK.
From the toolbox, drag and drop the WebBrowser
control onto the design surface. Make the width and height of that
control to be the full width and height of available design surface on MainPage.xaml.
Switch to code view (right-click MainPage.xaml and select View Code) and add the following code to the MainPage()
constructor. This code will create a WebClient object, register the
callback function for that object (you will write in in the next
section), and create a request to retrieve the contents of paypal.com securely.
WebClient client = new WebClient();
client.OpenReadCompleted += new
OpenReadCompletedEventHandler(HandleResponse);
client.OpenReadAsync(new Uri("https://www.paypal.com"));
Write
the HandleResponse callback function for the request. This function
will display the contents of whatever was returned as a result of the
previous request to https://www.paypal.com.
void HandleResponse(object sender, OpenReadCompletedEventArgs e)
{
    StreamReader reader = new StreamReader(e.Result);
    string res = reader.ReadToEnd();
    webBrowser1.NavigateToString(res);
}
Press F5 to run the application. You should see the PayPal page displayed in the web browser window.
As you can see from the
previous example, establishing a secure connection to the remote service
is fairly straightforward if a remote service has a certificate issued
by a major CA with whom Windows Phone 7 has an existing trust
relationship. Just remember to use Apress Standard Book Blank.doc instead of Apress Standard Book Blank.doc
when accessing a remote web service securely. But certificates issued
by a major certification authority can be expensive, and may not be
necessary if all users of remote service trust that the service is
legitimate. In addition, you may want to experiment or test your secure
service without spending a lot of money on the certificates. Self-signed
SSL certificates offer the same degree of data protection in transit
(data is encrypted using SSL), without the expense of using the
certification authority. There is a slight administrative overhead in
issuing and installing those certificates, but you will easily tackle it
in a few steps in the next walkthrough.
There are three steps to
enabling the use of self-signed certificates on Windows Phone 7 device:
first, you have to create a self-signed certificate; second, you have to
export that certificate for installation on the mobile device; and
third, you have to install that certificate on the Windows Phone 7
device. Creating and exporting the self-signed certificate steps occur
on the server where the secure service resides. Installing the
certificate, of course, happens on each device that will need to
establish a secure connection to the service using a self-signed
certificate.
3. Creating a Self-Signed Certificate
Internet Information Services
(IIS) is the web server software written by Microsoft. IIS has evolved
significantly over the years, and the most current version in production
as of this writing is IIS version 7. With IIS 7, creating self-signed
certificates and enabling SSL using those certificates is much easier
than with previous versions of IIS. IIS 7 comes with Windows 7 by
default, and the following walkthrough assumes that you are using IIS7
installed on a Windows 7 machine. The walkthrough also assumes that both
the server and the Windows Phone 7 client (the emulator) reside on the
same machine.
Open IIS Manager by clicking Start => Control Panel => Administrative Tools =>Internet Information Services (IIS) Manager.
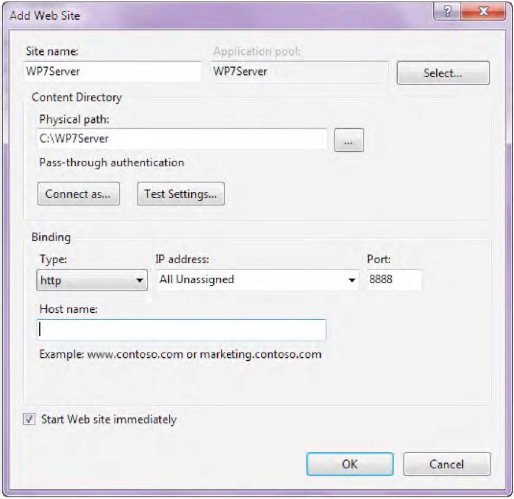
Create
a new web site by right-clicking the Sites node on the left and
choosing "Add Web Site." Name the site "WP7Server" and fill in the rest
of the web site properties as shown in Figure 1.
NOTE
The physical path on
your computer may certainly be something else, but be sure to make the
Port setting something other than the default "80," otherwise IIS might
complain that port 80 is already taken.
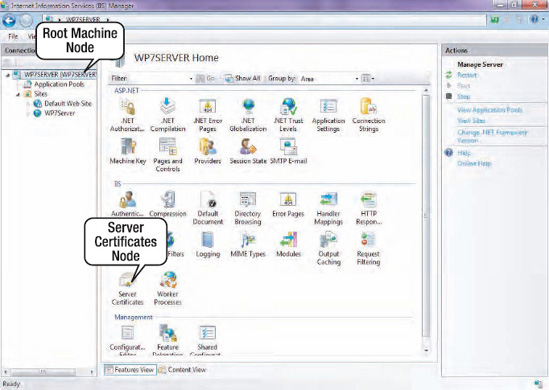
Next, you will issue a self-signed certificate.
Click the root machine node on the left, and then click the Server Certificates node, as shown in Figure 2. This should bring up a dialog listing all of the certificates currently registered on the machine.
Click
the "Create Self-Signed Certificate" link on the right-hand side of the
dialog. Then, specify a name for that certificate when prompted—for
example, "wp7cert."
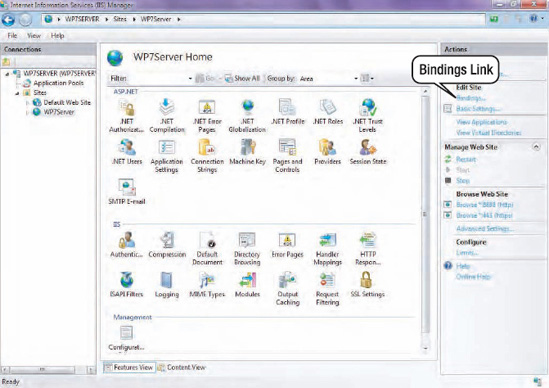
Next, you will enable SSL on the web site by creating a binding of that web site to the https protocol.
In the list of sites, click the "WP7Server" and then click "Bindings" on the right-hand side, as illustrated in Figure 3.
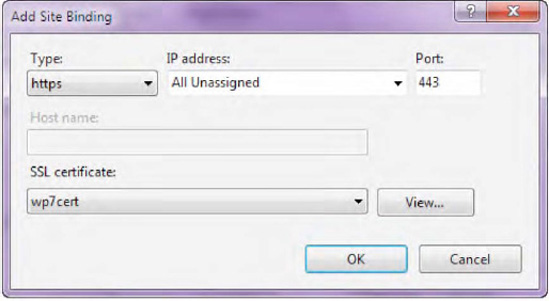
To
create an HTTPS binding for the site, so that traffic to and from the
site can be encrypted using SSL, click "Add Binding." When the dialog
shown in Figure 19-5
comes up, select https type binding and select the "wp7cert"
certificate from the certificates list. This certificate will be used to
encrypt traffic between the web site and your Windows Phone 7 client
application.
Finally, you need to
create some content to browse to on the secure web site. In the real
world, this would most likely be the service returning some sort of
sensitive data, such as financial information. However, for this
walkthrough, you will simply create an HTML file and save it onto the
server.
Open Notepad and paste the following HTML into it:
<html>
<h1>Hello, Windows Phone 7</h1>
</html>
Save the HTML file you created to the physical path for the web site that you specified in Step 2 (referenced in Figure 1) and name the file index.html.
For example, if you kept your Physical Path setting as "C:\WP7Server\"
in Step 2, then you will save the HTML file as
"C:\WP7Server\index.html."
NOTE
You may be getting a
"Permission Denied" error when you try to save the HTML file (we did).
In that case, make sure that the currently logged-in user has
permissions to write to that folder and try again.
You are now ready to test out your self-signed certificate.
1. Open Internet Explorer and navigate to https:/machinename, where machinename is the name of your computer (for example, wp7server). You should see the "Hello, Windows Phone 7" message in the browser.
You can also start testing accessing secure data from your Windows Phone 7 application.
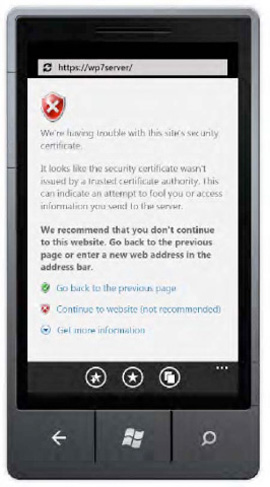
From your Windows Phone 7 emulator, navigate to https:/machinename/. The very first time you start up the emulator, you will see a screen like the one shown in Figure 6,
the absence of trust relationship error message. If you click Continue,
however, you will be able to establish SSL connections to the web
server from both the browser on the Windows Phone 7 device and the
applications.
4. Exporting a Self-Signed Certificate
It is possible to
establish secure connections to Microsoft Exchange from the Windows
Phone 7 device using self-signed certificates.
The first step in
establishing an Exchange connection secured by a self-signed certificate
between the client and the server is to export the certificate from the
server. The next walkthrough shows you how to do that. This walkthrough
assumes that you are using Internet Explorer 8 to export certificates.
On the server, open Internet Explorer, and click Tools => Internet Options. If the menu bar with Tools menu option is not visible, press the Alt key.
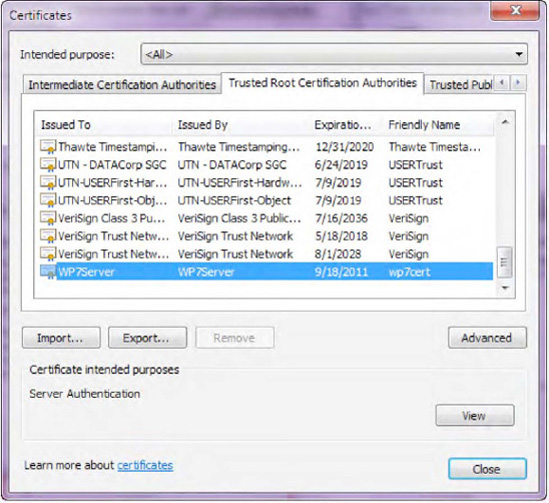
In
the window that comes up, click the Content tab, and then click the
Certificates button. In the dialog that comes up, select the Trusted
Root Certification Authorities tab. The self-signed certificate that you
created should be listed in this tab—you can scan the Friendly Name
column and look for the "wp7cert" name to find it, as shown in Figure 6.
Click
on the "Export..." button, then click the Next button. On the next
screen, select "No, do not export the private key" (the default option)
and click Next.
On
the next screen, choose the DER Encoded binary X.509 format (default
option) and click Next. Finally, select the folder, name the file
"wp7cert" (make sure to put it somewhere you can find it later!), click
Next, and then click Finish. You should get a message notifying you that
the export was successful.
With the certificate
exported, you are now ready to finalize the trust relationship between
the Windows Phone 7 device and the server secured by a self-signed
certificate. You will do that in the next section.
5. Installing Self-Signed Certificate on Windows Phone 7
The easiest way to
install a self-signed certificate on Windows Phone 7 device or emulator
in the first release of Windows Phone 7 framework is to simply e-mail
it. Then, let the built-in Windows Phone 7 features recognize the
certificate file and install it on the device. The next few steps will
guide you through this process.
Open or navigate to your e-mail program; for instance, if you use Hotmail as your default e-mail, log in to Hotmail.com and create an e-mail message to yourself. In that e-mail, add an attachment—the wp7cert.cer file you created previously. Send e-mail to yourself.
From the Windows Phone 7 device or emulator, access the e-mail message you just sent. Once you click the wp7cert.cer
attachment, the Windows Phone 7 framework should prompt you to open the
certificate file. Go ahead and click (or tap) the screen to get the
Install Certificate prompt . Then, click the Install Certificate button. After the installation, click the OK button.
You are now familiar with
how to secure data in transit from a remote service to the Windows
Phone 7 device. You have seen how to use SSL with both trusted
third-party certificates from established certification authorities and
self-signed certificates. In the next section, you will take a look at
securely storing data on your Windows Phone 7 device by encrypting it.
