DepthStencilState
Next up on the list is the
depth stencil state. This state has all of the settings and properties
required to control the depth and stencil buffers. The previous example
is a little dry with just blending the colors, so start a new game
project now. Add the depthmodel.fbx model to your content project, and add a few variables to the game, too:
Model model;
Matrix proj;
Matrix view;
Load the model and create the matrices, which you can do in your LoadContent overload:
proj = Matrix.CreatePerspectiveFieldOfView(MathHelper.PiOver4,
    GraphicsDevice.Viewport.AspectRatio, 1.0f, 100.0f);
view = Matrix.CreateLookAt(new Vector3(0, 3, 20), Vector3.Zero, Vector3.Up);

model = Content.Load<Model>("depthmodel");
foreach (ModelMesh mm in model.Meshes)
{
   foreach (Effect e in mm.Effects)
    {
        IEffectLights iel = e as IEffectLights;
        if (iel != null)
        {
            iel.EnableDefaultLighting();
        }
    }
}
protected override void Draw(GameTime gameTime)
{
    GraphicsDevice.Clear(Color.CornflowerBlue);
    GraphicsDevice.DepthStencilState = DepthStencilState.Default;
    float time = (float)gameTime.TotalGameTime.TotalSeconds;
    Matrix rotation = Matrix.CreateRotationZ(time) *
        Matrix.CreateRotationY(time / 4.0f);
    Matrix scale = Matrix.CreateScale(0.5f);
    Matrix transLeft = Matrix.CreateTranslation(-6, 0, 0);
    model.Draw(scale * rotation * transLeft, view, proj);
}
This
code renders the model to the left of the screen with it slowly rotating
around. Notice that the model is a donut-shaped object with four
spheres spinning around with it along its outside border. You also
should see that at the beginning of the method, you set the DepthStencilState property on the device, although you just set it to Default.
In this particular case, it doesn’t matter if you don’t make this call.
When you draw this model again to the right, it will matter.
What exactly is a depth
buffer? Well, it’s a buffer to hold depth, of course. If you render a
scene with the depth buffer enabled (which is the case by default), for
every pixel that is rendered, the depth of that pixel is also stored.
You can think of the depth as the distance from the camera. Something
near the camera has a depth close to 0.0f, and objects far away have a
depth close to 1.0f (the depth runs from 0.0f to 1.0f).
Each time a new pixel is
rendered, the system checks whether a depth is written for the position
already. If it is, it compares the depth of the current pixel with the
one that is already stored, and depending on the function of the depth
buffer (which is discussed later), it decides what to do with it. If,
for example, the function is CompareFunction.LessEqual,
it looks at the current pixel’s depth. If it is less than or equal to
the stored pixel’s depth, it writes the new pixel to the buffer;
otherwise, it discards it. This enables you to render scenes in 3D, with
objects appearing behind (and occluded) by other objects.
To give you an idea of why
having the depth buffer is so valuable in a 3D application, add the
following code at the end of your Draw overload:
Matrix transRight = Matrix.CreateTranslation(6, 0, 0);
GraphicsDevice.DepthStencilState = DepthStencilState.None;
model.Draw(scale * rotation * transRight, view, proj);
This turns the depth buffer
completely off, and then draws the same model again to the right side of
the screen, much like you see in Figure 2.
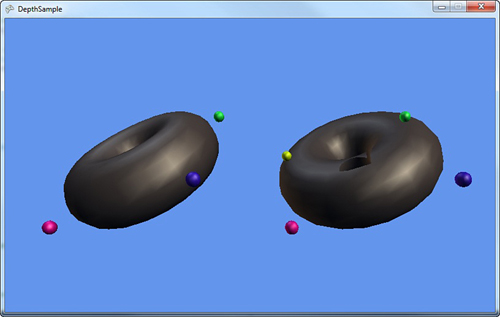
Notice that the model on the
right looks odd. You can see the small spheres whether they’re in front
of the torus or not. You can even see some of the inside of the torus
through the other portions of itself. With no depth buffer, the last
pixel drawn at a particular depth wins.
In the case of this model, it
is composed of five different meshes (the torus, and each sphere is its
own mesh). The torus is drawn first, and the spheres next, so the
spheres always appear on top of the torus, as they’re drawn later.
Depending on how the torus itself is drawn (and which angle it is at),
certain pixels in the center of the torus might be drawn after pixels
that would normally block it, so you can also get an odd visual with the
center.
Before moving on to the specific properties of the DepthStencilState object, let’s take a look at the last static member. You used Default (which turns the depth buffer on) and None (which turns it off). The last one is DepthRead, which reads from the depth buffer, but doesn’t write to it. What does that exactly mean?
It means that it does
the same operation as the default depth buffer state—it rejects pixels
that don’t pass the depth test, but when it finds a new pixel that does
pass the depth test, it doesn’t write the pixel’s depth to the buffer.
For example, add the following variable to your game:
Then, create and initialize it in your LoadContent method:
grey = new Texture2D(GraphicsDevice, 1, 1);
grey.SetData<Color>(new Color[] { Color.Gray });
Next, make one change to your current Draw overload, namely deleting the line that sets the graphics device to DepthStencilState.None before adding this code to the end of the method:
GraphicsDevice.Clear(ClearOptions.Target, Color.CornflowerBlue, 1.0f, 0);
model.Draw(scale * rotation, view, proj);
spriteBatch.Begin(SpriteSortMode.Deferred, BlendState.AlphaBlend,
    SamplerState.LinearClamp, DepthStencilState.Default,
    RasterizerState.CullCounterClockwise);
spriteBatch.Draw(grey, GraphicsDevice.Viewport.Bounds, null, Color.White,
    0.0f, Vector2.Zero, SpriteEffects.None, 1.0f);
spriteBatch.End();
Notice that you’re calling a version of Clear
that you haven’t seen before. You’re clearing again because you want to
erase the two models you just drew, because for this example, they were
to write only depth into the depth buffer. However, you cannot use the
prototype of Clear that you normally use, because it also clears the depth buffer. So instead, tell Clear to clear only the ClearOptions.Target (the color buffer) to the normal CornflowerBlue, and the rest of the parameters are ignored because they depend on other ClearOptions that you didn’t specify. You can use ClearOptions.DepthBuffer to clear the depth and ClearOptions.Stencil to clear the stencil, with the latter two properties as the values to clear each buffer to respectively.
Draw the model again in the center of the screen (this is where you see the effect of DepthRead in a few moments).
Next, you use one of the more complex spriteBatch.Begin overloads. Aside from the DepthStencilState.Default,
the rest of the parameters are the defaults for sprite batches though,
so you can ignore those for now. Render the texture to cover the entire
screen at a layer depth of 1.0f (the last parameter). Specify the Default
depth state because sprite batch (in its default) turns the depth off.
Because you turned it on for this sprite, rendering the texture tests
its depth (1.0f) against all the pixels in the depth buffer. Any pixels
where the models were drawn have a lesser depth, so the pixels in the
texture are discarded and not drawn. As you can see in Figure 3,
this is exactly what happens because you see a gray screen with the
outline of the model’s circling there with your extra model floating in
between them.
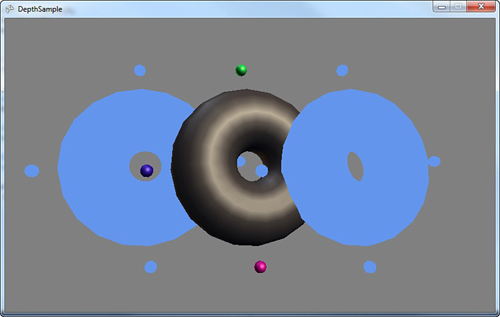
Notice that the middle
(colored) model looks perfectly normal in the scene. It gets occluded by
the cutouts sometimes (when they are behind it), but it shows up in
front of the
cutouts when it is closer to the camera. This is because it is writing
its depth into the depth buffer. Add the following line of code directly
after the second Clear call:
GraphicsDevice.DepthStencilState = DepthStencilState.DepthRead;
This is a different output
than before. Because it is not writing its depth to the scene, the only
places you actually see the rendered model are the portions inside the
cutouts where it passed the depth test. So why does this happen?
Let’s trace the lifetime of a
pixel through this scene. Imagine the pixel is one in which the colored
model is drawn through the cutout and intersecting the left model.
First, the scene is cleared; the pixel has the default color and a depth
value of 1.0f. Next, the left model is drawn, so now the pixel has the
left model color in it, and its depth, you can call it 0.1f to have a
nice round number. The right model is drawn next, but it doesn’t affect
the pixel, so now the clear call happens again. This time, the color is
reset back to default, but the depth isn’t changed, so it’s still 0.1f.
Now, the colored model is drawn, it has a depth of 0.09f and passes the
pixel test, so the color is now updated, but you aren’t writing depth,
so it is still 0.1f. Finally, the grey texture is drawn, and its depth
of 1.0f doesn’t pass the depth test, so the colored model’s pixel stays
there.
If you are looking at a pixel
outside of the cutout, though, something else happens. First, the left
and right model don’t intersect the pixel (otherwise, it would be in a
cutout), so this pixel is cleared, has a depth of 1.0f, and then cleared
again without modifying the depth. Next, the colored model is drawn; it
passes the depth test, updates the pixel color, but hasn’t modified the
depth, which is still 1.0f. When the sprite comes to render, its value
of 1.0f passes the depth test, it overwrites the pixel color with its
grey, and you get the scene you see when running this example.
There are only three properties on the DepthStencilState
object that deal directly with the depth buffer, and they’re all
basically covered by the static members you’ve used already. However,
because you aren’t setting them directly, let’s take a look at what they
are.
First, you have the DepthBufferEnable
property, which enables (or disables) the depth buffer completely. The
default value for this is true. You should note that everything in this
state object is only meaningful if you actually have a depth buffer. If
you don’t need a depth buffer (for example, a purely 2D game with no
layered sprites), you can simply turn the depth buffer off for the
entire game by changing your PreferredDepthStencilFormat type to DepthFormat.None (the default is DepthFormat.Depth24) in your constructor:
graphics.PreferredDepthStencilFormat = DepthFormat.None;
Next is DepthBufferWriteEnable,
which is by default true. This sets whether the system will take pixels
that pass the depth test and write them to the depth buffer. You’ve
seen the behavior when the write is false in the previous example.
The last depth buffer specific property is DepthBufferFunction, which has a default of CompareFunction.LessEqual.
This enables you to dictate how the depth buffer decides whether to
allow the pixel or not. By default, the depth buffer is cleared to a
value of 1.0f (this is the parameter of the Clear
function called depth). Because this is the farthest away point in the
depth buffer, anything within the viewing frustum passes the depth test
at first. However, you can change this behavior with the various values
of the CompareFunction enumeration.
The rest of the
properties deal with the stencil portion of the depth buffer, but first,
let’s take a bit of time to talk about render targets.
