In previous versions, there were three main objects used to control the graphics device state: namely the RenderState object, the SamplerState object, and the StateBlock
object. As the names implied, the first controlled various rendering
states, the second sampler states (textures), and the last was a way to
control an entire “block” of states.
The StateBlock
objects looked very useful, but in reality, they were a bit confusing to
understand, and the performance of them was abysmal. Even when people
used them correctly, the performance hit for using them was enough that
they would have been better off not using them at all!
Knowing this, the object type was completely removed for Game Studio 4. Various features that relied on this type (such as the SaveStateMode
enumeration) were also removed. Don’t worry, though, we made using the
states themselves so much easier that you won’t even miss it being gone.
The SamplerState object still exists, although it’s behavior and members have changed. The RenderState object has changed quite drastically. It has mainly split into three new objects: BlendState, RasterizerState, and DepthStencilState.
Again, as the name implies, these objects control the blending and
rasterization of the scene, along with the depth and stencil buffer
options.
Each of these new state objects
has a number of properties that they control, and when they are set on
the device, all of the properties are set at once. This enables you to
easily set a wide variety of states in a single call, where in previous
versions the same operation could take quite a few separate calls.
BlendState
One of the most common states you’ll want to change is the BlendState
object, which controls how each color in your scene blends with
another. At a high level, the blend operation is little more than taking
two colors, performing some operation on them, and returning a third
blended color. The first color is normally called the source color, and
the second color is called the destination color. Knowing this, the
actual formula for blending is quite simple:
output = (sourceColor * sourceBlendFactor) blendFunction (destColor * destBlendFactor)
SpriteFont font;
Texture2D background;
Texture2D alphaImage;
Texture2D red;
To load and create these as well, add the following to your LoadContent overload:
font = Content.Load<SpriteFont>("font");
alphaImage = Content.Load<Texture2D>("alphasprite");
background = new Texture2D(GraphicsDevice, 1, 1);
background.SetData<Color>(new Color[] { Color.CornflowerBlue });
red = new Texture2D(GraphicsDevice, 1, 1);
red.SetData<Color>(new Color[] { Color.Red});
This example shows the
difference between the various blending modes. To do this, you have one
background image (that is the destination color) that is the ubiquitous
cornflower blue color and one source image (which includes the source
color), which is either a solid red color or the data in the alpha
sprite. Replace your Draw overload to include the rendering of the background:
protected override void Draw(GameTime gameTime)
{
    GraphicsDevice.Clear(Color.CornflowerBlue);
    spriteBatch.Begin();
    spriteBatch.Draw(background, GraphicsDevice.Viewport.Bounds, Color.White);
    spriteBatch.End();
    base.Draw(gameTime);
}
To render your source
image easily and compare how it is rendered, add the following method,
which helps render the source image with varying blend states:
private void DrawBlendedImage(BlendState blend, string text, Texture2D image, Point position, Point size)
{
    // Draw the source image on top opaque
    spriteBatch.Begin(SpriteSortMode.Deferred, BlendState.Opaque);
    spriteBatch.Draw(image, new Rectangle(position.X, position.Y,
        size.X, size.Y), Color.White);
    spriteBatch.End();
    Vector2 measure = font.MeasureString(text);
    spriteBatch.Begin();
    spriteBatch.DrawString(font, text, new Vector2(position.X,
        position.Y + size.Y + 2), Color.White);
    spriteBatch.End();
    // Draw the blended version now
    spriteBatch.Begin(SpriteSortMode.Deferred, blend);
    spriteBatch.Draw(image, new Rectangle(position.X,
        position.Y + size.Y + (int)measure.Y + 2,
        size.X, size.Y), Color.White);
    spriteBatch.End();
}
There are several sprite
batch begins and ends in this code, because you need to draw the images
differently so you can tell the difference. After you set the blend mode
for a sprite batch, it cannot be changed. Because you draw things with
(potentially) different blend modes, you need a separate sprite batch Begin/End pair for each.
The first call draws the source image using the built-in BlendState.Opaque
object. The built-in objects are described more in depth in a moment,
but for now, this object replaces the destination color with the source,
ignoring alpha blending. This enables the source image to be rendered
without any blending at all. The source image is drawn at the position
passed into this helper method.
Next, draw some text
describing which blend operation is shown here. Rendering text requires
alpha blending to be enabled, so use the default sprite batch Begin call (which uses SpriteSortMode.Deferred and BlendState.AlphaBlend). Also use the MeasureString call on the font so you know how big it is (so you can start the blended image at the correct spot).
Finally, use your last Begin/End
pair to draw the image with the specified blending state. During this
next section of code, you create state objects on the fly, and every
frame. Although this certainly works, it is a bad idea. It creates
garbage, and unnecessarily makes your game run slower. In a real game,
these are cached and reused.
Warning
You should not create new state objects every frame. This example does it for clarity reasons.
Before you create your new
blend object and call the helper function, add two more helper functions
to easily calculate the point and size parameters you pass in to DrawBlendedImage:
const int size = 80;
Point GetPoint(int i)
{
    return new Point(10 + ((i % 9) * (size + 6)), 10 + ( (i/9) * (size * 2 + 50) ) );
}
Point GetSize()
{
    return new Point(size, size);
}
int i = 0;
BlendState currentBlend = new BlendState();
currentBlend.ColorBlendFunction = BlendFunction.Add;
currentBlend.ColorSourceBlend = Blend.One;
currentBlend.ColorDestinationBlend = Blend.One;
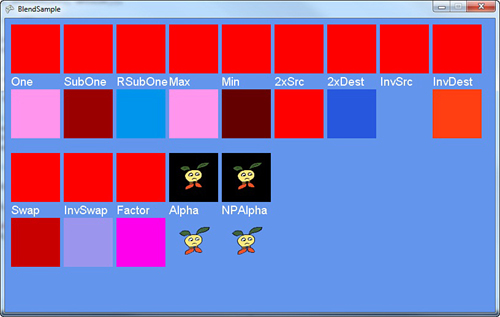
DrawBlendedImage(currentBlend, "One", red, GetPoint(i++), GetSize());
Note
After you set a particular
state onto the device, it becomes immutable (you can no longer change
it). You need to have separate state objects for each permutation you
plan on using.
In the previous formula, the blended color for this image is the following:
output = (sourceColor * 1) + (destColor * 1)
Essentially, you add the two
colors. Can you predict what it would look like without running the
example? If you guessed that it would look like a brighter version of
the source red, you’d be correct. Let’s look at why this is using real
numbers in the formula. Assume the source color is RGB (Red, Green,
Blue) of (255,0,0) and the destination color is (0,0, 255). You have the
following:
output = ( (255,0,0) * 1) + ((0,0,255) * 1)
output = (255,0,0) + (0,0,255)
output = (255,0,255)
Pure
red added with pure blue gives you a purple color. What if your source
and destination colors were the same, and they were each (127,127,127) a
mid-gray? Using this formula for the colors gives you the following:
output = ( (127,127,127) * 1) + ((127,127,127) * 1)
output = (127,127,127) + (127,127,127)
output = (254, 254, 254)
This gives you almost a pure white. Adding can be a powerful way to
blend. However, what if you wanted to subtract instead? Add this code
before your base.Draw call in your Draw overload:
currentBlend = new BlendState();
currentBlend.ColorBlendFunction = BlendFunction.Subtract;
currentBlend.ColorSourceBlend = Blend.One;
currentBlend.ColorDestinationBlend = Blend.One;
DrawBlendedImage(currentBlend, "SubOne", red, GetPoint(i++), GetSize());
Can you predict what this one
will do? This is simply the opposite of the addition, so you should see
a dark version of the source image. Using the previous examples, if you
use both source and destination colors of (127,127,127), it returns
pure black (0,0,0). If you use a source color of purple (255,0,255) and a
destination of red (255,0,0), it returns pure blue (0,0,255).
Here’s an interesting one. Add the following code:
currentBlend = new BlendState();
currentBlend.ColorBlendFunction = BlendFunction.ReverseSubtract;
currentBlend.ColorSourceBlend = Blend.One;
currentBlend.ColorDestinationBlend = Blend.One;
DrawBlendedImage(currentBlend, "RSubOne", red, GetPoint(i++), GetSize());
The ReverseSubract
value is similar to the Subtract operation except, reversed. At a high
level, instead of source-dest, this is dest-source. The formula is the
following:
output = (destColor * 1) - (sourceColor * 1)
Knowing this, can you predict
what this output color would be? If you guessed it would appear to be a
negative of the source image, then bravo for you again! Let’s discuss
the last two blend functions. Add the following code:
currentBlend = newBlendState();
currentBlend.ColorBlendFunction = BlendFunction.Min;
currentBlend.ColorSourceBlend = Blend.One;
currentBlend.ColorDestinationBlend = Blend.One;
DrawBlendedImage(currentBlend, "Min", red, GetPoint(i++), GetSize());
currentBlend = new BlendState();
currentBlend.ColorBlendFunction = BlendFunction.Max;
currentBlend.ColorSourceBlend = Blend.One;
currentBlend.ColorDestinationBlend = Blend.One;
DrawBlendedImage(currentBlend, "Max", red, GetPoint(i++), GetSize());
These two functions are basically self-explanatory. It looks at both pixel colors and picks the largest value if you specified Max, and the smallest value if you specified Min. You see a brighter image for the max function and a darker image for the min function.
Note
The Max and Min values of the BlendFunction enumeration require that both the source and destination use Blend.One.
For each of these examples so
far, you used Blend. One for both the source and destination. This is
easy to understand because it simply leaves the color unchanged;
however, there are quite a few different blend operations available. Blend.Zero
is just as easy to understand, because it multiplies the color by zero,
effectively ignoring it (depending on the blend function, of course).
To set the blend operation to simply use the source or destination color, add the following code:
currentBlend = new BlendState();
currentBlend.ColorBlendFunction = BlendFunction.Add;
currentBlend.ColorSourceBlend = Blend.SourceColor;
currentBlend.ColorDestinationBlend = Blend.Zero;
DrawBlendedImage(currentBlend, "2xSrc", red, GetPoint(i++), GetSize());
Notice that you use the blend
operation for the source to be the source color. It doesn’t mean that
you are simply using the color as is! Remember the formula, plugging in
the data gets you the following:
output = (sourceColor * sourceColor) + (destColor * 0)
Using this essentially doubles the amount of the source in the final color. You can do the same with the following destination:
currentBlend = new BlendState();
currentBlend.ColorBlendFunction = BlendFunction.Add;
currentBlend.ColorSourceBlend = Blend.Zero;
currentBlend.ColorDestinationBlend = Blend.DestinationColor;
DrawBlendedImage(currentBlend, "2xDest", red, GetPoint(i++), GetSize());
This makes the following formula:
output = (sourceColor * 0) + (destColor * destColor)
Again, it essentially doubles the destination color. Now, you can also use the inverse of either of these colors by choosing InverseSourceColor or InverseDestinationColor.
Calculate the values by subtracting the current color value from the
maximum color value for the channel; for example, if you used single
byte RGB values such as
solid green (0,255,0), inversing this color gives you (255 - 0, 255 -
255, 255 - 0) or a purple color of (255,0,255). Using the inverse of a
color on itself cancels itself out, as you can see in the following
code:
currentBlend = new BlendState();
currentBlend.ColorBlendFunction = BlendFunction.Add;
currentBlend.ColorSourceBlend = Blend.InverseSourceColor;
currentBlend.ColorDestinationBlend = Blend.One;
DrawBlendedImage(currentBlend, "InvSrc", red, GetPoint(i++), GetSize());
currentBlend = new BlendState();
currentBlend.ColorBlendFunction = BlendFunction.Add;
currentBlend.ColorSourceBlend = Blend.One;
currentBlend.ColorDestinationBlend = Blend.InverseDestinationColor;
DrawBlendedImage(currentBlend, "InvDest", red, GetPoint(i++), GetSize());
If you look at the formula, it makes sense (for example, for the first state):
output = (sourceColor * inv(sourceColor)) + (destColor * 1)
output = (destColor * 1)
However, you can just as easily blend with the opposite colors.
currentBlend = new BlendState();
currentBlend.ColorBlendFunction = BlendFunction.Add;
currentBlend.ColorSourceBlend = Blend.DestinationColor;
currentBlend.ColorDestinationBlend = Blend.SourceColor;
DrawBlendedImage(currentBlend, "Swap", red, GetPoint(i++), GetSize());
This makes the following formula:
output = (sourceColor * destColor) + (destColor * sourceColor)
You can even use the inverse of the colors swapped.
currentBlend = new BlendState();
currentBlend.ColorBlendFunction = BlendFunction.Add;
currentBlend.ColorSourceBlend = Blend.InverseDestinationColor;
currentBlend.ColorDestinationBlend = Blend.InverseSourceColor;
DrawBlendedImage(currentBlend, "InvSwap", red, GetPoint(i++), GetSize());
Let’s discuss the last blend operation, BlendFactor (and it also has the InverseBlendFactor
to go along with it). This essentially lets you blend either of your
colors with an arbitrary color of your choice, for example:
currentBlend = new BlendState();
currentBlend.ColorBlendFunction = BlendFunction.Add;
currentBlend.ColorSourceBlend = Blend.One;
currentBlend.ColorDestinationBlend = Blend.BlendFactor;
currentBlend.BlendFactor = Color.Blue;
DrawBlendedImage(currentBlend, "Factor", red, GetPoint(i++), GetSize());
This makes the formula for the output color the following:
output = (sourceColor * 1) + (destColor * blue)
Given the red color of the
source image and the slightly blue background color, this color ends up
as a bright purple. A common use of a blend factor is to have it change
over time to perform fancy effects.
Note
It is unreasonable to force
someone to use a new state object for every blend factor (remember that
the state objects are immutable). Therefore, use a BlendFactor
property on the graphics device to override what is in the state
object. Note that the graphics device’s value is updated when the state
is applied, so make sure you change it only after the state is set.
There are two more properties to discuss briefly. First are the ColorWriteChannel
properties (there are four total) that specify which color channels can
be written during the blend operation. Each channel corresponds to a
render target, and by default it writes all the channels.
The MultisampleMask
property enables you to control which samples are valid for
multisampling. By default, all bits are on, so all samples are valid,
but you can change this on the fly.
Note
Like BlendFactor, MultisampleMask is also a property on the device so it can be changed without using the blend state.
Premultiplied Alpha
Another change in this
release of Game Studio involves the default mechanism used to perform
alpha blending. In previous versions, “normal” interpolated blending was
performed for alpha blending, which in the formula you’ve been using
now was defined as:
output = (sourceColor * sourceAlpha) + (destColor * inv(sourceAlpha))
This was the standard way to
declare transparency, but in Game Studio 4.0, the default changed to
premultiplied alpha. This mode assumes that the color’s RGB values are
multiplied by the alpha value before the blend takes place (hence, the
term premultiplied), and the formula for this alpha blending is the
following:
output = sourceColor + (destColor * inv(sourceAlpha)
This is similar to the
original one, but subtly different enough to matter. Game Studio’s
defaults changed to use premultiplied alpha because (while it is not
perfect) in the majority of cases, it is the blending mode that most
developers actually want in the first place. Plus, it is easy to switch
back to the old default way of blending.
What does it mean that Game Studio uses premultiplied alpha as the default? Look at the properties of the AlphaSprite.png that you added to your content project. Under the texture content processor, notice a property for PremultipliedAlpha that is set to true. This
means that during build time when the content pipeline is processing
this texture, for each pixel that it processes it premultiplies the
alpha in this formula:
pixelColor.rgb *= pixelColor.a;
Add the following code to your project to see how the alpha computation changes:
DrawBlendedImage(BlendState.AlphaBlend, "Alpha", alphaImage, GetPoint(i++), GetSize());
If you render this now, the
source image has a black background where the alpha channel is when
drawn opaque, with a transparent background and the image showing up
alpha blended below it. Now, go to the properties of AlphaSprite.Png and
change the PremultipliedAlpha
value to false. Run the application, and notice that the top and bottom
images look the same, and rather than a black background, it has a white
background with no alpha blending at all.
I’m sure you can guess why.
The blend operation expects the alpha value to be premultiplied, and it
is not. The background turned white because without the
premultiplication multiplying the 0 alpha value with the white RGB
value, returning a 0 RGB value of black, it maintains the white color.
However, add the following code to the project:
DrawBlendedImage(BlendState.NonPremultiplied, "NPAlpha",
  alphaImage, GetPoint(i++), GetSize());
Because the image isn’t premultiplied anymore, this shows the image normally alpha blended. Lastly, switch the image back to PremultipliedAlpha
true. Notice that now both premultiplied and non-premultiplied seem to
render alpha blended, and appear to look identical. This is because this
particular image only has an alpha value of completely on or completely
off. There are no partial alpha values, so the two blend operations
come up with the same values. This wouldn’t be the case otherwise.
Whew, that was a long
discussion about blending. There are a number of built-in blend states
for the more commonly used operations as well that are static objects
off of the BlendState itself. These include Opaque, Alphablend, Additive, and Nonpremultiplied. After all that, running the app gives you quite a few examples of varying blend modes, much like you see in Figure 1.