Up until this point, the rendering has been directly
onto the screen. You perform a rendering operation, and it appears on
the screen. You can go so far as to say that the display was your render
target (as in the target of your rendering).
What if you need to render
something that you don’t need to show on the screen? You would need a
different type of render target, and as luck would have it, there is a RenderTarget2D class available for you!
A RenderTarget2D object is a special kind of texture (it inherits from Texture2D)
that enables you to use it as a source for rendering, instead of the
device. This enables you to use the render target on your device, and
then later, use that rendered scene as a texture. To help visualize this
concept, create a new Game project and add the depthmodel.fbx from the
downloadable examples to the Content project.
Add the following variables to the project so you can draw the model later and use your render target:
Model model;
RenderTarget2D rt;
Like always, initialize these as well by adding the following code in your LoadContent overload:
model = Content.Load<Model>("depthmodel");
foreach (ModelMesh mm in model.Meshes)
{
    foreach (Effect e in mm.Effects)
    {
        IEffectLights iel = e as IEffectLights;
        if (iel != null)
        {
            iel.EnableDefaultLighting();
        }
    }
}
rt = new RenderTarget2D(GraphicsDevice, 256, 256, false,
    SurfaceFormat.Color, DepthFormat.Depth16);
Load the model and update the
lights as you’ve done many times before. Next is the render target
creation. There are three different overloads for creating a render
target, with the first as the simplest by taking in the graphics device,
the width, and the height. You don’t use this one here because a render target created with this overload does not have an associated depth buffer.
The difference between a
render target and a texture is render targets can have associated depth
buffers. If you think about it, it seems obvious because it can be a
target of your rendering, and rendering 3D scenes without a depth buffer
can give you ugly scenes.
The overload for creation
used here includes the three parameters, and a Boolean parameter to
dictate whether the render target includes mipmaps , followed by the color format and depth format for
the render target. Notice that this example uses a 256×256 render
target. Render targets do not have to be the same size as your display
or back buffer. This size was chosen because later in the example, it is
rendered overlaid on the screen.
Understanding The RenderTargetUsage Options
The last overload includes the parameter to specify RenderTargetUsage. This enumeration has three values: PreserveContents, PlatformContents, and DiscardContents. The default value for new render targets is DiscardContents,
which means whenever a render target is set onto the device its
previous contents are destroyed. The framework attempts to help you
realize this by clearing the buffer to a solid purple color, a familiar
color when working with render targets. If you choose to use PreserveContents,
then the data associated with the render target is maintained when you
switch to and from the render target. Be warned though, that this can
have a significant performance impact because, in many cases, it
requires storing the data, and then copying it all back into the render
target when you use it again. At a high level, the PlatformContents
chooses between the other two depending on the platform, preserving the
data on Windows in most cases, and discarding it on Windows Phone and
Xbox 360.
Note
The RenderTargetUsage option can be specified for the device as well if you want your device to have preserve semantics.
To show the rendering into the
render target, render the model multiple times, and add the following
helper method to encapsulate the operation:
private void RenderModel(float time, Matrix view, Matrix proj)
{
    Matrix rotation = Matrix.CreateRotationZ(time) *
        Matrix.CreateRotationY(time / 4.0f);
    Matrix scale = Matrix.CreateScale(0.5f);
    GraphicsDevice.DepthStencilState = DepthStencilState.Default;
    model.Draw(rotation * scale, view, proj);
}
This sets up a simple
rotating world matrix, turns the depth buffer back to its defaults (you
render via the default sprite batch later), and draws the model. This is
not fancy, but let’s call it. Replace your Draw overload with the following:
protected override void Draw(GameTime gameTime)
{
    float time = (float)gameTime.TotalGameTime.TotalSeconds;
    Matrix proj = Matrix.CreatePerspectiveFieldOfView(MathHelper.PiOver4,
        1.0f, 1.0f, 100.0f);
    Matrix view = Matrix.CreateLookAt(new Vector3(-34, 23, 20),
        Vector3.Zero, Vector3.Up);
    GraphicsDevice.Clear(Color.CadetBlue);
    RenderModel(time, view, proj);
}
There’s nothing here that’s
extremely new and exciting, unless of course you consider the different
clear color to be new and exciting. Running the example now shows you
the model spinning in the center of the screen. Well, the aspect ratio
is different too, because you use this (in a moment) on a render target
with a 1.0 aspect ratio (width and height are the same). Now, switch to
your render target before you call clear using the following line:
GraphicsDevice.SetRenderTarget(rt);/
Note
You can set up to four render targets at a time for HiDef projects by using the SetRenderTargets method instead.
You probably shouldn’t run the example now, because you’ll just get an exception complaining that you can’t call Present when a render target is set. To unset the render target when you’re done, add the following to the end of your Draw method:
GraphicsDevice.SetRenderTarget(null);
With your rendering now
happening onto a separate render target, when you run the example you
get a purple screen. As mentioned earlier, this is because your render
target (and the device) each have a usage of DiscardContents.
When a render target is set with this usage, its contents are cleared
to a purple color. In this case, when you set the render target back to
null (the device’s back buffer), its contents are cleared and you see
purple. Add the following to the end of your Draw method:
proj = Matrix.CreatePerspectiveFieldOfView(MathHelper.PiOver4,
    GraphicsDevice.Viewport.AspectRatio, 1.0f, 100.0f);
view = Matrix.CreateLookAt(new Vector3(0, 23, 20), Vector3.Zero, Vector3.Up);
GraphicsDevice.Clear(Color.CornflowerBlue);
RenderModel(time, view, proj);
Notice that the view matrix
has changed so you’re looking at the model from a different direction.
However, when you run the example, the model spins in the middle of the
scene, and there is only one copy of it. It is as if the first version
you rendered vanished, which is somewhat true.
Remember earlier when the RenderTarget2D
object was just a special kind of texture? That means you can use it
exactly as you would a texture! So, add the following to the end of the Draw method in your example to show both views of the model rendering at the same time:
spriteBatch.Begin();
spriteBatch.Draw(rt, Vector2.Zero, Color.White);
spriteBatch.End();
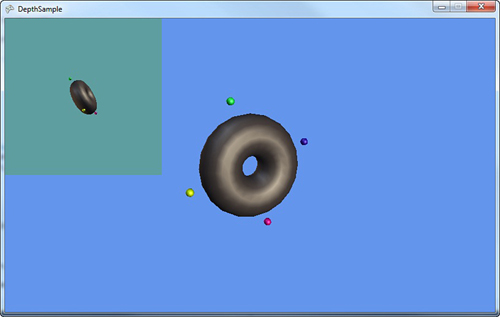
There it is! Now you can see that the model you drew originally is now in the upper left corner of the screen as in Figure 1, and the second model is still spinning in the center. Also, notice that they’re viewed from different angles.
Note
Just like there is a RenderTarget2D, there is also a RenderTargetCube, which derives from TextureCube.
