While the data in Isolated
Storage is sandboxed for each application—i.e., an application cannot
access the contents of Isolated Storage of another application—it is
still important to encrypt sensitive data stored on the device.
Encrypting data makes it impossible for anybody other than the data
owner to read that data, something that is especially critical for
enterprise users. Windows Phone 7 provides a powerful subset of .Net
encryption classes, which make data encryption not only possible, but
extremely easy on this device. The following data encryption algorithms
are supported on Windows Phone 7:
AES
HMACSHA1
HMACSHA256
Rfc2898DeriveBytes
SHA1
SHA256
As you will see shortly in
the next walkthrough, many of these algorithms complement each other to
provide a robust data encryption strategy for Windows Phone 7 devices.
But first, let's briefly review the purpose of each of the supported
encryption algorithms.
AES (stands for
Advanced Encryption Standard) is a symmetric encryption algorithm. That
means that it uses the same key (password) to encrypt and decrypt data.
Since the key used to encrypt/decrypt data could be easy to guess by
iterating through words in a dictionary in an automated manner, an
additional secret key is added during the encryption process.
This key is called salt
and is usually a random set of bits, such as an employee identification
number, that is used to make the AES-encrypted message harder for
intruders to decrypt.
HMACSHA1 and HMACSHA256
algorithms both generate a unique message authentication code (MAC) from
the data and password supplied. Both algorithms use the same approach
to generating MAC: they take data and hash it with the secret key using
standard hash function SHA1 and SHA256 correspondingly. The difference
between HMACSHA1 and HMACSHA256 lies in the strength of the message
generated: HMACSHA1 output is 160 bits long, while HMACSHA256 has output
256 bits in length.
Finally, Rfc2898DeriveBytes
is an algorithm that relies on the HMACSHA1 function to generate a
strong key, using the password and salt values supplied, to be used to
encrypt and decrypt data. In the following walkthrough, you will see how
the Rfc2898DeriveBytes algorithm is used to generate a set of keys for
the AES-based encryption.
NOTE
Do not store password or
salt values in application code. It is extremely easy to peek at
compiled .NET code using tools such as Ildasm.exe or even a simple text editor and retrieve the value of the password/salt.
In the first data
security walkthrough, you will experiment with HMACSHA1 and HMACSHA256
algorithms to observe the keys that those algorithms generate from the
input and password/salt values supplied. In the second walkthrough, you
will encrypt and decrypt data on the device using the AES algorithm.
1. Using HMACSHA1 and HMACHSHA256
Both HMACSHA1 and
HMACSHA256 functions are one-way: once the message authentication code
is generated using either of those functions, it is impossible to
recreate the original message from the generated MAC. This makes those
functions ideal for storing values of security codes: the only way to
produce a match of the MAC on those values is to supply a valid password
and security code. The following walkthrough demonstrates how to
generate HMACSHA1 and HMACSHA256 messages.
1.1. Creating a User Interface
The application
interface will consist of textboxes to accept a message and password to
create a MAC from, and it will show the MAC generated using both
HMACSHA1 and HMACSHA256 algorithms.
Open Visual Studio Express for Windows Phone and create a new project called HMACTest.
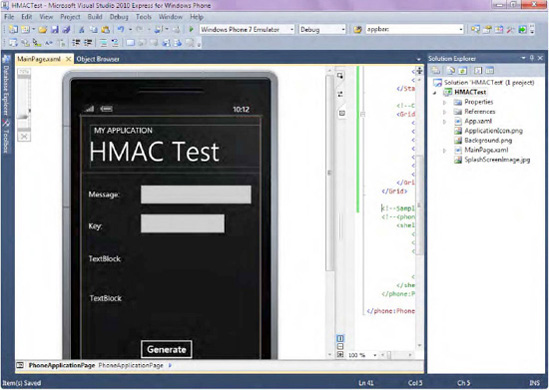
Make MainPage.xaml look like Figure 19-9.
For reference, the XAML of this page is pasted here (and don't forget
that you can also download all code samples for this book):
<!--LayoutRoot contains the root grid where all other page content is placed-->
<Grid x:Name="LayoutRoot" Background="Transparent">
<Grid.RowDefinitions>
<RowDefinition Height="Auto"/>
<RowDefinition Height="*"/>
</Grid.RowDefinitions>
<!--TitlePanel contains the name of the application and page title-->
<StackPanel x:Name="TitlePanel" Grid.Row="0" Margin="24,24,0,12">
<TextBlock x:Name="ApplicationTitle" Text="MY APPLICATION" Style="{StaticResource PhoneTextNormalStyle}"/>
<TextBlock x:Name="PageTitle" Text="HMAC Test" Margin="-3,-8,0,0" Style="{StaticResource PhoneTextTitle1Style}"/>
</StackPanel>
<!--ContentPanel - place additional content here-->
<Grid x:Name="ContentGrid" Grid.Row="1">
<Button Content="Generate" Height="72" HorizontalAlignment="Left" Margin="149,437,0,0" Name="button1" VerticalAlignment="Top" Width="160" Click="button1_Click"/>
<TextBox Height="72" HorizontalAlignment="Left" Margin="149,23,0,0" Name="txtMessage" Text="" VerticalAlignment="Top" Width="317" />
<TextBlock Height="99" HorizontalAlignment="Left" Margin="21,216,0,0" Name="textBlock1" Text="TextBlock" VerticalAlignment="Top" Width="445" TextWrapping="Wrap" />
<TextBlock Height="114" HorizontalAlignment="Left" Margin="24,321,0,0" Name="textBlock2" Text="TextBlock" VerticalAlignment="Top" Width="442" TextWrapping="Wrap" />
<TextBlock Height="30" HorizontalAlignment="Left" Margin="21,44,0,0" Name="textBlock3" Text="Message:" VerticalAlignment="Top" Width="122" /> <TextBlock Height="30" HorizontalAlignment="Left" Margin="21,129,0,0" Name="textBlock4" Text="Key:" VerticalAlignment="Top" /> <TextBox Height="72" HorizontalAlignment="Left" Margin="149,101,0,0" Name="txtKey"Text="" VerticalAlignment="Top" Width="246" /> </Grid></Grid>
1.2. Coding the Application Logic
The next step is to add logic
that takes advantage of the cryptography classes on Windows Phone 7 to
show Message Authentication Codes.
Add the following using directive to the top of the page:
using System.Security.Cryptography;
Because you want all of the encryption logic to happen on the button click, add an event handler to the Click event of the Generate
button. To do that, double-click the "Generate" button and paste the
following code inside the handler. Note how after declaring the HMACSHA1
and HMACSHA256 classes, all of the magic happens in the ComputeHash
function, which returns an array of bytes that you convert to the
hexadecimal string.
string message = txtMessage.Text;
string key = txtKey.Text;

System.Text.UTF8Encoding encoding = new System.Text.UTF8Encoding();

byte[] keyByte = encoding.GetBytes(key);

HMACSHA1 hmacsha1 = new HMACSHA1(keyByte);
HMACSHA256 hmacsha256 = new HMACSHA256(keyByte);

byte[] messageBytes = encoding.GetBytes(message);
byte[] hashmessage = hmacsha1.ComputeHash(messageBytes);
textBlock1.Text = ConvertToString(hashmessage);

hashmessage = hmacsha256.ComputeHash(messageBytes);
textBlock2.Text = ConvertToString(hashmessage);
Finally, paste the contents of the ConvertToString helper function that converts a byte array passed in to the hexadecimal string.
public static string ConvertToString(byte[] buff)
{
    string sbinary = "";

    for (int i = 0; i < buff.Length; i++)
    {
        //hex-formatted
        sbinary += buff[i].ToString("X2");
    }
    return (sbinary);
}
Press F5 to run the
application. Enter some message text (for example, "Hello, World") and
key (for example, "test") and observe the MAC values generated using the
HMACSHA1 algorithm (top TextBlock) and HMACSHA256 algorithm (bottom
TextBlock). Notice that not only does the length of the MACs differ, but
the MACs themselves are completely different from each other.
In the next walkthrough, you will encrypt and decrypt data using AES.
