To produce more realistic 3D objects, you need to add
simulated lighting and shading to the objects you are drawing. There
are many different types of lighting models that simulate how light
works in the real world. Simulated lighting models have to strike a
balance between realism and performance. Many of the lighting models
used within 3D graphics are not based on how light physically works in
the real world; instead, the models try to simulate how the light looks
reflected off different types of objects.
We look at some of the common lighting models that are used in 3D graphics including those used in the built-in BasicEffect.
Ambient Lighting
The simple light to
simulate is light that has no general direction and has a constant
intensity in all directions on an object. This light is scattered many
times meaning it has bounced off many other objects before hitting the
final object you are shading.
In the real world, this type of
light occurs when you are outside but in the shade. Although you are
not in the direct sunlight, there is plenty of light that bounces around
off other objects to light you and your sounding objects.
In 3D graphics, ambient
lighting is used to give the lowest possible level of lighting an object
can have in your scene when it is not lit by other types of lighting.
The light value is represented by a Vector3 that describes the color in three colors: red, green, and blue using the X, Y, and Z properties. A value of 0 means no light, and a value of 1 means it is fully lit, which is not likely for your ambient light.
To see how ambient
lighting looks when used in a game, let’s create a sample that displays
four objects: a cylinder, a sphere, a torus, and a flat plane on the
ground. You use these objects through your lighting examples while you
continually add different types of lighting to the example.
The first step is to add the following member variables to your game class:
Effect ambientEffect;
Model model;
Matrix[] modelTransforms;

Matrix world;
Matrix view;
Matrix projection;

// This is both the light color and the light intensity
Vector3 ambientLightColor;
// The color of the objects you are going to draw
Vector3[] diffuseColor;
The ambientEffect
variable stores your custom effect. Update the name of the effect
variable in each of the examples with the type of lighting you are
using. The next two variables, model and modelTransforms, are used to store the Model and transform hierarchy for the ModelMesh’s contained within the Model.
The next three Matrix values are used to store the matrices to transform the vertices of the Model from local space into screen projection space.
The final two variables are used for the lighting calculations. The ambientLightColor represents the light color and intensity of the ambient light. The diffuseColor
array contains the colors for the three objects you plan to draw. This
is the color of the object if it was fully lit. Unlike the vertex color
example, you set the color to draw the objects by passing the value into
the shader as a global constant. If the model contained vertex colors,
use those values instead.
Next, in the game’s Initialize method, set the initial values for the previous variables.
// Set the values for our world, view, and projection matrices
world = Matrix.Identity;
view = Matrix.CreateLookAt(new Vector3(0, 1.5f, 3.5f), new Vector3(0, 0, 0), new
Vector3(0, 1, 0));
projection = Matrix.CreatePerspectiveFieldOfView(MathHelper.PiOver4,
GraphicsDevice.Viewport.AspectRatio, 0.1f, 100.0f);

// Set the ambient color
ambientLightColor = new Vector3(0.4f, 0.4f, 0.4f);

// Set the diffuse colors
diffuseColor = new Vector3[4];
diffuseColor[0] = new Vector3(1, 0.25f, 0.25f);
diffuseColor[1] = new Vector3(0.25f, 1, 0.25f);
diffuseColor[2] = new Vector3(0.25f, 0.25f, 1);
diffuseColor[3] = new Vector3(0.5f, 0.0f, 0.5f);
First, set the matrices to
sensible values to frame the models close to the screen. Then, set the
color of the ambient light. Use values of 0.4f or 40 percent. This value
is combined with each of the color values set in the next array. Set
red, green, blue, and purple values for each of the objects.
Next, load the custom effect file and the model file. In the game’s LoadContent method, add the following lines of code:
// Load custom effect
ambientEffect = Content.Load<Effect>("AmbientLighting");

// Load our model
model = Content.Load<Model>("LightingModels");
// Create an array for model transforms and make a copy
modelTransforms = new Matrix[model.Bones.Count];
model.CopyAbsoluteBoneTransformsTo(modelTransforms);
Most of the code should look familiar. You load the Effect file that you will create shortly and a Model that contains the four objects that will display the lighting models. The final two lines of code populate a Matrix array with the local Matrix transforms for each of the MeshParts. Because the fbx file contains multiple objects, they are represented as separate MeshParts, each with its own local Matrix that is used to transform the object into world space.
The final piece of your game code is to update the game’s Draw method with the following code:
int diffuseIndex = 0;


// Set effect wide parameters
ambientEffect.Parameters["View"].SetValue(view);
ambientEffect.Parameters["Projection"].SetValue(projection);
ambientEffect.Parameters["AmbientLightColor"].SetValue(ambientLightColor);

foreach (ModelMesh mesh in model.Meshes)
{
    // Set mesh effect parameters
    ambientEffect.Parameters["World"].SetValue(modelTransforms[mesh.ParentBone.Index] *
                                               world);

    foreach (ModelMeshPart meshPart in mesh.MeshParts)
    {
        // Set vertex and index buffer to use
        GraphicsDevice.SetVertexBuffer(meshPart.VertexBuffer, meshPart.VertexOffset);
        GraphicsDevice.Indices = meshPart.IndexBuffer;
        // Set diffuse color for the object
ambientEffect.Parameters["DiffuseColor"].SetValue(diffuseColor[diffuseIndex++]);

        // Apply our one and only pass
        ambientEffect.CurrentTechnique.Passes[0].Apply();

        GraphicsDevice.DrawIndexedPrimitives(PrimitiveType.TriangleList, 0, 0,
                                                meshPart.NumVertices,
                                                meshPart.StartIndex,
                                                meshPart.PrimitiveCount);
    }
}
Let’s break the code down.
The first variable diffuseIndex is used to offset into the color array to set the color of each of the MeshParts in the Model.
The next section sets the Effect parameters that don’t change over the course of drawing the different parts of the Model. In this case, you set the View and Projection matrix along with the AmbientLightColor.
Because setting effect parameters can be expensive, set only new values
when you have to. In this case, set them at the highest level and once
per use of the Effect.
The next section of code loops over all of the ModelMeshs in the Model. The World matrix is then set by combining the local transform from the ModelMesh with the world matrix for the scene.
The final section of code loops over all the ModelMeshParts within each of the ModelMeshs. Set the VertexBuffer and IndexBuffer, and then set Effect parameters that change per object you draw. In this case, set the color for each object before you call EffectPass.Apply. Each mesh is then drawn by calling DrawIndexedPrimitives.
You have all of the C# game code
you need to draw your model using ambient lighting. Now you need to
create the custom effect that you need to use with the previous bit of
code. Create a new effect file as you have done previously in this article and name it AmbientLighting.fx.
Along with the template global variables, add the following global variables:
float3 AmbientLightColor;
float3 DiffuseColor;
These store the ambient light and object color.
Leave the VertexShaderInput and VertexShaderOutput structures as is from the template along with the vertex shader VertexShaderFunction.
Finally, update the pixel shader with the following code:
float4 PixelShaderFunction(VertexShaderOutput input) : COLOR0
{
    // Store the final color of the pixel
    float3 finalColor = float3(0, 0, 0);
    // Add in ambient color value
    finalColor += AmbientLightColor * DiffuseColor;

    return float4(finalColor, 1);
}
This
is a simple pixel shader. It starts by declaring the variable that is
used to store the return final color of the pixel. The ambient lighting
is then calculated by multiplying the ambient light by the color of the
object. The final color is then returned adding the fourth channel for
alpha with a value of 1 for fully opaque.
Running this sample should display something similar to Figure 1.
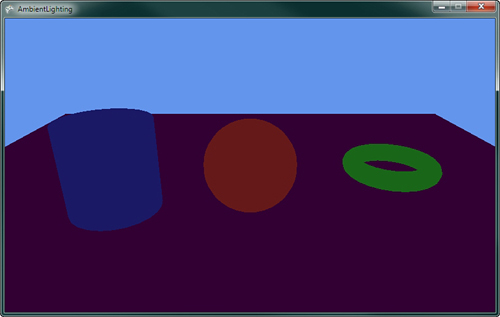
Notice how each of the
models is a constant color across the entire mesh. The direction of the
triangle is not taken into account with this ambient lighting model.
