1. Problem
You have to create a Windows Phone 7 application by using Silverlight.
2. Solution
Use Visual Studio 2010
(either the Express, Professional, or Superior edition). Use the Windows
Phone Application project template.
3. How It Works
After opening Visual Studio 2010, you have to create a new project. From the File menu, choose New Item => Project item (or press Ctrl+Shift+N). Figure 1 shows the dialog box that appears after launching the New Project command.
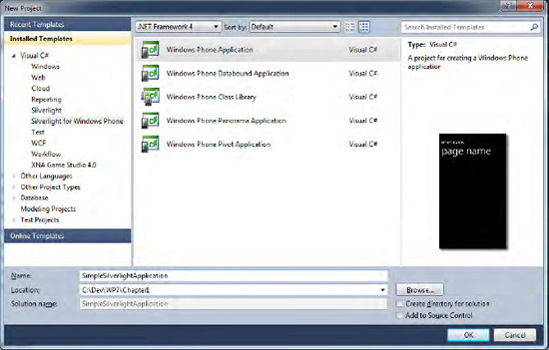
From the Installed
Templates on the left, select Silverlight for Windows Phone. There are
five project templates provided by Visual Studio 2010:
Windows Phone Application creates a skeleton code for a generic phone application; no controls or other stuff are added.
Windows Phone Databound Application creates a Windows Phone application, adding List and Navigation controls.
Windows Phone Class Library creates a skeleton code for an external assembly specific to Windows Phone 7.
Windows Phone Panorama Application creates an application including the Panorama control .
Windows Phone Pivot Application creates an application including the Pivot control .
Select the Windows Phone Application project template and type SimpleSilverlightApplication
in the project's Name text box. Choose a Location where to save the
project and then click the OK button. Wait while Visual Studio 2010
writes every file and folder, and after a few seconds you should have MainPage.xaml opened in the integrated development environment (IDE) of Visual Studio 2010 (see Figure 2).

3.1. The Code
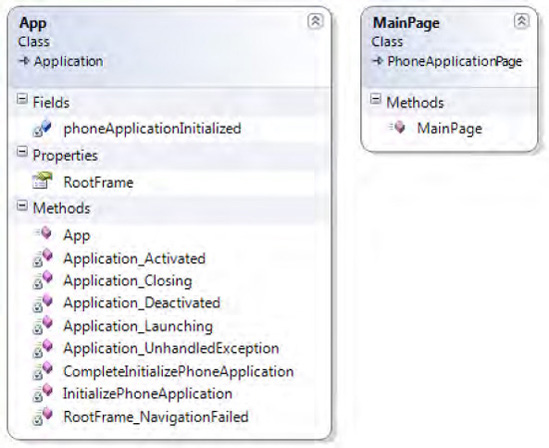
The project contains two main files: App.xaml and MainPage.xaml. Two classes are created: the App class and the MainPage class (see class diagram in Figure 3).
The other files are resources such as a splash screen image, background
image, and the application icon. Finally, there is an application
manifest file called WMAppManifest that
contains application data such as the application's title, the resource
names, and so forth. It also includes a list of capabilities that you
have to specify when you want to use a particular phone feature. For
example, if you want to use the phone microphone in your application,
you have to add the ID_CAP_MICROPHONE capability. The file comes with more than ten capabilities already defined in it; you should remove the ones you don't use.
Let's focus our attention on the main two files. The MainPage.xaml
file contains the Extensible Application Markup Language (XAML) markups
that define the main page. At the beginning of the code, all the
namespaces used by the application are declared.
<phone:PhoneApplicationPage
    x:Class="SimpleSilverlightApplication.MainPage"
    xmlns="http://schemas.microsoft.com/winfx/2006/xaml/presentation"
    xmlns:x="http://schemas.microsoft.com/winfx/2006/xaml"
    xmlns:phone="clr-namespace:Microsoft.Phone.Controls;assembly=Microsoft.Phone"
    xmlns:shell="clr-namespace:Microsoft.Phone.Shell;assembly=Microsoft.Phone"
    xmlns:d="http://schemas.microsoft.com/expression/blend/2008"
    xmlns:mc="http://schemas.openxmlformats.org/markup-compatibility/2006"

....
The root tag is PhoneApplicationPage, which is the class from which our application derives. The prefix phone: is necessary because the PhoneApplicationPage name is defined in the namespace clr-namespace:Microsoft.Phone.Controls;assembly=Microsoft.Phone. The x:Classattribute states that the MainPage class is defined in the code-behind and is included in the SimpleSilverlightApplication namespace. The first namespace in the XAML code is the main Silverlight namespace; the x namespace contains definitions of all extra XAML elements not defined in the previous namespace. The shell, d, and mc
namespaces are specific to the Windows Phone application and contain
markups for shell instructions, Microsoft Expression Blend, and the
Visual Studio designer.The other attributes of the <phone:PhoneApplicationPage>
markup are used to define the application's orientation, font, and
colors. It is worth noting the use of static resources provided by the
Windows Phone resource dictionary (see http://msdn.microsoft.com/en-us/library/ff769552(v=vs.92).aspx for the full list of available resources).
....
    mc:Ignorable="d" d:DesignWidth="480" d:DesignHeight="768"
    FontFamily="{StaticResource PhoneFontFamilyNormal}"
    FontSize="{StaticResource PhoneFontSizeNormal}"
    Foreground="{StaticResource PhoneForegroundBrush}"
    SupportedOrientations="Portrait" Orientation="Portrait"
    shell:SystemTray.IsVisible="True">
Then the code includes a
grid with two rows. In the first row is a stack panel with two text
blocks, and in the second row is a content panel where you can add your
controls.
<!--LayoutRoot is the root grid where all page content is placed-->
    <Grid x:Name="LayoutRoot" Background="Transparent">
        <Grid.RowDefinitions>
            <RowDefinition Height="Auto"/>
            <RowDefinition Height="*"/>
        </Grid.RowDefinitions>

        <!--TitlePanel contains the name of the application and page title-->
        <StackPanel x:Name="TitlePanel" Grid.Row="0" Margin="12,17,0,28">
            <TextBlock x:Name="ApplicationTitle" Text="MY APPLICATION"
                       Style="{StaticResource PhoneTextNormalStyle}"/>
            <TextBlock x:Name="PageTitle" Text="page name" Margin="9,-7,0,0"
                       Style="{StaticResource PhoneTextTitle1Style}"/>
        </StackPanel>
<!--ContentPanel - place additional content here-->
        <Grid x:Name="ContentPanel" Grid.Row="1" Margin="12,0,12,0"></Grid>
    </Grid>
The other important file is App.xaml and its related code-behind App.xaml.cs file. The Application root tag represents the class from which our App class derives. Again, the x:Class
attribute contains the name of our class and the namespace in which it
is contained. The namespaces are the same as those you have seen before.
The <Application.Resources> markup is used to add custom resources to the application. But the most important code section is the one included in <Application.ApplicationLifetimeObjects>, which defines four event handlers in response to four important events in the application's lifetime. The Launching event occurs when the application is started, the Closing event occurs before the application is closed, the Activated event occurs when the user comes back to the application after having browsed to other phone applications, and the Deactivated event occurs when the user leaves the application (for example, by pressing the Back button or answering an incoming call).
<Application
    x:Class="SimpleSilverlightApplication.App"
    xmlns="http://schemas.microsoft.com/winfx/2006/xaml/presentation"
    xmlns:x="http://schemas.microsoft.com/winfx/2006/xaml"
    xmlns:phone="clr-namespace:Microsoft.Phone.Controls;assembly=Microsoft.Phone"
    xmlns:shell="clr-namespace:Microsoft.Phone.Shell;assembly=Microsoft.Phone">

    <!--Application Resources-->
    <Application.Resources>
    </Application.Resources>

    <Application.ApplicationLifetimeObjects>
        <!--Required object that handles lifetime events for the application-->
        <shell:PhoneApplicationService
            Launching="Application_Launching" Closing="Application_Closing"
            Activated="Application_Activated" Deactivated="Application_Deactivated"/>
    </Application.ApplicationLifetimeObjects>
</Application>
In the App.xaml.cs
code-behind, there is a lot of interesting auto-generated code. First,
there are the event handlers, where you have to insert your code to
respond to application tombstoning .
// Code to execute when the application is launching (e.g., from Start)
        // This code will not execute when the application is reactivated
        private void Application_Launching(object sender, LaunchingEventArgs e)
        {
        }

        // Code to execute when the application is activated (brought to foreground)
        // This code will not execute when the application is first launched
        private void Application_Activated(object sender, ActivatedEventArgs e)
        {
        }
// Code to execute when the application is deactivated (sent to background)
        // This code will not execute when the application is closing
        private void Application_Deactivated(object sender, DeactivatedEventArgs e)
        {
        }

        // Code to execute when the application is closing (e.g., user hit Back)
        // This code will not execute when the application is deactivated
        private void Application_Closing(object sender, ClosingEventArgs e)
        {
        }
In the App class's constructor, there are application initialization steps.
public App()
        {
        ...

            // Standard Silverlight initialization
            InitializeComponent();

            // Phone-specific initialization
            InitializePhoneApplication();
        }
In the InitializePhoneApplication method, RootFrame is created. Frame
is the topmost control that contains phone pages. It allows page
navigation, manages orientation, and reserves space for the system bar
and application bar. The Navigated event is used to understand when the application has completed the initialization. Until then, a splash screen is shown. The SplashScreenImage.jpg image will be used as a splash screen, but you can customize it or replace it with another one you prefer.
private void InitializePhoneApplication()
        {
            if (phoneApplicationInitialized)
                return;

            // Create the frame but don't set it as RootVisual yet;
            // this allows the splash
            // screen to remain active until the application is ready to render.
            RootFrame = new PhoneApplicationFrame();
            RootFrame.Navigated += CompleteInitializePhoneApplication;

            // Handle navigation failures
            RootFrame.NavigationFailed += RootFrame_NavigationFailed;

            // Ensure we don't initialize again
            phoneApplicationInitialized = true;
        }
Finally, in the CompleteInitializePhoneApplication event handler, the RootVisual property is set to RootFrame. RootVisual is the main application user interface.
private void CompleteInitializePhoneApplication(object sender,
                                                        NavigationEventArgs e)
        {
            // Set the root visual to allow the application to render
            if (RootVisual != RootFrame)
                RootVisual = RootFrame;

            // Remove this handler since it is no longer needed
            RootFrame.Navigated -= CompleteInitializePhoneApplication;
        }
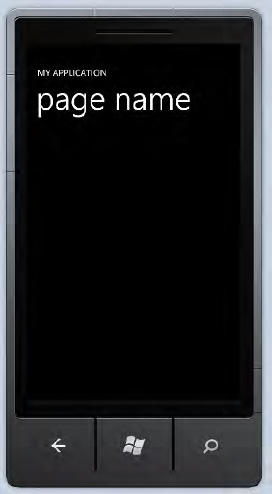
4. Usage
Press Ctrl+F5 (or choose Debug =>
Start Without Debugging from the menu).After Visual Studio 2010
compiles the code, the application will start. Visual Studio 2010 will
launch the Windows Phone 7 Emulator application (unless you changed the
target from the related combo box that is Windows Phone 7 Emulator by
default), and you will be able to see your application running in the
emulator, as shown in Figure 4.