At their core, itineraries are nothing more than
plain old XML. This means that you could create one using nothing more
than a simple text editor if you wanted. However, writing XML manually
is not something most people really want to do, and fortunately, version
2.0 of the ESB Toolkit gives you a great tool for visually designing
them. Version 2.0 of the ESB is built on top of BizTalk 2009 and
therefore works with Visual Studio 2008 and its built-in support for
domain-specific language (DSL) capabilities. The Patterns &
Practices team has done a great job of defining a new DSL specifically
for itineraries. That means that in the ESB Toolkit 2.0 you have a great
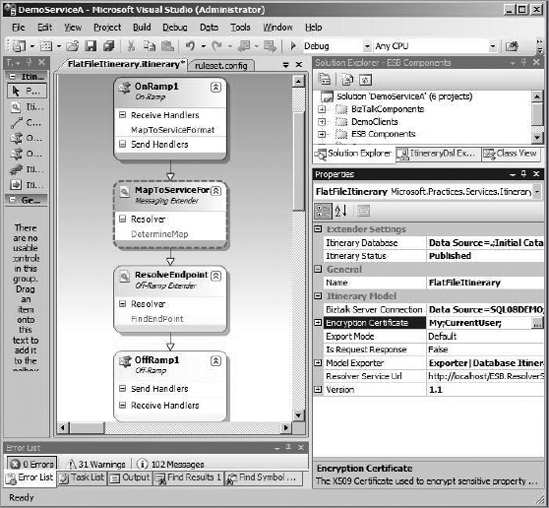
new tool for designing itineraries visually (as shown in Figure 1).

This design makes use of the
usual Visual Studio features, such as the Toolbox for itinerary shapes,
the Properties window for configuring itinerary elements, and the
Itinerary Explorer for navigating all of the components in your
itinerary.
1. Setting Up a New Itinerary
Start by creating a new
project in Visual Studio. You can use any project type (we typically use
a class library), and you can use either C# or Visual Basic. You are
not going to be compiling this project or writing any code, and you will
never need to compile this project, so it does not matter what you
select. You are just using the project to hold the itinerary while you
have it in Visual Studio. Eventually, you will export this itinerary out
of Visual Studio in order to use it.
A new itinerary is be created by right-clicking a project and selecting Add => New ItineraryDSL. Once you have a new itinerary, you will need to set up some basic configuration information for it. Figure 2 shows the properties that you can set for your overall itinerary.

Beyond setting the initial
version and name for this itinerary, you are going to need to set up the
BizTalk Server Connection String. The Itinerary Designer is able to
connect directly into a BizTalk environment, which will ultimately make
the job of designing itineraries much easier.
One example of this is when you
want to use an off-ramp in your itinerary. Doing so means that your
itinerary will have an XML structure like the following.
<Service uuid="0e1d2b42c9564352b6878accc290fe52" beginTime=""completeTime=""
  name="DynamicOffRamp" type="Messaging"
state="Pending" isRequestResponse="false" position="2"
serviceInstanceId="" />
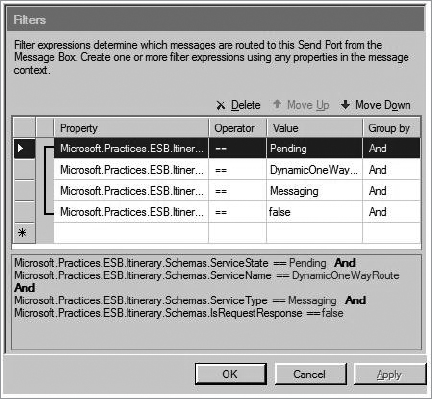
For this to work, the values for the name, type, state, and isRequestRequest attributes need to have the exact same values as the ones set up in the off-ramps filters. Figure 3 shows these filters.
Since the XML values match the values in the send ports, then this itinerary will be able to route a message to this off-ramp.
Now, manually having to set up
these values in the itinerary can be slow and painful. However, since
the designer can connect directly into the BizTalk environment, it is
capable of pulling down these values directly from the send port. All
you need to do is to say which send port you want to use, and this data
is extracted for you and added to your itinerary.
There are a number of other
areas where the designer can connect to BizTalk as well as other remote
servers to make your design-time experience much nicer. These are some
other examples:
When building a Static
resolver for the mapping service, the tool will provide you with a list
of all the maps that have been deployed into BizTalk.
The tool can connect into remote UDDI servers and allow you to select a web service when you are defining a UDDI resolver.
When building a BRE resolver, the tool will provide you with a list of all the available policies.

In addition to
setting up this BizTalk Service Connection String, you will also need to
specify an export model for your itinerary. Itineraries can be exported
automatically via an XML file or the Itinerary Database. If you select
the database option, then you will need to provide a connection string
for the ItineraryDb database. Once you have set this property, you can
export an itinerary by right-clicking anywhere on the design surface and
selecting Export Model.
Since the itineraries you
design using this tool are eventually going to be exported and converted
into plain old XML, you may face a security issue. These itineraries
may contain sensitive data or processes that should not be easily
readable by just anyone. To address this issue, the Itinerary Designer
allows you to assign a certificate to your itinerary that will be used
to encrypt it during the export process. In the Properties window for
your itinerary, you will see a property named Encryption Certificate.
This property allows you to select a specific certificate from a
specific certificate store to use for the encryption process.
When setting up your
itinerary, one last step you will want to take is to check the Resolver
service Url property. This should contain the URL of the ESB Resolver
service. This will be very important later when you want to be able to
test your resolvers from within Visual Studio.
2. Defining Your Itinerary
The Itinerary Designer is a
relatively complex tool, and it can't be covered adequately in a few
pages. Fortunately, the ESB Toolkit ships with a number of prebuilt
itinerary models that you can use to fully understand this tool.
Assuming you have installed the toolkit source to C:\projects
as per the default installation instructions, you can find these
samples at
C:\Projects\Microsoft.Practices.ESB\Source\Samples\Itinerary\Source\ESB.Itinerary.Library.
This section will cover the high-level basics concepts of the tool.
Defining an itinerary is composed of two core activities:
Adding and configuring the on-ramps, off-ramps, and Itinerary Services that you want your itinerary to have
Defining resolves for each of the Itinerary Services
To add an on-ramp,
off-ramp, or Itinerary Service, you simply drag the require shape from
the toolbox onto the design surface. As you click each shape that you
have added, the Properties window will show you a list of all the
properties you need to configure for that component. For on-ramps, you
need to start by setting the Extender property equal to on-ramp ESB Service Extension.
Once you do this, the Properties window will change, and the designer
will retrieve a list of all available applications from the BizTalk
environment. Once you select an application, you will be given a list of
all available on-ramps that have been configured in that application.
To use the default ESB on-ramps, you would need to select the
Microsoft.Practices.ESB application, at which point you will be able to
select one of the default on-ramps.
Adding an off-ramp follows
pretty much the same process. You add the shape to the design surface,
you select a BizTalk application, and then you select a send port that
exists in that application. Once you do that, the designer will retrieve
a bunch of data about that port, and the designer will include it in
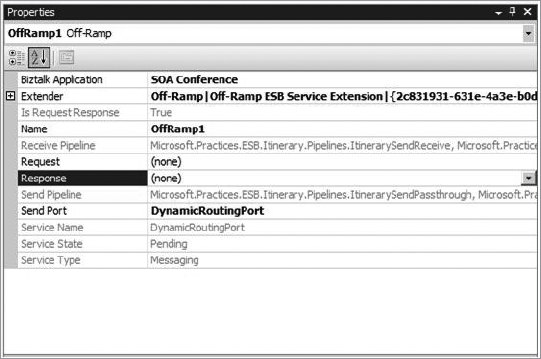
your itinerary. Figure 4 shows the data that the designer retrieved from BizTalk, once a specific send port is selected.

In this case, we selected
the DynamicRoutingPort that we had already set up in the BizTalk
environment. You can see that the designer pulled down information about
the values that this port is looking for with regard to the ESB context
properties.
The Itinerary Service shape,
as you might expect, allows you to add a new service to your itinerary.
When you add this shape, you need to specify whether it a
messaging-level service, orchestration-level service, or off-ramp
service. If you define the service is an off-ramp service, then you need
to define where this service should run. This is done setting the
Itinerary Service's Container property, and you will need to select an
off-ramp that has already been added to the itinerary. If this is a
messaging- or orchestration-level service, then you will need to specify
which service should be run. Using the Service Name property, you can
select either the Routing Service or the Transform Service. If this is a
messaging-level service, you will again need to specify where this
service will run. You can select a send or receive pipeline for either
an on-ramp or off-ramp for this.
You can add as many
different Itinerary Services to the design surface as you require. To
connect all of these on-ramps, off-ramps, and Itinerary Services, you
need to use the Connector component. The connectors show the flow of the
messages across your various services. Figure 5
shows how an on-ramp, an Itinerary Service (which implements the
Transformation Service), another Itinerary Service (which implements the
Routing Service), and an off-ramp have been connected together to
create an itinerary that dynamically maps and routes a message. (Note
that this is a one-way itinerary, but you can use the Itinerary Designer
to create a synchronous request/response message flow.)

Once you have defined and
connected all your on-ramps, off-ramps, and services, you will need to
start adding in your resolvers. To add a resolver, right-click an
itinerary service, and select Add New Resolver from the context window
that appears. This resolver will appear in your service. When you click
this service, its properties will appear in the Properties window. If
you click the Resolver Implement property, you will be given a dropdown
list containing all of the registered resolvers. After you pick the one
that you want, the Properties window will update and will now contain
the properties for the resolver that you selected. You need to assign
all of these properties to properly configure your resolver. Once you
have done this, then a properly structure resolver connection string
will have been added to your itinerary.
3. Validating and Testing
You can also use the designer
to validate your itineraries and test your resolvers. To validate an
entire itinerary, you can right-click anywhere on the design service and
select Validate All from the context window. Any errors with your
itinerary will be output to the usual Visual Studio Error List window.
If you want to validate a single service, on-ramp, or off-ramp, you can
simply right-click it and select Validate. Any errors with this one
component will be shown in the Error List window. Both of these
validation processes are simply checking the overall structure of your
itinerary.
When it comes to resolvers,
you very likely want to be able to see the data that these resolvers are
returning before you deploy your itinerary out to the ESB. Fortunately,
because the designer is able to connect the live resolver mechanism by
way of the Resolver Web Service, you can do this. To test a resolver,
simply right-click it, and select Test Resolver Configuration. If an
error occurs, it will be shown in the Error List window. If the resolver
runs successfully, then the data is collected will be shown in the
output window.
Now, testing the BRE
resolver is slightly more complex than this since it allows you to pass
in a message as part of the resolver process. Fortunately, the designer
allows you to test this behavior as well by assigning a test message to
use when the resolver is tested. You can assign this message by setting
the Message File property of the resolver. To assign this property, you
provide it with the path to an XML file that contains the message you
want to use.